Wednesday 19 January 2022

The Siege of Buda, 1541


This weekend my friend Tom visited to continue our series of wargames. Having already played a couple of scenarios based around the struggles for control of 16th century Hungary we thought it would be interesting to give some of my 1540s collection its first outing and game a clash from the siege of Buda in 1541. The Erhard Schön series of woodcuts, all five of which are shown together in the image below, is incredibly detailed with images of the Imperialist camp and siege lines as well as the Ottoman assault on the camp and earthworks. This provided plenty of inspiration for a scenario that pitted a combined force of Imperialist and Hungarian troops against an Ottoman army that included Suleiman the Magnificent himself. They would do battle amongst the trenches and earthworks of the Habsburg siege lines.

Buda 1541, Erhard Schön.

The Siege of Buda, 1541

A war for Hungary had followed the battle of Mohacs as Ferdinand of Habsburg, brother of the Holy Roman Emperor Charles V, challenged John Zápolya, Voivode of Transylvania for control of the country. Suffering defeats at the hands of the Habsburgs at Tarcal, 1527, http://camisado1500s.blogspot.com/2021/08/tarcal-1527.html, and Szina, 1528, John Zápolya was driven into the arms of the Ottomans and made his portion of Hungary a vassal state in return for Ottoman support. Suleiman I invaded Austria, unsuccessfully besieging Vienna in 1529, and after more years of war a peace was established in 1533 with western Hungary becoming Habsburg and the east being ruled by John Zápolya, now John I of Hungary, Suleiman's vassal.

Following this peace, and expecting John to die childless, Ferdinand pressured John for the rest of the kingdom. In 1538 they made the secret Treaty of Nagyvárad in which John, having no heir, designated Ferdinand to be his successor, thus inheriting the whole of Hungary. Ferdinand's plans were thwarted when in early 1539 John married Isabella Jagiellon, daughter of King Sigismund I of Poland and Bona Sforza. They had a son on 15 July 1540 and days later John I died. The infant was crowned John II with his mother Isabella Jagiellon and bishop George Martinuzzi acting as regents with Ottoman backing.

This outcome was unacceptable to Ferdinand of Habsburg and in May 1541 the Hungarian capital, with perhaps 3,000 defenders, was besieged by up to 50,000 Habsburg and Hungarian troops under the command of Wilhelm von Roggendorf, a veteran captain of the Habsburgs who had commanded the heavy cavalry during the 1529 siege of Vienna. The siege did not go well for the Imperialists and their assaults on the breaches of Buda's walls were repulsed with heavy losses.

The Ottoman Sultan, Suleiman I, led the relief force himself, taking control of an army that included over 6,000 janissaries. By July 1541 Ottoman light cavalry were arriving at the Habsburg siege lines and skirmishing with Von Roggendorf's forces. On 21 August Suleiman himself arrived and immediately attacked the siege lines from the east. The Habsburgs were unprepared for this assault and Suleiman began to force them out of their positions being aided by troops from Buda's garrison and his light cavalry who had been previously harassing the Imperialists. 

The exact course of the battle is unknown but 20,000 Imperial troops are thought to have been killed with Von Roggendorf, their commander, dying of his wounds two days after the battle. The woodcut below gives a contemporary impression of what the Imperialists believed had happened to some of the besieging army following their capture by the Ottomans. How accurate such an image is remains open to debate but the Habsburgs had suffered an enormous defeat at the hands of the Suleiman. The relief of the siege by Suleiman was followed up by the Ottoman occupation of the city when the Turkish troops who had been allowed into the city by the rejoicing defenders suddenly disarmed the garrison and captured it for the Sultan. 

Slaughter of the landsknecht 1541, Erhard Schön.

The table before any troops are deployed. The walls represent the city with the gun battery, tents and wagons forming the objectives the Ottoman army had to attempt to destroy. The guns in the battery were not active units in the game instead forming an objective. 

The Scenario

The game represented the attack by Suleiman and his forces on the Imperialists on 21 August 1541. As always we used heavily modified "Renaissance Rampant" rules and the two armies were divided into two separate retinues each for the game. The Imperialists deployed along one table edge with no Ottoman forces starting on the table. The two Ottoman retinues would deploy via move activations to enter anywhere along the opposite table edge.

None of the janissary or kapikulu süvarileri units could enter until the kapikulu süvarileri unit that represented the Sultan had entered the table. This was to prevent the Ottoman player using that retinue to good effect whilst making it impossible for Suleiman to be targeted by keeping him off the table.

The earthworks and trenches gave cover to any units within them and counted as difficult terrain to fight in unless a unit was in position behind earthworks and defending them in which case only the attacking unit would suffer any penalties. The large earthwork with the gun battery on did not count as difficult terrain and the guns themselves were an objective and could not be used in the game. They represented a battery that had been focused on Buda's walls which the Imperialists had not had time to redeploy to face the Ottomans. 

The Objectives

The aim of the Ottoman player was to destroy the 3 objectives comprised of the gun battery, the camp and the wagons (see the photo above) along the Imperial line. To do so they had to use an infantry unit and had to have at least one base from that unit in contact with the objective at the start of their activation phase. As an ordered activation, they could use that unit to destroy the objective (instead of moving, attacking, or shooting). If there were 7 or more models in the unit the objective was destroyed on a roll of 8+ on 2D6; if there were 6 or fewer models in the unit then the position was destroyed on a roll of 9+ on 2D6. 

Once one of these objectives was destroyed the Ottoman player could also bring on two Balkan Cavalry units via a move activation from the town gates. They could do this on the turn the objective was destroyed and the units would form part of the Ottoman retinue that succeeded in destroying the objective.

If all 3 of the Imperial objectives were destroyed the game would immediately end and the Ottoman player would be victorious.

The Imperial aim was to either prevent the 3 objectives being destroyed or kill or rout Suleiman. If the Imperial player removed the Sultan from play they would win the game immediately.

Activation Fails

Each turn each player would take 5 cards from a deck. Any King, Queen or Jack cards from the 5 they took could be used to get a reroll on an activation fail for that turn for either of their retinues. At the end of the turn all unused cards were put in a discard pile. Once the deck ran out a fresh deck was used for the reroll cards.

The Imperialist army deployed in defence of the siege works.

A view along the siege lines as the Imperialists prepare to face the Ottoman attack.

The Imperial infantry are deployed closer to the walls of Buda.

The Habsburg camp.

The Armies

The Imperialists

The Imperial Infantry

1 Unit of Foot Knights - Wilhelm von Roggendorf  
3 Units of Landsknecht Pike                                            
2 Units of Landsknecht Shot                                          
3 Units of Mercenary Arquebusiers                            
2 Units of Imperial Mercenary Pike                                                   

The Imperial and Hungarian Horse

2 Units of Gendarmes (One is the retinue leader)
2 Units of Lancers 
2 Units of Hussars
2 Units of Hungarian Horse Archers

The Ottomans

Suleiman and the Kapikulu

2 Units of Kapikulu Süvarileri (One unit of the guard cavalry is joined by Suleiman the Magnificent)
1 Unit of Janissary Arquebusiers 
2 Units of Janissary Archers
2 Units of Zirhli Nefer
2 Units of Janissary Infantry

The Sipahis, Akinji and Infantry

2 Units of Sipahis (One is the retinue leader) 
3 Units of Akinji                                             
1 Unit of Azabs with arquebuses           
2 Units of Azab Archers                             
3 Units of Azab Infantry     

Buda's garrison

Once the Ottoman's had destroyed one objective two units of Balkan Horse could enter the game from the town gates.                        

For this game Tom decided to play as Von Roggendorf's Imperialists and I took command of Suleiman the Magnificent's Ottomans. As always the photos are the best way to follow the action. This was an epic game played out over two days and some of it was played once it got dark which had a noticeable affect on the photos. That said enough were taken to give a good idea of how the game went and a brief write up of the game also follows.

The Ottoman army appears in the distance, advancing along the siege works.

The kapikulu spearhead the attack.

The Sultan himself, Suleiman the Magnificent, is surrounded by his household troops.

A view of the table, the main Ottoman attack is coming from the top left corner, facing the Habsburg cavalry.

To the deep booms of enormous kettle drums the action started with Suleiman accompanied by his guard cavalry and janissaries launching a concentrated attack against the Habsburg right wing which was held by the Imperial cavalry. Whilst the weight of the Ottoman forces were concentrated on this wing across the field akinji and azab units also joined the assault in an attempt to distract and disorganise the Imperial lines with skirmishing attacks.

The hussars in the Imperial ranks rode forward and succeeded in quickly defeating the lighter armed Ottoman skirmishers, preventing them from becoming a problem for the rest of the Habsburg army.  Although the hussars themselves were eventually overwhelmed and routed they managed to defeat the sipahi unit that contained a retinue leader which was an early blow to the morale of the Ottomans. 

Hussars in Habsburg service are the first Imperial units to clash with the Ottomans.

More of Suleiman's army has deployed and Von Roggendorf's forces move forward to meet it.  

Units of hussars take on the akinji that are harassing the Habsburg lines.

The armies before the inevitable clash. The hussars can be seen in the top right engaging with the sipahis and akinji.

A view of the trenches and earthworks from above.

Akinji and Hungarian hussars clash. The janissaries can be seen pouring onto the battlefield in the background.

The hussars who have ridden forward to push back the Ottoman skirmishing horse are successful in bringing down the Ottoman retinue leader.

Following the initial clashes with the hussars some of the Sultan's own guard cavalry, the kapikulu süvarileri, clashed with the Habsburg heavy cavalry and were pushed back in the swirling melee. These Ottoman heavy horse were no match for the fully plated and barded German and Hungarian horsemen the Habsburgs could field.

Defeating one unit of the kapikulu süvarileri, the Imperial gendarmes then engaged in a series of bloody melees with the janissaries. Flushed by their initial success against the Sultan's elite they rode deep into the ranks of the oncoming janissary corps to find themselves surrounded and brought down, their captain also perishing in the chaos. With the heavy cavalry and hussars gone the rest of the Imperial cavalry could not stand against the disciplined janissaries and soon fled the field leaving the wagon train open to attack.

Meanwhile the Imperial gendarmes, including the cavalry retinue commander, clash with Suleiman's elite guard cavalry, the kapikulu süvarileri. 

Cavalry clashes have taken place all along the front lines.

The walls of Buda can be seen in the background with the battle developing in front.

The Imperial pike and shot move forward through the earthworks to stop the Ottoman advance.

Janissaries face the Imperialist cavalry.

Suleiman is surrounded by his elite troops.

The Imperial heavy cavalry clash with the janissaries in a series of fierce melees...

...and the retinue captain of the Imperial cavalry force is slain.

Whilst the Habsburg cavalry faced the Sultan with his elite cavalry and infantry at one end of the field closer to the city walls the Imperial pike blocks had moved forward in an attempt to defend their gun battery from a potential Turkish attack. This came in the form of a wild charge by a mass of poorly armed azabs. A combination of landsknecht and other mercenary pike, all in the pay of Ferdinand, stood their ground against the azabs. The pikemen successfully defended the gun battery and defeated the spear and sword armed azab infantry units who crashed against them. At the same time they suffered from a constant rain of turkish arrows and this in turn broke them, leaving only the Imperial shot to defend the Habsburg siege lines. 

Wilhelm von Roggendorf was not one to surrender and, reinforced by the arrival of some more Hungarian horse archers, he formed a defensive line with his arquebusiers and prepared for the final onslaught by the Ottomans who still looked to have overwhelming numbers. The Turks hadn't reached any of their objectives and Von Roggendorf knew his well entrenched mercenaries would prove difficult to break.

Closer to the walls a force of azabs enters the battlefield.

Some of the azabs are thrown back by the Habsburg pike.

The Imperialists form a wall of pikes against the rush of Turkish infantry.

Landsknecht and azabs clash in front of the city walls.

The landsknecht face the Ottomans in the ditches and earthworks of the siege lines.

Wilhelm von Roggendorf, in the bottom righthand corner, oversees the defence of his siege lines.

The Landsknecht have put up a stiff defence against the Turkish infantry but they are slowly forced into a retreat by the sheer numbers against them.

Imperial arquebusiers form a last line of defence.

Suleiman's janissaries over ran the Imperial wagons, with camp followers fleeing in all directions. The elite Ottoman infantry did not fall to looting but instead redressed their lines for the inevitable assault on the remaining Imperial positions. The zirhli nefer, heavily armoured janissaries who specialized in the storming of fortifications, lead the charge on the camp trenches but faced with a hail of close range shot they could not break into the earthworks. For a moment the arquebusiers faltered and withdrew so they were firing from the tents and the camp itself but their constant fire held the janissaries at bay and took a heavy toll on the Sultan's elite infantry.

Sensing an opportunity to turn the tide a cheer went up from within the walls of Buda and the pro Zápolya garrison rode out of the gates to attack their Habsburg besiegers. Their sally was ill judged as Von Roggendorf had positioned a mixture of landsknecht, Italian and Spanish arquebusiers in the earthworks outside the gates. The horsemen clattered out of the gatehouse into a lethal storm of arquebus shot that sent the survivors reeling back into the city.

The janissaries had taken the wagon train but both the gun battery and camp remained, despite both having been very close to being over run. The assault on the camps trenches had ground to a halt, the janissaries being unable to close with the mercenary arquebusiers and defeat them. Sensing his own position may be under threat the Sultan withdrew his troops from the attack. Far from being a Habsburg disaster this assault on Buda had been bloody, but had been repelled. As Suleiman withdrew Wilhelm von Roggendorf held the siege lines.

Janissaries armed with arquebuses are successful in reaching and destroying one of the objectives, the Imperial wagons.

Armoured janissaries, zirhli nefer, specialists in assaulting fortifications, attempt to dislodge the entrenched arquebusiers.

The right wing of the Imperialist lines has broken and the Sultan's men attempt to roll up the Habsburg forces.

The Habsburg camp trenches are defender by skilled mercenary shot.

Some of Buda's garrison sally out in support of the Ottoman attack. They are loyal to the newly crowned infant John Zápolya II, an Ottoman vassal.

The garrison's sally is quickly seen off as landsknecht and other mercenary arquebusiers send a hail of shot into the horsemen. 

Meanwhile the janissaries are finally halted at the camp. The veteran arquebusiers are more than a match for them and the attack has been thwarted.

 This was a marathon of a game that swung back and forth. It was really close as I managed to reach all of the objectives with the Ottomans at different stages of the game but could never quite be at the gun battery or camp long enough to destroy them. Tom put up a tenacious defence that paid off in the end. It was great to finally field lots of my 1540s figures that had never seen action before and they really looked the part amidst the trenches, gabions and earthworks that formed the Habsburg camp. Hopefully in some part the game matched the Erhard Schön woodcuts that depicted the events of the siege and were a big inspiration for the game. 

Tom and I will return to Hungary at some point, no doubt, but I think for our next game we plan to change things up a bit and return to the Italian Wars.

Saturday 1 January 2022

"the Almaynes on foot would diverse times issue out with handgonnes, and morish pycks"


The weekend before Christmas I visited Stuart as we had an unexpected opportunity to fit some games in. We decided to base our games on the early stages of the siege of Thérouanne. Stuart was keen to get his newly painted mounted archers on the field and as the last games we played at his were set in the wilds of 16th century Ulster, http://camisado1500s.blogspot.com/2021/09/poynings-in-ireland.html, this time we wanted to use his walls and gatehouse for some very different scenarios.

"Likewise the Almaynes on foot would diverse times issue out with handgonnes, and morish pycks" 

Henry VIII's siege of Thérouanne in 1513 began in the English King's absence. George Talbot, 4th Earl of Shrewsbury and Charles Somerset, Lord Herbert, in command of the vanguard and rearward respectively, began the formal siege on 25 June 1513 before Henry had even set foot on continental Europe, arriving in Calais on 30 June. Shrewsbury and the vanguard occupied a position to the northwest of the town whilst Herbert and the rearward lay to the east. They set about entrenching their respective wards to protect themselves from the guns of the French defenders and to enable their own artillery to be positioned within effective range of Thérouanne's walls. 

No major events took place whilst they waited for Henry's arrival, which wasn't until 1 August, but during this time the defenders sallied out on numerous occasions as Hall describes in his chronicle:

"While the siege laye thus before Tyrwyn as you have harde, the Frenchmen diverse times issued out on horseback and many a staffe was broken & many a proper feat of armes done. Likewise the Almaynes on foot would diverse times issue out with handgonnes, and morish pycks & assaile the Englishme, but by force of the archers thei were ever driven home agayn, & every day the Englishmen shott at the towne and dyd them muche displeasure".

The 1,300 or so Landsknecht who formed an important part of Thérouanne's garrison were under the command of Fritz (possibly Hans) Brandhec a man of Swiss origin who would command Landsknecht in the service of the French into the 1520s.

The setting for our first game was one of the sallys by Brandhec and his landsknecht from Thérouanne's garrison, supported by some of the men at arms who "diverse times issued out on horseback".

The English gun positions in front of Thérouanne.

German gunners man some of Henry's expensive guns.

The Scenario

As always we played the games using our heavily adapted "Renaissance Rampant" adaptation of Lion Rampant.

The game began with only the English and French guns in position, these were immobile and could activate outside the normal retinue activations of each of the players turns. The two English culverins were positioned behind earthworks and were objectives for the French. The two French guns were positioned on the walls.

Units for each army had to arrive from their designated areas. The French and landsknecht units could emerge from the gate and from behind a tower at the end of the board (this was to represent a hidden sally port). The English could arrive to defend their siege lines from two locations within their earthworks. The French and landsknecht force would take the first turn.

Objectives

The objective of the landsknecht sally was to attempt to destroy the two English gun positions and pull two wagons, located within the English siege lines, back into Thérouanne to achieve victory points.

To destroy a gun position, a landsknecht unit had to move into base to base contact with it. The French cavalry could not destroy the gun positions. To achieve the victory points the landsknecht player had to have at least one base from a unit in contact with the earthworks of the gun position at the start of their activation phase. As an ordered activation, they could use that unit to destroy the position (instead of moving, attacking, or shooting). If there were 7 or more models in the unit the position was destroyed on a roll of 8+ on 2D6; if there were 6 or fewer models in the unit then the position was destroyed on a roll of 9+ on 2D6.

The wagons could be picked up by an infantry unit in base to base contact with them. The unit could then move a maximum of 6" per turn and would loose the wagon if the unit was defeated in combat or battered. The unit could not attack but could shoot whilst it had the wagon. Both landsknecht and English units could move the wagons but the English could not deliberately move them off the table.

Victory Points were awarded as follows:

Landsknecht and French

5 Points if George Talbot, 4th Earl of Shrewsbury was slain
3 Points for each gun position destroyed
2 Points for each wagon brought into the fortress
1 Point for each enemy unit destroyed or routed

English

5 Points if a unit could get into Thérouanne via the gate
3 Points if Captain Brandhec was slain
1 Point for each enemy unit destroyed or routed

The Organ Guns

Henry VIII took 120 organ guns on this campaign with 40 being assigned to each of the 3 wards, the vanguard, mainward and rearward.

Stuart and I have not been happy with the rules we have used for organ guns and we wanted try a different approach with them, having them as unit "add ons" as opposed to units in their own right.
Rather than operating as separate units in this game we instead had three of them attached to three English infantry units. A unit could move as normal but would loose the organ gun (it being removed from play) if any of them moved into difficult terrain.

Instead of a normal activation the unit could instead fire the organ gun. It would activate on a 7+ on 2D6 with a range of up to 8”, rolling 10 dice to hit on a 5+ (4+ if the target unit was in schiltron). Hits from the organ gun conferred a -1 to the targets armour. Once fired it was then removed from play. The unit could not do anything else that turn. If the organ gun failed its activation the organ gun remained in play and and could try and activate again. If the unit was charged whilst having the organ gun attached it could also try and fire at the attackers on a 7+ on 2D6 as described above.

If a unit with an organ gun was  battered or attacked in hand to hand before the organ gun had fired (and it failed to fire in defence) it was considered lost.

The French men at arms and Brandhec's landsknecht sally out of the gates. The landsknecht arquebusiers spearhead the attack.

English troops rush to the scene of the attack to defend their siege lines.

The Armies

The English of the vanguard of George Talbot, 4th Earl of Shrewsbury

2 Units of Demilancers (One represents George Talbot, 4th Earl of Shrewsbury)
1 Unit of Mounted Archers 
1 Unit of Foot Knights
1 Unit of Garrison Bill
2 Units of Shire Bill
1 Unit of Garrison Bow
2 Units of Shire Bow

Plus 3 organ guns to assign to 3 of the English infantry units

2 Culverins (Immobile) in the earthworks.

The French and Landsknecht of Thérouanne

1 Unit of Foot Knights (Captain Brandhec)
3 Units of Landsknecht Pike
3 Units of Landsknecht Shot
2 Units of Landsknecht Halberdiers
1 Unit of Gendarmes
2 Units of Men at Arms

2 Culverins (Immobile) on the walls.

For this game Stuart took command of the English and I took command of the French and landsknecht force. The best way to follow the action if through the photos but a brief summary of the chaos follows!

Thérouanne's gates are briefly open and the portcullis is raised.

A view from the walls of Thérouanne showing the fight developing below.

As the town's defenders sally out, on the left, the English rush to their siege lines, on the right.

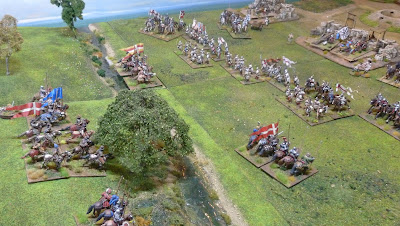
English archers and supporting organ guns are brought up to hold their lines.

As the gates of Thérouanne opened landsknecht arquebusiers rushed out supported by French gendarmes. Any hopes that they would take Talbot's siege lines by surprise were quickly crushed as they faced an oncoming wave of English reinforcements which included the Earl of Shrewsbury himself. Some of Brandhec's German mercenaries (or "Almaynes" as they were called by the English) took up positions in the sconces and ditch outside the walls. Another landsknecht force of chosen men armed with two handed swords and all manner of vicious looking polearms headed straight for one of the English gun positions.

Within moments the two sides had clashed with the gendarmes charging down some of the English archers before then engaging with Talbot and his mounted body guards. The melee was inconclusive. As Talbot and his cavalry drew back the gendarmes faced one of the organ guns and were dispersed by a combination of shot and arrows from the English lines. Outside the open town gate another force of English archers dismounted and attempted to send a rain of arrows into the landsknecht but they were close to the arquebusiers in the sconce and became targets themselves. As more French men at arms rode into the fighting they too became a target for the English artillery like the gendarmes who had sallied out first.

The landsknecht arquebusiers rush into the sconces whilst the pike hold the gate to secure the retreat.

French gendarmes charge down some of the English archers.

A view of the attack from the English siege lines.

Some of the landsknecht rush to the undefended English wagon. 

George Talbot, 4th Earl of Shrewsbury, and his body guards engage in a fierce melee with the French gendarmes, "many a staffe was broken & many a proper feat of armes done".

The gendarmes have managed to hold back the English reinforcements but have ridden within range of the organ gun.

The fighting continues in front of the gates.

From the safety of one of the gate's turrets, Antoine de Créquy, captain of the garrison, watches the sally.

As they reach the English siege lines Captain Brandhec leads his chosen landsknecht, armed with polearms and two handed swords, and they assault the gun positions.

As Antoine de Créquy, captain of the garrison, looked on from Thérouanne's walls, Brandhec and his "verloren hoop" or forlorn hope of picked men reached the English siege lines. They managed to secure one of the English wagons and to attack and destroy one of the gun positions that had been threatening the town gate they had sallied from. Whilst this was happening some of the English billmen and archers made their own assault on the gate in an attempt to turn the surprise attack on their lines to their own advantage.

The English attempt on the gate initially looked threatening as the landsknecht arquebusiers were driven back from the sconce and some of the English bill got dangerously close. Brandhec had not left the gate undefended though and with German pike and shot guarding the gate Talbot's infantry were driven back. The fighting within the English earthworks continued with many of the landsknecht storming party being killed in the fighting with the English infantry. Brandhec made it back to the safety of the garrison and one of the captured English wagons was also drawn into the town to loud cheers from the walls. Still within range of the landsknecht arquebusiers the Earl of Shrewsbury withdrew from the field. He needed the time to think up an excuse for Henry as to how the surprise attack on his siege works had succeeded during his command.

The landsknecht assault party reach the guns.

Finding himself within range of the landsknecht arquebus shot Shrewsbury retreats from the field.

The gun position is over thrown.

Whilst the landsknecht attack the guns some of the English counter attack the gate. English billmen push the landsknecht arquebusiers back from the sconce.

Whilst the sally may have gone well it costs the defenders dearly as many of the landsknecht are slain in the fighting in the siege works.

One of the English wagons is captured and drawn back into Thérouanne.

Reinforcing the Garrison

Our second game was based on a letter to the Signora of Florence written by Roberto Acciajuolo, Florentine Ambassador in France. He wrote to his fellow citizens that on 21 July 1513 200 French cavalry escorted 100 pioneers into Thérouanne. In the skirmish to enter the town 10 French men-at-arms were killed along with 300 English. How accurate these figures are may be open to debate but this formed a good basis for our second scenario.

The Scenario 

The French entered from one entry point on the crest of a slight hill and had to try and get as many units as possible into the gate at the other end of the table. The English started with two units on the field, defending their siege lines, but the rest entered from a point next to their gun positions (the English guns were for scenic purposes only in this game). The English could attempt to bring on units once the first French unit had entered the game. Units for each army arrived from their designated areas on a move activation each turn.

The objective was simple, the French had to try and get as many units a possible into Thérouanne via the gate. We intended to use the "dice bag" method of activation for this game to make it even more random and uncertain but unfortunately we forgot this so will have to try that another time!

From behind the English siege lines a force of French men at arms is silhouetted against the skyline.

The mounted archers race to defend their siege lines.

The Armies

The French relief force

2 Units of Gendarmes (One is the retinue leader)
2 Units of Men at Arms                                          
1 Unit of Mounted Archers                                    
2 Units of French Halberdiers (representing the pioneers) 
1 Unit of Stradiots

The English defenders

1 Unit of Foot Knights (retinue leader) 
2 Units of Demilancers
2 Units of Garrison Bill
2 Units of Shire Bow
1 Unit of Mounted Archers

We decided not to switch sides for this game with Stuart taking command of the English and me the French.

As the French archers dismount to support the attack with their archery the English forces block the route to the gate. 

The relief force is close to the walls of Thérouanne but the path is blocked by the English with more troops still arriving.

The French cavalry move towards the English lines.

Some of the border horse who were patrolling the area are also drawn to the defence of the siege lines.

The English rain arrows on the French horse.

As the French gendarmes with supporting men at arms and archers crested the hill in front of the siege lines they were dismayed to see that the English forces were already well aware of their presence and were hastily taking up positions to defend their earthworks and prevent any route to the gates of Thérouanne. To make matters worse a troop of border horse who had been patrolling the area had also learnt of this relief attempt and ridden to the scene, reinforcing the English lines. The French were temporarily stalled by this as they argued amongst themselves whether it was possible to break through the troops in front of them.

This stalling only made matters worse as the English archers advanced on the French and sent a hail of arrows into the horsemen. Galled into action the French cavalry then charged into the English ranks and were initially very successful. The drove off many of the archers and sent some of the English horse back as swirling cavalry melees took place.

The path is blocked but the armoured French cavalry try and punch through

French gendarmes and supporting men at arms lead the attack.

The English form a solid wall between the gates and the relief force.

Fighting breaks out in front of the English earthworks.

As their cavalry engage the French pioneers and supplies appear over the hill.

The pioneers head for the gates, shielded by the men at arms.

Both sides have taken casualties and it looks as though the pioneers may be able to get through the English lines and into Thérouanne.

With the fighting in full swing the French pioneers arrived with wagons laden with supplies for the town. It looked as though the relief effort may have paid off. There were still plenty of French heavy cavalry on the field to defend them as they crossed the English siege lines and the "no man's land" between the English and the town walls.

The English may have lost some of their archers but their demilancers and billmen were still a force to be reckoned with. These troops struck back at the French cavalry who after the arrow storm and a series of melees lost their cohesion and fled the field. The French captain and his gendarmes tried to buy time for the pioneers and supplies but they were defeated by the demilancers and border horse. Caught in the open and undefended the pioneers put up brief resistance with their polearms but they too were soon scattered. Roberto Acciajuolo, the Florentine Ambassador in France, would certainly not be writing back to the Signoria of Florence to tell how three hundred English had been slain in this encounter! The French relief force had been completely destroyed.

The English demilancers and French men at arms engage in a swirling cavalry melee.

Similarly the gendarmes clash with more of the English demilancers and both sides suffer losses.

The French horse are defeated and driven off by the combined efforts of the English infantry and horse. The pioneers are close to the gates but are scattered by the English never managing to get through the siege lines. The relief of Thérouanne has failed.

 These were two really fun and spectacular looking games. Stuart's English and French armies are both specifically set around the 1513 Siege of Thérouanne so it was a joy to see them fielded in two scenarios set around it. The first game was a strong win for the French (or perhaps more accurately the landsknechts) and the second game was an even more spectacular victory for the English, not a single French unit made it into Thérouanne! Inspired by these games we are keen to set some more during the 1513 campaign and Bayard's capture at the battle of the Spurs, defending a bridge by a mill, is in the pipeline already. Let's see what 2022 brings.

Happy New Year.