Wednesday 1 December 2021

The 9th Earl of Kildare in Ulster, 1523


For our second game a couple of weekends ago Stuart and I went for something totally different from Wenzenbach. Stuart was keen to get his new beautifully painted kern, https://stuartsworkbench.blogspot.com/2021/11/irish-kern.html, on the tabletop so we continued our exploration of Ireland in the late 15th and early 16th centuries. The various wars, skirmishes and feuds that took place in Ireland during this period provide the basis for all kinds of wargames scenarios. So far we have covered events from early Tudor interventions in Ireland, Poyning's 1494-1495 campaigns and Surrey's 1520-1521 deputyship and there are still events from these that we are yet to game. For this game we decided to focus on the return of the 9th Earl of Kildare in 1523 and his campaign to reinforce FitzGerald power following his absence. The scenario is taken from a letter Kildare wrote to Henry VIII on 24 May 1523, https://www.british-history.ac.uk/letters-papers-hen8/vol3/pp1273-1287, as well as information in "Gaelic Ulster in the Middle Ages", by Katharine Simms.

The 9th Earl of Kildare in Ulster

Following his time spent in England after accusations of his maladministration Gerald FitzGerald, the 9th Earl of Kildare, was allowed to return to his Irish homeland in January 1523. The Earl of Surrey had acted as Lord Deputy during Kildare's absence and on his return he was keen to assert his authority once again despite the fact Piers Butler, the 8th Earl of Ormond had since been appointed Lord Deputy. In May of 1523 in support of his O'Neill allies, who had been at war with the O'Donnell, Kildare led an army into eastern Ulster in a raid against O'Donnell's ally, Aodh Buidhe (Hugh) O'Neill of Clandeboy. In a letter to Henry VIII of 24 May 1523 Kildare describes how the Clandeboy O'Neill had employed 1,500 Scots mercenaries. During the campaign Kildare destroyed Clandeboy's castle in Belfast along with two other tower houses belonging to the MacDonalds of the Glens (soon to become famous as the MacDonnell's under the leadership of Sorley Boy), the source of the Scots mercenaries. He also took the mayor and some of the aldermen of Carrickfergus prisoner as they had been trading with Bretons and Scots.

A MacDonald Scots tower house on the coast of Eastern Ulster (the flag on the top is actually a MacLean one).

Scots and Clandeboy O'Neill troops prepare to defend the tower house. Whilst most of the Scots are Gaelic "redshanks" a small contingent of pike has also joined them.

A view of Kildare's galloglass and artillery from the top of the tower house.

Scenario

Based on the above campaign we decided to centre the game around the Earl of Kildare attacking one of the Scots tower houses mentioned in his correspondence to Henry with a mixture of Anglo-Irish (or  "English of Ireland" to use a contemporary term) and Gaelic troops. Between us we had a combination of buildings that when put together made a suitably impressive looking tower house. The tower house was defended by Aodh Buidhe O'Neill of Clandeboy with some of his own troops as well as some of the 1,500 MacDonald Scots referred to in the letter. Most of the Scots were Gaelic redshanks but we also included a motely unit of Scots pike, Stuart's Scots pike blocks are so impressive it's hard not to use them when the chance arises!

Rather than having lots of special rules we decided to fight this one out as a straight up fight, or more appropriately a large skirmish. As always we used our heavily modified Renaissance Rampant adaptation of Lion Rampant. To really reflect the hit and run nature of the fighting in Gaelic Ulster the one extra rule added was to reused the dice bag method that we first tried in our Surrey's 1520 raid on the O'More game back in June of this year (see the second scenario here: http://camisado1500s.blogspot.com/2021/06/this-was-chaunce-of-warre-lord-maxwells.html). Every turn a dice was pulled out of a bag and the army it represented could then take a turn with one unit. If that unit failed its activation this didn't end the turn but meant that unit alone could not act that turn and another dice was then chosen. As units were destroyed or routed the dice that represented them were removed from the bag. We also added a "joker" dice and the turn was immediately over if this was pulled from the bag. Challenges and rolls for battered units were made by both players at the beginning of each turn.

We rolled a dice to see who controlled which army and Stuart took the Clandeboy O'Neill and MacDonald forces while I took command of the FitzGerald army and its allies. The forces we used were as follows:

Gerald FitzGerald, the 9th Earl of Kildare

1 Unit of Demilancers - (Gerald FitzGerald, the 9th Earl of Kildare)
2 Units of Anglo-Irish Horse
2 Units of Shire Archers
1 Unit of Shire Bill
2 Units of Galloglass
2 Units of Kern
1 Unit of Kern with arquebuses
1 Culverin 

The Clandeboy O'Neill

3 Units of Irish Horse - (One is the Chieftan Aodh Buidhe O'Neill of Clandeboy)
1 Unit of Scots Pike
4 Units of Redshanks
3 Units of Kern
1 Unit of Kern with arquebuses
2 Units of Horseboys

Clandeboy O'Neill kern await the galloglass in the employ of the FitzGeralds.

Gerald FitzGerald, the 9th Earl of Kildare with troops from the English of Ireland.

The clash begins with the Scots launching an attack on the FitzGerald army.

Kildare's light cavalry ride into the shallow river.

A view of the coastal tower house, the sea shore can be seen in the top right corner. 

This was very much a clash of two halves. The fighting opened with most of the Clandeboy O'Neill cavalry and some of the Scots, including the unit of pike, attacking the Anglo-Irish section of Kildare's army. Whilst the Irish horse and redshanks launched darts, javelins and arrows at the billmen and archers from a distance the pikemen marched forwards towards the FitzGerald lines. Meanwhile directly in front of the tower house the Clandeboy O'Neill troops used the shallow river and hedges as cover whilst they skirmished with Kildare's Gaelic troops and kept them at a distance in this manner.

 Kildare's archers took their toll and by the time the Scots pike crashed into the Anglo-Irish troops they were already weakened. After a brief melee the pike were pushed back only to then be routed under a close range hail of arrows. Similarly some of the accompanying redshanks were pushed back by the Anglo-Irish billmen with the Irish cavalry also being forced away by the rain of arrows.

As the Scots and their Clandeboy O'Neill allies advance they are hit by a rain of arrows by the Anglo-Irish archers.

A view of the whole field as the forces are about to clash.

Kern in the employ of the Earl of Kildare skirmish with redshanks and Clandeboy O'Neill horsemen.

The FitzGerald cavalry and kern.

The tower house is well defended with troops in the river and the hedges in front.

A view from the top.

The fighting rages around the fortress.

Redshanks and kern pour arrows and darts into the FitzGerald galloglass.

More Clandeboy O'Neill  reinforcements rush to the defence of the MacDonald fortress.

The Anglo-Irish bill and bow have formed a defensive line.

The battle is in full swing.


The Scots pike charge Kildare's archers but are sent back after a brief melee.

Although shaken the Anglo-Irish part of Kildare's small army has held.

With a large part of the Clandeboy O'Neill and MacDonald force routed it looked as if all Kildare had to do was surround the tower house and crush the remaining defenders. Aodh Buidhe O'Neill redeployed some of his Kern that had been kept out of harms way on the sea shore. As the FitzGerald forces tried to push in on the fortress they found stiff resistance from the kern and redshanks hiding in the shallow river and hedges close by. Aodh Buidhe's kern used the difficult terrain to their advantage and defeated Kildare's galloglass. The Earl's only success was that his culverin was put to good effect and with a couple of shots scared off some of the defending redshanks.

As the fighting escalated around the tower house, with both sides slowly feeding more troops into the fight, the Earl of Kildare himself led a charge of his personal retinue into the shallow river in an attempt to bring down Aodh Buidhe O'Neill. The nimble Irish cavalry deftly evaded his heavier horse and he and his retinue were defeated in a brief skirmish in the water. At the same time Clandeboy O'Neill kern carrying arquebuses came to the fore. Being reminded of the fate of his father, who was mortally wounded by a fire arm in 1513, the 9th Earl thought it prudent to retreat from the river with his horsemen before sounding a general retreat. This was one Scots tower house he would have to leave standing.

The centre of the field is held by MacDonald redshanks and Clandeboy O'Neill kern and cavalry.

Kildare's galloglass attempt to clear a path to the tower but are beaten in a bloody melee in the water.

The Earl of Kildare's cannon successfully scares off some of the defenders.

Gerald FitzGerald himself is forced to enter the fray as his troops are unable to clear the defenders from the tower house...

...he charges Aodh Buidhe O'Neill of Clandeboy and his noble bodyguard but is unable to defeat him.

 Aodh Buidhe O'Neill of Clandeboy has led a successful defence and the FitzGeralds are unable to take the tower house.

This was a really close game that looked like it could go either way. The dice bag method for activations yet again brought a real element of chaos to the order in which events took place and we both had to gamble on who would activate a unit first during the skirmishing. Added to this an unusual amount of 4s were rolled during the activations which would then leave the unit that failed to activate in a real predicament. As with the other 16th century Irish games we have played this is another campaign which was followed by further events which provide potential for other scenarios.

The year following this campaign, 1524, Kildare was once again appointed as Lord Deputy of Ireland. The O'Donnell and Kildare made peace after an impressive show of strength by Magnus O'Donnell who had fortified Port na dTri Namhad with trenches and hired large numbers of Scots. His ally, Aodh Buidhe O'Neill of Clandeboy, featured in the scenario above, refused to surrender and was killed when Kildare led a further campaign against him. I am sure we will revisit these early 1520s clashes in the future.
 

Wednesday 24 November 2021

Wenzenbach, 1504


This weekend Stuart visited and we played out the battle of Wenzenbach, 1504, a game which had become inevitable once I had finished the Bohemian Infantry, http://camisado1500s.blogspot.com/2021/04/bohemian-infantry.html. This was a victory that Maximilian I was particularly proud of, featuring in his legacy projects; the Triumphal Arch, the Weisskunig and the Triumphal Procession. In all of these the battle is depicted with the German troops in the latest fashions. For example in Weisskunig we can see landsknecht in the fashions of 1516 as oppose to 1504 when the clash actually took place. With the resources we had available Stuart and myself were keen to try and make this game match the 1504 images, see the first two below, as closely as possible.

In an effort to achieve this we used the Assault Group early landsknecht miniatures for Frundsberg's contingent and we tried to pick gendarmes and men at arms for the cavalry that fit in well with an Imperial army at the start of the 16th century. Some of Stuarts heavily converted lesser armed French men at arms and demilancers being good examples of suitable miniatures. Similarly his Picard pike carrying pavises fitted well with my Bohemians. We also matched the Nuremburg and Augsburg flags of the 1504 images along with the Imperial Eagle and of course the Habsburg saltire. This careful selection from our collections combined with the suitable flags meant we could refight this very unique battle of the early 16th century.

Die Behemsch Schlacht, Hans Burgkmair,  1504.

Schlacht von Wenzenbach, Codex Germanicus c.1504-1505. Note the early landsknecht fashions in the block of pikemen on the left.

The Battle of Wenzenbach, The Triumphal Arch of Maximilian c.1512-15. The landsknecht are now depicted in the fashions of the 1510s.

The Battle of Wenzenbach, Hans Burgkmair, Weisskunig c.1516.

Die Behemisch Slacht, Albrecht Altdorfer, The Triumphal Procession of Maximilian, begun c.1512.

As with some of the Hungarian battles I have covered English sources for this battle appear to be scarce so for this account I have had to rely on google translate for much of the information relating to what happened. This report to the City of Cologne three days after the battle was particularly useful: http://www.regesta-imperii.de/id/1504-09-15_1_0_14_4_0_3422_19141

Wenzenbach, 1504

The death of George the Rich, Duke of Bavaria-Landshut in December 1503 led to war in the Holy Roman Empire. A 14th century agreement between the Wittelsbach duchies of Bavaria-Munich and Bavaria-Landshut had stipulated that if one branch of the Wittelsbachs died out in the male line then the other branch of the family would inherit, whilst Imperial law decreed the Emperor should inherit if the line failed. In breach of both of these George the Rich, not having any sons, had named Elisabeth his daughter as his heir. She was married to Ruprecht, Count Palatine of the Rhine, son of the powerful Elector Palatine.

Maximilian I of Habsburg was called in as a mediator and decided in favour of Albert Duke of Bavaria in the Munich line, he was after all married to Maximilian's sister, Kunigunde of Austria. He did offer Ruprecht a third of his father-in-laws inheritance by way of compromise. This was refused by Ruprecht, which lead to two years of war. Maximilian supported Albert's claim, offering military assistance along with the Swabian League, Duke Ulrich von Wurttemberg and the Imperial City of Nuremburg. Ruprecht was supported by his father, Philip of the Palatinate, and Vladislaus II, King of Hungary and Bohemia.

The battle of Wenzenbach, also known as the Battle of Schönberg or the Bohemian Battle, took place when the castle of Schönberg and the nearby village of Wenzenbach were threatened by an army of Boheminan mercenaries that had been provided by Vladislaus II. Following the Hussite wars of the early 15th century the Bohemians had become successful mercenaries. As they raided close to Regensburg they were caught on 12 September 1504 by Maximlian I and his forces. Georg Wisbeck was the leading Captain in the army of Ruprecht and Elisabeth but when he saw the 4,000 Bohemian mercenaries in his army attempt to escape with their wagonburg he left with the 300 cavalry under his command. Outmaneuvered by Maximilian and his 1,600 horsemen the Bohemians formed the wagonburg on a hill. 

Maximilian had wanted to wait for his 3,000 infantry and heavier guns but they were lagging behind the cavalry after a long march. Worried that the raiding Bohemians would escape he launched his cavalry in mounted assaults against their pavises and war wagons. Maximilian was personally involved in the assault, at one point his horse fell and he was at risk of being trampled in the chaos. Erich von Braunschweig managed to rescue the Emperor Elect and get him to safety. 

It was only with the arrival of the infantry, particularly Georg von Frundsberg, later to become even more famous at the battles of la Bicocca and Pavia, and his landsknecht that the Bohemian defences could finally be successfully stormed. Using light artillery and arquebusiers the Imperialists were able to soften up the wagonburg to the extent that it could be breached by the landsknecht. Possibly as many as 1,600 Bohemian mercenaries were slain with hundreds also being captured. The war ended the following July with George the Rich's two grandsons receiving a small part of their inheritance as both Ruprecht and Elisabeth had died of dysentry during the campaign that resulted in Wenzenbach. Most of the duchy fell to the Munich line of the Wittelsbachs with Maximilian and the Imperial city of Nuremburg also receiving some of the territorial spoils for their parts in the campaign.

A view of the field from behind the Bohemian lines.

Abandoned by Georg Wisbeck and his 300 horse, the Bohemian mercenaries prepare to defend the hill.

The Bohemian mercenaries in front of the wagonburg.

Ruprecht and Elisabeth's mercenary army.

The pavisiers line the hilltop.

A close up of the Bohemian mercenaries.

The pavise wall.

A view of the mercenaries on the hill.

The Bohemian mercenary army of Elisabeth and Ruprecht, Count Palatine of the Rhine.

A view from the Bohemian wagons.

The Scenario

In the scenario we played the Bohemians were deployed at one end of the table along the hill.  Rather than fight it out as a straight up battle with an attacker against a defender we decided it would be more fun if we each took control of half of the Imperial army and then competed against each other to see who could break into the wagonburg first. After a dice roll it was decided that Stuart would take control of Georg von Frundsberg's mostly infantry retinue whilst I took command of Maximilian I and the majority of the Imperialist cavalry.

The aim of the game was simple. The winning player would be the first player to break into the Bohemian wagonburg, by destroying a wagon and then using a move activation to enter their camp. As always we used our heavily modified Renaissance Rampant rules for the game with even more adaptations to account for the Bohemians and the war wagons. In some ways this was a much a play test as it was a game based on a historical battle.

The Bohemian Units 

We revisited some of the rules used in "this is like no house of praier", http://camisado1500s.blogspot.com/2021/07/this-is-like-no-house-of-praier.html, for this game with the Bohemian army being a mix of static and mobile units. The 6 Pavise Units, 3 backed by crossbowmen and 3 backed by arquebusiers, formed the Bohemian front line of static units on the top of the hill. Behind them were the mobile units, comprised of the Bohemian Captain, crossbowmen and halberdiers, and then behind them the war wagons were another block of static units in front of the camp.

During the Bohemian turn the static units always activated first. All of the static units could attempt to activate every turn and would always fire at the nearest target. The only movement they could make was to attempt to return to their original position if they retreated. If the crew in one of the war wagons retreated by being broken then that wagon was considered destroyed as the crew had fled.

For the mobile Bohemian units we both started with 5 playing cards. Each turn we played a card and whoever played the highest card took control of the mobile units for that Bohemian turn. Both of us would then take another card. These units behaved like a normal retinue and a failed activation would end their turn. During the actual game this rule changed as my friend Dave, who I used to wargame with for years as a teenager, turned up to see the game. Stuart and I decided to let him take control of the Bohemian mobile units as a third player. This drastically changed the game as rather than either Stuart or I deliberately using the mobile units to block the other Imperial player whilst at the same time letting our own troops nearer to the wagons Dave consolidated the Bohemian defence and made it very difficult for Stuart and myself to get our units anywhere near the wagons!

Maximilian I's army.

The Imperial cavalry of Maximilian I.

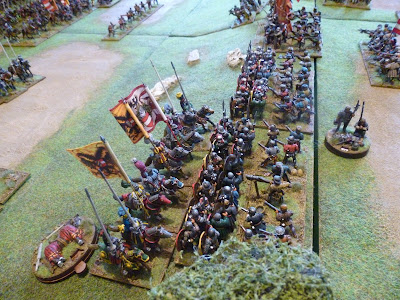
Georg von Frundsberg and his early 16th century landsknecht.

Early 16th century landsknecht.
            
Pikemen under the banners of the city of Nuremburg. The Nuremburg banner can be seen in the first two contemporary images shown above.

Pikemen under the banner of Augsburg, as with Nuremburg, this banner can clearly be seen in the contemporary images produced very soon after the battle.

The Armies

The armies we used, shown in detail in the photos above, were as follows:

The Bohemians

Static Units (see the Scenario above)

3 Units of Pavise Arquebus Infantry
3 Units of Pavise Crossbow Infantry
2 Artillery War Wagons 
3 Infantry War Wagons

Mobile Units(see the Scenario above)

1 Unit of Foot Knights (the Bohemian Captain) 
3 Units of Halberdiers
2 Units of Crossbowmen 

Imperialists

Maximilian I, King of the Romans, and the Cavalry

2 Units of Imperial Knights (1 unit contains Emperor Maximilian I)
5 Units of Imperial Men at Arms
2 Units of Mounted Crossbowmen

Georg von Frundsberg and the Infantry

1 Unit of Landsknecht Halberdiers (Georg von Frundsberg)
2 Units of Landsknecht Pike 
1 Unit of Landsknecht Arquebusiers 
2 Units of Pike (The Nuremburg and Augsburg City Contingents)
1 Culverin
2 Units of Imperial Men at Arms

During the battle both of the Imperial retinues rolled up reinforcements as a result of a double 6 during activation roles.

A brief write up of the game is below with the accompanying photos. The light towards the end of the day was poor and did limit the pictures, as did the fact that Dave had taken control of the Bohemians and was slaughtering us both!

Maximilian's forces begin the attack.

The Imperial forces are strung out as they reach the Bohemian forces.

The Imperial cavalry can be seen in the distance as they charge towards the mercenaries.

The Imperialists are taking casualties from the Bohemian crossbows and arquebus fire.

The forces are about to clash.

A view of the armies from above.

Wenzenbach, 1504.

The battle started with the Imperial cavalry predictably outpacing their infantry and nearing the pavise wall before the accompanying pike and shot. A small group of Bohemian crossbowmen emerged from the wall of pavises and polearms to skirmish with the Imperialists as they came within range. Some of Maximilian and Frundsberg's men fell to the Bohemian crossbows. Within moments the first charge was launched when Imperial men at arms under Frundsberg's command clashed with the Bohemians on the Imperialist left. Whilst this disrupted the mercenary lines the men at arms did not break through and fled back down the hill. 

The disruption the first charge caused was followed by successful Imperial artillery fire which helped to push back one of the pavise units and cause significant casualties. The next charge came from the Imperialist right where Maximilian I and his fully barded knights charged headlong into the pavise wall. Initially they met with great success and the first unit of Bohemians to be engaged was sent fleeing for their lives into the surrounding woods.

Frundsberg's artillery opens fire.

The first Imperial lancers crash into the Bohemians and are repulsed in a bloody melee.

The Bohemian lines have been disrupted by the first clash. Maximilian and his knights lead the second attack.

Maximilian I and his Imperial Knights charge the Bohemians.

Maximilian I charges the Bohemians.

A second fierce clash occurs on the crest of the hill.

Maximilian I and his men at arms push into the Bohemian lines.

The Imperial cavalry charge the Bohemian army.

A view of Frundsberg and his landsknecht advancing.

The city contingents of Nuremburg and Augsburg come under heavy fire from the Bohemian mercenaries.

The top left shows where Maximilian and his knights have pushed back the defenders.

Another charge is launched at the Bohemians.

In the chaos Maximilian I is unhorsed and brought down, his remaining knights flee. The Bohemians have held against the assault.

Supported by units of men at arms Maximilian and his knights pushed further into the Bohemian army on the Imperial right and succeeded in routing more units of the Bohemian mercenaries. It looked as though this would be an easy victory for the King of the Romans until disaster struck and he was unhorsed and brought down in a clash with the Bohemian captain and his personal bodyguard. This time there was no Erich von Braunschweig to rescue the Emperor and he was left on the hill as his remaining Knights fled.

With this dramatic cavalry charge beaten back it was the turn of Georg von Frundsberg and his infantry to try and punch through the pavise wall but try as they might the constant rain of crossbow bolts and hail of arquebus shot meant they struggled to get up the hill. Another large scale cavalry charge was launched on the right in the hope that the wagons could be reached. Some armoured horsemen did break through and for a moment it looked as though the Imperialists would have a bloody victory and breach the Bohemian camp but it was not to be. The Bohemians had regrouped and plugged the gaps in their lines preventing further Imperialists, be they cavalry or infantry, from reaching their last line of defence. This battle of Wenzenbach had not been a triumph for Maximilian!

The infantry of Nuremburg attempt to push up the hill.

Another wave of cavalry attack...

...some of them get to the wagons but are beaten back. The Bohemians have consolidated their defence and the wagons hold. The Imperial army has been unable to crack the Bohemian wagonburg.

This was a really different game to play, it felt very much like a 16th century Battle of Hastings. Stuart and myself had a lot of fun vainly trying to breach the wagonburg. Once Dave had taken control of the Bohemian defenders we didn't stand a chance, especially as during the preparations for the game we made the war wagons quite tough units. It was also a joy to behold the line of pavises along the hill facing off against the mass of Imperial cavalry and infantry marching under the Habsburg banners. Wenzenbach has always seemed an odd battle to me and the images depicting it have fascinated me for a long time. It was great to recreate it on the table top. Stuart and myself also played a very different early 16th century Irish game set in Ulster which I will cover in my next post, I think Wenzenbach deserves a post all to itself!