This weekend Stuart visited and we played two games set at the very end of the 15th century. We decided to revisit two characters who have featured in our wargames before, the Yorkist pretender to the throne, Perkin Warbeck, and the Tudor professional soldier, Sir Edward Poynings.
 |
| A map of Exeter in 1597. The attacks on the 17th and 18th of September 1497 were made against the north gate, shown on the left of the above image, and the east gate, shown at the top of the image. The scenario we played out focused on the attack through the destroyed east gate in the early hours of the 18th September 1497. |
Perkin Warbeck's assault on Exeter
The year 1497 saw the Yorkist pretender Perkin Warbeck remain a persistent threat to the Tudor monarch, Henry VII. Following his failed attempts to raise rebellions in England and Ireland in the summer of 1495,
http://camisado1500s.blogspot.com/2022/02/warbeck-deal-and-waterford-1495.html, Warbeck sought refuge in Scotland where the Scottish King, James IV, was initially happy to use him as a pawn to taunt Henry VII. With Warbeck in tow James invaded Northumberland in September 1496 plundering the local population and destroying fortifications at Twizel, Tillmouth, Duddo, Branxton and Howtel. Hearing that the English were raising an army at Newcastle James then retreated back across the border.
Keen to strike back at the Scot's Henry VII raised taxes across England the following year. Cornwall suffered particularly badly due to the monarch's interference with the tin-mining industry. This sparked a rebellion that was only quelled following the Cornish rebel's march on London and their defeat at the Battle of Blackheath, also known as the Battle of Deptford Bridge, on 17 June 1497 (
http://camisado1500s.blogspot.com/2024/03/blackheath-1497.html). The border raids between England and Scotland continued into the summer of 1497 but with the Spanish monarchs, Ferdinand of Aragon and Isabella of Castile, attempting to make peace between the two kingdoms Warbeck's presence at the Scots court became an issue. It seems the Spanish Ambassador, Don Pedro de Ayala, had been sent to Scotland by Ferdinand and Isabella to make it look as if the Scottish King was a potential match for their daughter Catherine of Aragon. The reality of de Ayala's mission was to undermine the position of Warbeck and protect English interests as the marriage negotiations for a match between Henry VII's eldest son, Arthur Prince of Wales, and Catherine of Aragon were close to conclusion.
Regardless of the intentions behind the negotiations between Scotland, Spain and England and whether or not James was really convinced by the proposal of a Spanish marriage Warbeck left Scotland with three ships in July of 1497, whilst the Scots were still at war with the English. James IV would besiege Norham Castle for the first time in August 1497. Initially, whether by design or bad weather, Warbeck landed in Ireland arriving in Munster where again he attempted to take control of Waterford as in 1495 but again the city was in no mood to support his rebellion, its citizens instead informing the earls of Kildare and Desmond, who were now reconciled with the Tudor regime. Warbeck and his band of rebels fled Ireland being pursued by four ships from Waterford.
On the 7 September 1497 Warbeck and perhaps 120 fellow rebels landed at Whitesand Bay in Cornwall. Much of the population of the region was still keen to support an uprising, their defeat at Blackheath having been only three months earlier. At Penzance Warbeck raised the banners of the Duke of York. One banner showed a child escaping from a wolf, another a boy emerging from a tomb, apparently signifying his early escape from death, whilst a third showed a Red Lion of Flanders invoking a political prophecy that salvation would come from Flanders. Within a week of his landing Warbeck raised a force of around 3,000 men at Bodmin. The local sheriff attempted to stop him but the attack failed when his men deserted en masse to join the rebels. Edward Courtenay, Earl of Devon, raised an army to oppose the Yorkist pretender, with Plymouth even sending him soldiers dressed in green and white Tudor livery, but he too was forced to retreat and fell back to Exeter as the rebels advanced.
On the afternoon of 17 September the rebel army, perhaps now numbering as many as 6,000 men, reached the walls of Exeter. Warbeck's force arrayed itself against the north and east gates of the city and called on Courtenay to surrender. Accompanied by his son William and members of the gentry such as Sir Walter Courtenay, Sir John Sapcote, Sir Piers Edgcumbe and Sir Humphrey Fulford, the Earl of Devon refused to surrender the city prompting the rebel army to attack. Warbeck's men attempted to scale the walls and force the gates but Courtenay had readied the city for an assault, his retinue including gunners who had prepared gun emplacements at the gates. Courtenay estimated three to four hundred rebels were killed in the initial assault on the afternoon of the 17 September.
Early the following morning the Earl of Devon and his son William were still in their lodgings in the Blackfriars when the second assault came. Initially the rebels attempted to storm the north gate which had been badly damaged during the fighting the day before but the gunners defending Exeter drove them off. The rebel army then attacked the east gate, perhaps using a battering ram, as they were able to force their way through and into the high street. Courtenay and his men were still arming allowing the rebels to fight their way up to Castle Lane within the city. The Earl of Devon was wounded in the arm, presumably by an arrow, as he rushed to the scene of the fighting. Together the citizens and Courtenay's forces drove the rebels back out of Exeter.
Hall gives a good account of the assault by Perkin's army in his chronicle: "and because he (Warbeck) lacked ordinance to make a battrye to rase & deface the walles he studied all the weyes possible how to breake and infrynge the gates, and what with casting of stones, hevyng with yron barres & kyndeling of fier under the gates, he omitted nothing that could be devised for the furtheraunce of his ungracious purpose. The cytezens perceaving their towne to be envyronned with enemies and lyke to be enflamed, beganne at the first to be sore abashed, and let certeyn messengers by cordes downe over the walle whiche should certefie the kyng of all their necessitee & trouble. But after that, takyng to theim lusty heartea and manly courages they determined to repulse fyer by fier, & caused fagottes to be brought to the inward part of the portes and posternes and set theim all on fier, to thentent the fier being enflamed on bothe the sydes of the gates, might aswel exclude their enemies from entryng, as include the citezens fro ronnyng or fliyng out, and they in the meane ceason might make trenches and rapayres to defende their enemies in stede of gates and Bulwerkes. Thus all the doynges and attemptes of the rebellious people had evell sucesse in their first entreprice: And thus by fyer the citee was preserved from flame and burnynge. Then Perkyn beyng of very necessitee compelled to leave the gates, assaulted the toune in diverse weake and unfortefied places, and set up laders, attempting to clime over the walles and to take the cytee, thinkyng suerly to compell the cytezens either by feare or lacke of succoure to rendre theim selfes and yelde the toune. But the cytezens nothing so mynded, so courageously lyke valaut chapions defended the walles, that they slewe aboue. ii.C. of his sedicious souldiours at this assaute."
Both sides had taken heavy casualties, the Earl of Devon later writing to Henry VII that many of his men were hurt that day. With the rebels having failed to take the city after two bloody assaults a truce was made and Warbeck departed after Courtenay had promised he would not pursue him. By the 19th of September Warbeck's army reached Taunton but by now the Tudor king had raised an army to defend the south west, his vanguard under Lord Daubney reaching Glastonbury on the same day. Warbeck fled to be captured at Beaulieu Abbey in Hampshire and was then brought to the king at Taunton on 5 October. After confessing to being an impostor Warbeck was initially treated well by Henry but following two escape attempts from his confinement he was hung in November 1499.
 |
| Following the attack on the city on during the afternoon of 17th September the citizens man the walls, nervously waiting so see what Warbeck and his rebel army does next. |
 |
| Within Exeter the livestock are herded to safety... |
 |
| ...and the citizens arm themselves and prepare for another attack on the city walls. |
Scenario
Our scenario focused on Warbeck's second assault on the early morning of 18 September and the break through of the east gate. As always we played the game using our modified Lion Rampant rules. Both armies consisted of two retinues each with one of the retinues for each army starting on in the city and the other arriving during the game. Warbeck's forces had to get as far into the city as possible and take three objectives in order to win the game whilst Sir Edward Courtenay and the citizens of Exeter had to stop him.
Deployment
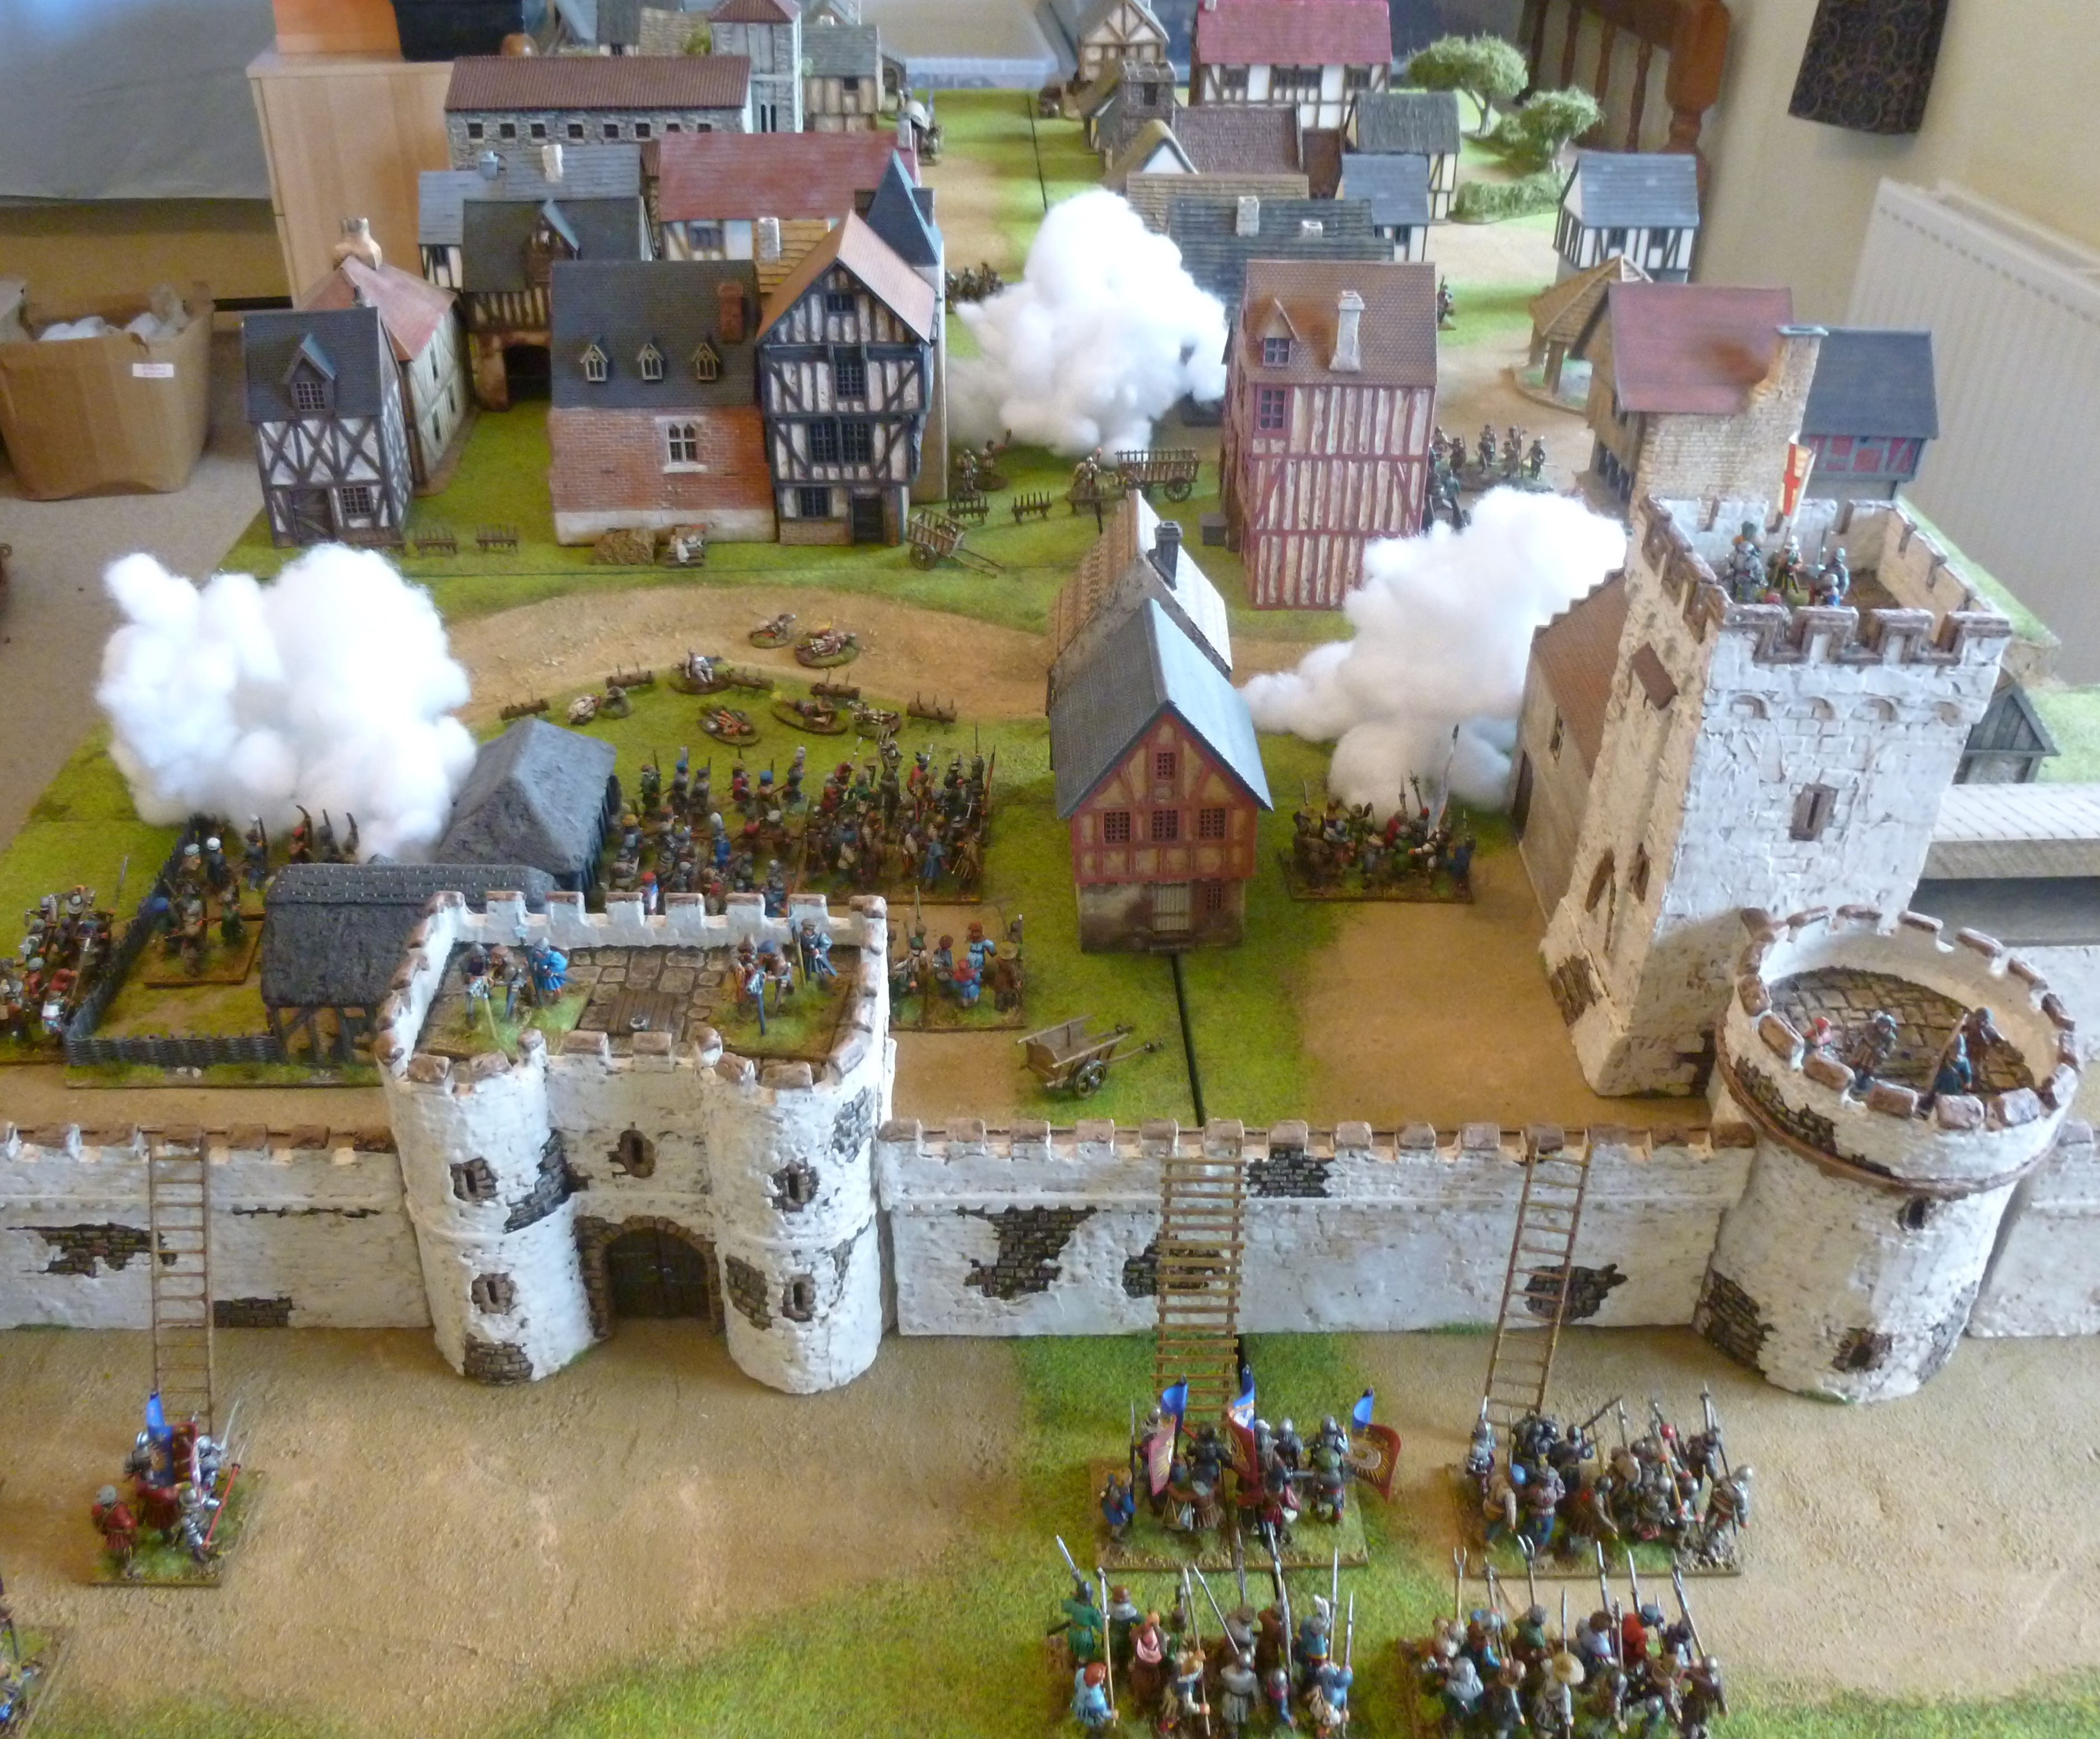
At the start of the game Perkin Warbeck's retinue was deployed within 12" of the east gate inside the city (see the overview of the table below). The citizens of Exeter were deployed within the city.
Warbeck's other retinue deployed via move activations from the walls. A successful move activation would place a unit at the bottom of the wall from where they were arriving. The unit could then do nothing else that turn.
On the morning of September 18th Sir Edward Courtenay's retinue was caught off guard by the early morning attack and was still arming. To represent this from the start of turn four the Courtenay and Exeter player could roll 2D6. On the first roll (at the start of turn 4) an 11+ on 2D6 would herald the arrival of Sir Edward Courtenay's retinue. The following turn a 10+ would mean they could arrive and the following turn a 9+ and so on. Sir Edward Courtenay's retinue could only enter the table via a move activation and could not shoot, attack or skirmish when first arriving. Sir Edward Courtenay's retinue would arrive via the high street at the other end of the table (see the photo below).
The Objectives
In order to take an objective one of Warbeck's units had to be in base to base contact with it at the start of their turn, this would mean the objective was taken. If all three were taken and Warbeck was still alive then Warbeck and the rebels would win the game. The photo below shows the three objectives.
If Warbeck was killed or routed from the table then Courtenay's forces and the citizens of Exeter would win.
The Smoke
Due to the citizens determination to "repulse fyer by fier" there were a number of large smoke clouds on the table at the start of the game (these were provided by the selfless sacrifice of a teddy bear from a charity shop!). Each turn we would roll a scatter dice and a D6 and this would determine how many inches and which direction the clouds would move for that turn. The clouds obscured line of sight and units could not shoot through them. If a unit was partially obscured by a smoke cloud they gained +1 armour if fired at by a unit that could see them. If a cloud moved off the table it was removed from play.
The Trenches
Hall describes how the citizens had made "trenches and rapayres to defende their enemies in stede of gates and Bulwerkes". The trenches that the citizens dug to defend the city gave +1 armour for any units within them that were targeted by missile fire and counted as difficult terrain to move across or fight in.
 |
A view of the table from above. The east gate is shown to the left of the photo. Warbeck's retinue start the game within 12" of the gate whilst his other retinue start outside the walls and will enter via scaling ladders. The objectives Warbeck and his forces need to reach are shown above. The armed citizens of Exeter are deployed within the city whilst Sir Edward Courtenay and his retinue will arrive from the right of the photo during the game.
|
 |
| A view of the table showing half of Warbeck's troops deployed around the gate with the other half about to scale the walls. |
 |
| Perkin Warbeck, here shown with a Yorkist standard, and his retinue deployed as if they have just broken through the east gate. |
.jpg) |
| The citizens have dug a trench across the streets and set fire to parts of the city in an attempt to prevent Exeter being taken by assault. |
Perkin Warbeck and the Cornish Rebels
Perkin Warbeck's Retinue deployed inside the east gate
1 Unit of Foot Knights (Perkin Warbeck - retinue leader)
2 Units of Shire Bill
2 Units of Shire Archers
4 Units of Peasants
Rebel Retinue scaling the walls
1 Unit of Foot Knights (Warbeck's mercenaries - retinue leader)
1 Unit of Garrison Bill (Warbeck's remaining professional troops)
1 Unit of Shire Archers
2 Units of Shire Bill
2 Units of Peasants
Sir Edward Courtenay, Earl of Devon, and the citizens of Exeter
Sir Edward Courtenay's Retinue
1 Unit of Foot Knights (Sir Edward Courtenay - retinue leader)
1 Unit of Foot Knights (William Courtenay)
2 Units of Garrison Archers
1 Unit of Garrison Bill
The Citizens of Exeter
1 Unit of Shire Bill (retinue leader)
2 Units of Shire Archers
2 Culverins
5 Units of Peasants
2 Organ Guns
As always a brief write up of the game follows. In this case it is very brief as due to a foolish move by one of the protagonists things were brought to an unexpected end! Reading the photo captions is also a great way to follow the action.
.jpg) |
| The attack begins and Warbeck's Cornish rebels storm the trench in the city. |
.jpg) |
| The rebels advance into the city. |
 |
| As the rebels push forward the city is engulfed in flame and smoke. |
 |
| Warbeck's troops pour into Exeter. |
 |
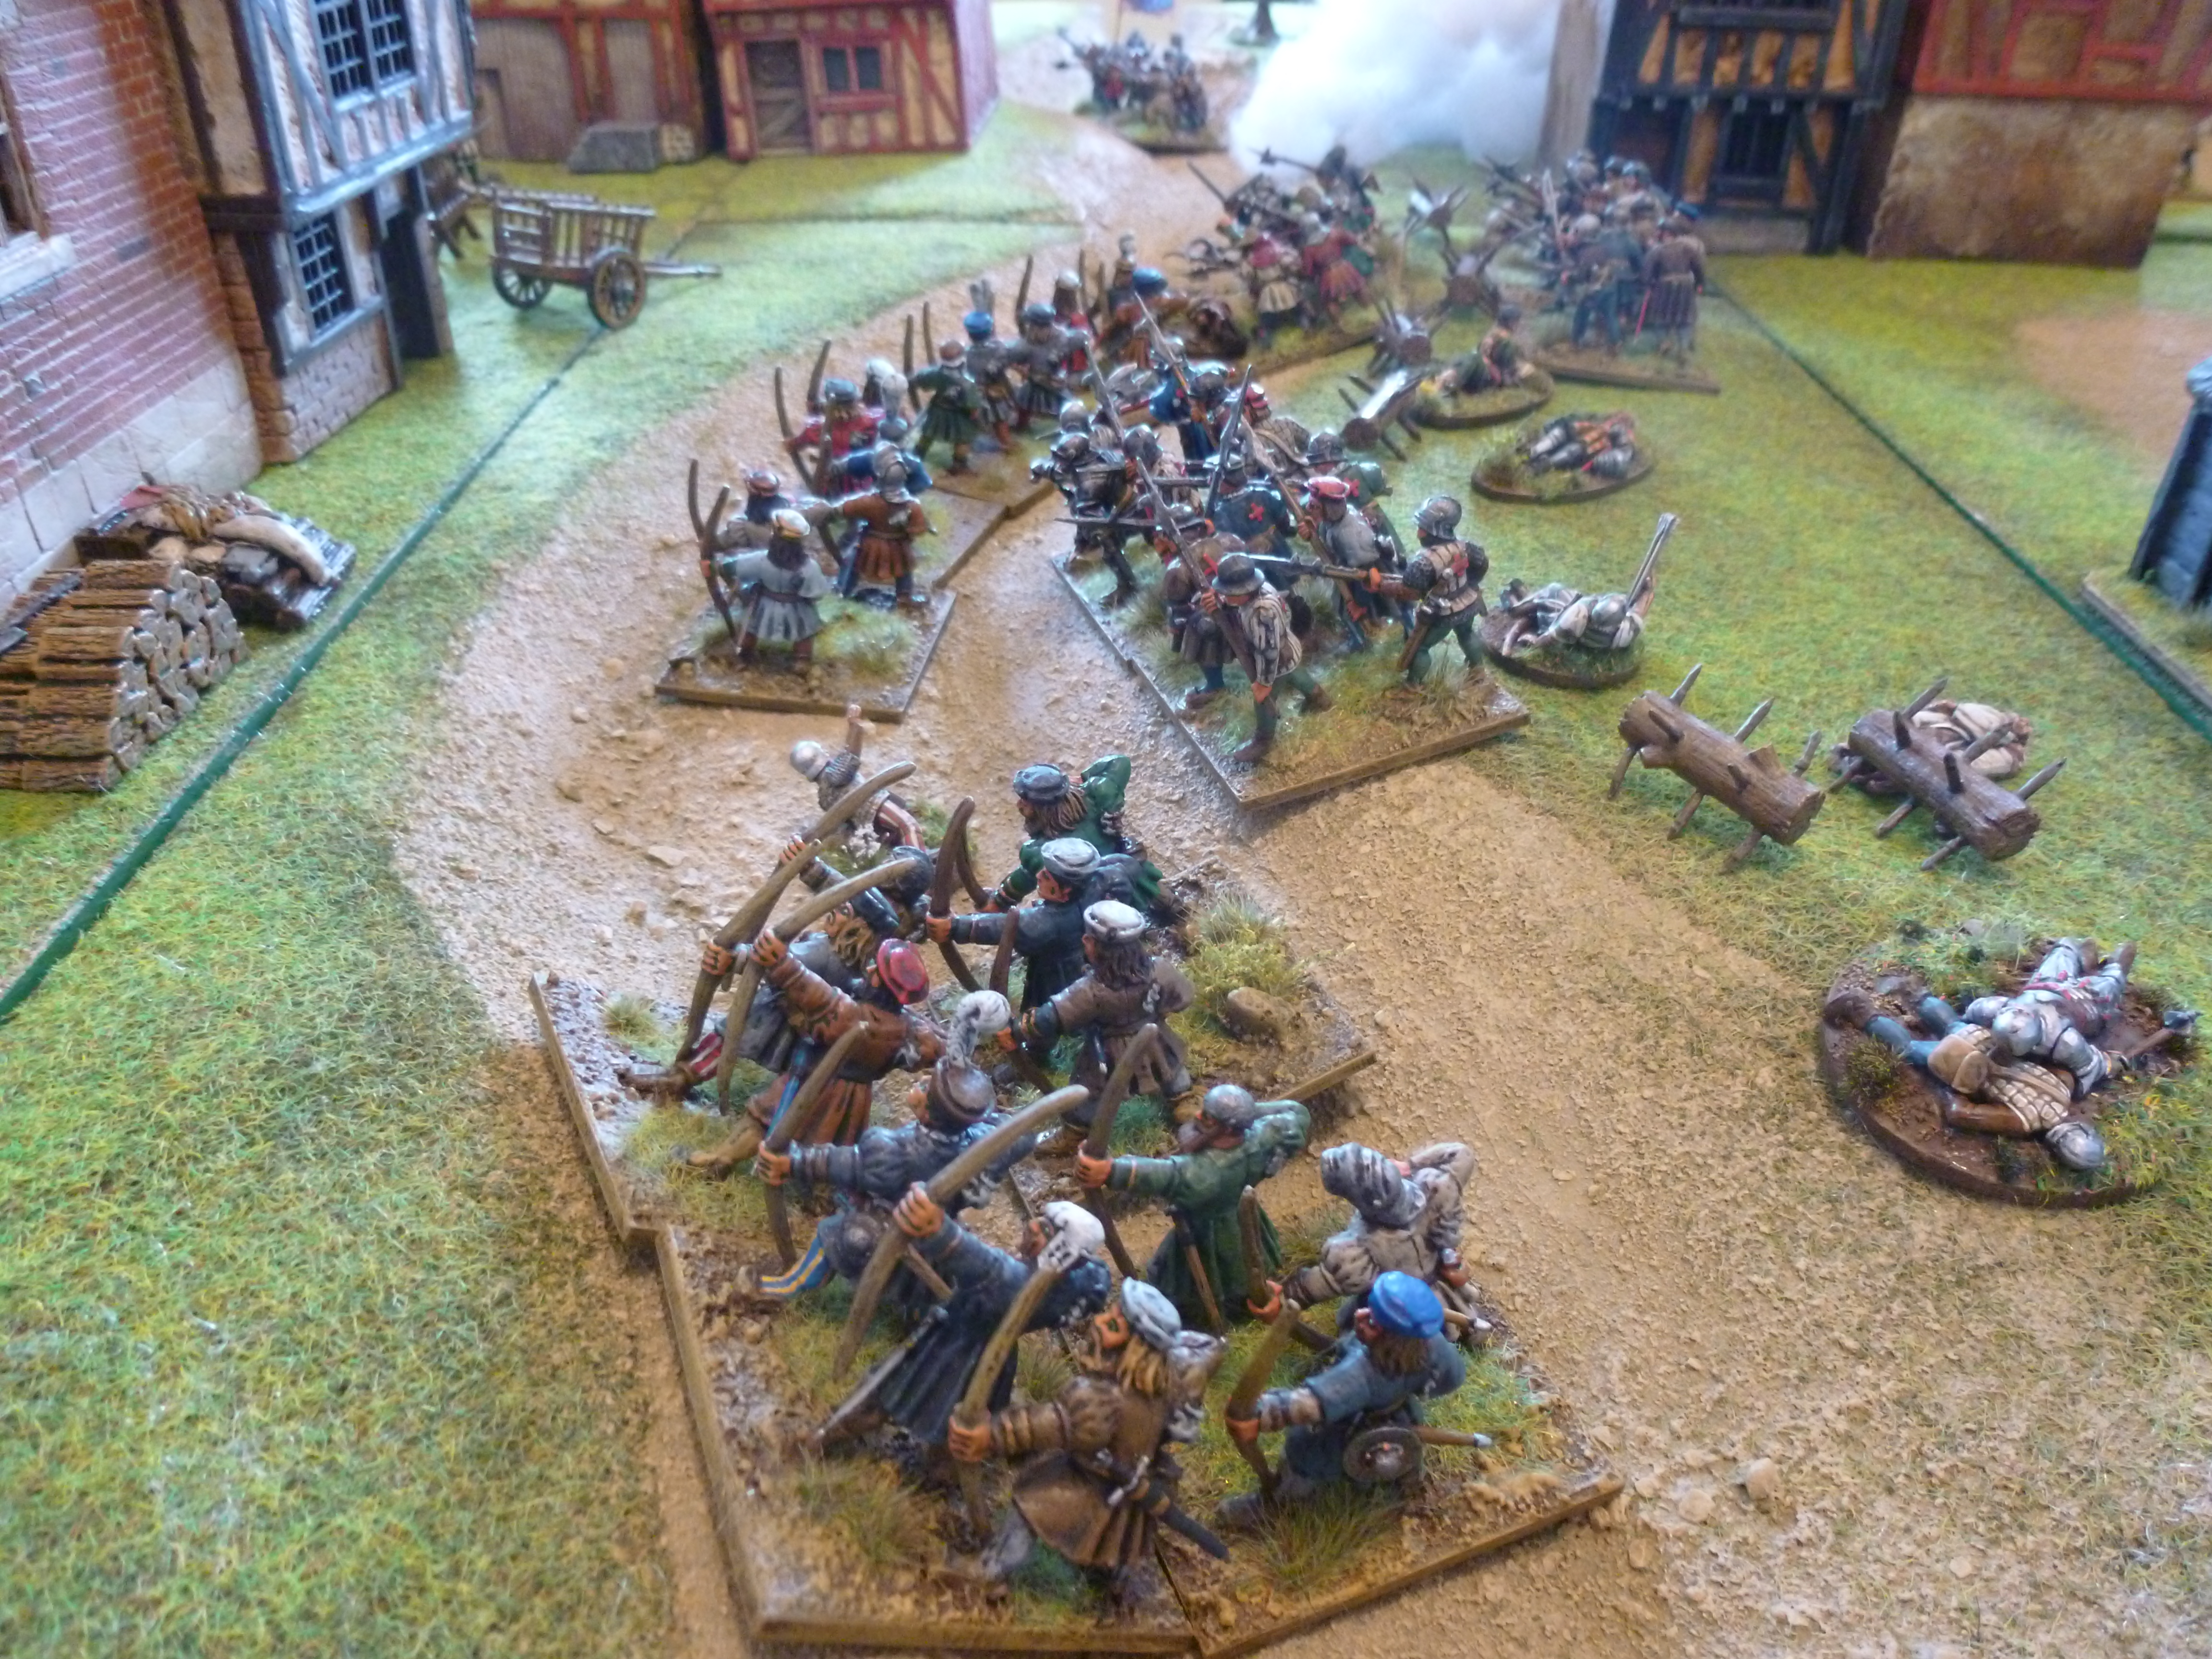
| Rebel archers and billmen advance across the abandoned trench of the defenders. |
 |
| Fierce street fighting takes place between the citizen militia and Warbeck's rebels. |
The early hours of September 18th had seen an attack launched on the north gate of Exeter but this was quickly driven off by the gunners defending the walls. As soon as this attack stopped a second attempt was made against the east gate. This time the rebels were more successful and within moments they were through the gate and into the city. Other rebels scaled the walls and joined the assault. Both the attackers and defenders had set fire to parts of the city and the smoke seemed to play to the advantage of the attackers allowing them to push forward undercover. The attackers found the trench the defenders had dug to be undefended and were easily able to cross it, and enter the city streets.
It was in the city streets that the fighting really began with Warbeck's troops clashing with the armed citizens of Exeter. The city's archers were unable to clearly see the attackers in the smoke which meant that most of the fighting was hand to hand. The attackers took casualties but by sheer force of numbers they were able to force the defenders back and begin to take over the eastern part of the city.
 |
| Whilst the castle cannot be stormed by the rebels the streets around it fill with the sounds of battle. |
.jpg) |
| A view from the east gate into the city. As the rebels push forward the top of the photo shows that Sir Edward Courtenay and his men have arrived, hastily rushing to the gate from their lodgings in the Blackfriars. |
 |
| The Yorkist Pretender's men have pushed up the high street but their path is blocked by the defenders guns. |
 |
| In the side streets the Cornish rebels overwhelm units of defenders. |
 |
| Sir Edward Courtenay and his son, William, rush to defend the streets. |
 |
| In the eastern end of the city the fighting continues... |
 |
| ...as the attackers surge across the trench and into Exeter. |
 |
| Sir Edward Courtenay and his men rally the defenders. |
It looked as if things were going well for the Yorkist pretender and his rag tag army as unit by unit the city's defenders were defeated or pushed back. At the end of the high street Sir Edward Courtenay with his retainers and accompanying gentry arrived from their lodgings in the Blackfriars. They charged down the street preparing to engage with Warbeck's men and hopefully drive them back out of Exeter.
Sensing a decisive moment in the assault Perkin Warbeck ran to the head of the attack in an attempt to stir his troops and lead them to victory. He was accompanied by his armoured bodyguard, the few remaining men who had been loyal to him throughout his adventures in Ireland and Scotland. As they charged up the high street they ran headlong into the defender's trap. From a side street a storm of arrows was unleashed into them whilst the city gunners opened fire sending shot bouncing down the high street. Warbeck and his men were caught in the crossfire and slain! With the the pretender dead the word spread in minutes and the attack faltered. The gunners had certainly earnt their wages. The rebels withdrew and Exeter was saved.
 |
| The gunners open fire on the attackers as they swarm down the high street. |
.
 |
| Exeter's defenders look on anxiously as Warbeck's men press forward. They still carry their torches having set the gates on fire in an attempt to prevent the attackers from breaking through. |
 |
| Warbeck himself advances into the city... |
 |
| ...and attempts to lead his rebel army to victory... |
 |
| ...but the attack is brought to a sudden halt when the pretender is brought down in a blast of cannon fire. With Warbeck slain the attack is called off! |
For our second game we revisited Ireland and Sir Edward Poynings's attempts to quell unrest there during Henry VII's reign.
Sir Edward Poyning's Siege of Carlow Castle, March to July 1495
Following Sir Edward Poyning's campaign in Northern Ireland in the autumn of 1494,
https://camisado1500s.blogspot.com/2021/09/poynings-in-ireland.html, he returned to Dublin believing that Gerald FitzGerald, the 8th Earl of Kildare was conspiring against him. Kildare was summoned to Dublin on 27 February 1495 to be sent to the Tower of London a week later on 5 March. Whilst Kildare was being taken prisoner his brother, Sir James FitzGerald, seized the King's castle of Carlow on 2 March 1495, only adding credence to the claims that Kildare was acting treacherously. Carlow castle had been held by 16 soldiers and fell easy prey to James FitzGerald who garrisoned the castle forcing Poynings and Sir James Ormond to lay siege to it.
Once reinforced by the FitzGeralds the castle cannot have been easy to retake. Being located outside the town of Carlow where the Barrow River was joined by the Burren River it was surrounded by water on three sides with an area of marsh crossed by a causeway on its fourth side (see this conjectural reconstruction here:
https://carlowmuseum.com/wp-content/uploads/2021/11/carlowcastlebrochure.pdf). An act of Poynings's Parliament in Ireland described "
his long and paynefull lying at the siege of the same." The castle was recaptured by Poyning's in July of 1495, which was not a moment to soon. On 23 July the Earl of Desmond linked up with the Yorkist pretender, Perkin Warbeck (see
https://camisado1500s.blogspot.com/2022/02/warbeck-deal-and-waterford-1495.html) and laid siege to Waterford forcing Poynings to raise an army of Anglo-Irish retinues and Gaelic Irish allies before marching south to relieve the town and chase off the pretender.
 |
| A view of the table from above. Poyning's forces must storm the gates of Carlow Castle to achieve victory. Poyning's main force will attack from the right of the above photo. His troops can also attack from the carrack via the River Barrow and from row boats via the Barrow and Burren rivers. The two rivers are shown in the photo above. Sir James FitzGerald can place units in the outbuildings in the castle's outer bailey to surprise the attackers. |
Scenario
I was unable to find much information about the siege of Carlow, other than it was "long and paynefull" so for this scenario we decided to game an attempt by Poynings to storm the castle during the siege. As the castle was surrounded on three sides by the Barrow and Burren rivers this also meant we could bring some boats into the game and have troops landing for the attack. As with the first game we used our adapted Lion Rampant rules.
Poynings's attack
For this scenario Poynings would attack from the landward side (see the photo above), over the marsh, but his forces would also attack from the two rivers. Before the game started the player in command of Poynings's army wrote down the turn (any turn after turn 1) and the location at which his troops would land by boat to attack the castle. The naval attack would be delivered in the form of two row boats and the larger carrack. The carrack could only arrive from the larger Barrow river and not the smaller Burren (see the photo above). Poynings had to dedicate at least one unit each to the carrack and row boats but could dedicate up to four units, meaning two units could land from the carrack and two from the row boats.
The Poynings player had to announce the turn before the boats landed that they were heading in and the boat models were then placed as if they were about to land. The following turn the Poynings player rolled a D6 and on a 2+ the troops in the boats could then attempt to move, shoot, attack or skirmish from the location where they were landing. On a 1 the Poynings player had to try again next turn for that element of the naval attack. The D6 roll did not affect the rest of the Poynings players turn. The boat attacks did not have to happen at the same time; the carrack could attack at a different time from the row boats.
Objectives
To win the game Poynings had to get a unit to take the castle. To take the castle the Poynings player had to get a unit to the castle gates (see the photo above). The unit had to be in base to base contact with the gates at the start of their activation phase. As an ordered activation, they could then use that unit to try to break into the gates (instead of Moving, Attacking, or Shooting). If there were 7 or more models in the unit the gates were broken into on a roll of 8+ on 2D6; if there were 6 or fewer models in the unit the gates were broken into on a roll of 9+ on 2D6.
The Carrack
The carrack would anchor slightly off the shore of the Barrow river and a smaller row boat then used to reach the shore. When it arrived it had to be positioned at least 3" from the shore. The turn after the troops were deployed from the carrack the model could then attempt to shoot each turn as if it were a culverin. Any shots were measured from the main deck of the vessel. A failed activation for the carrack attempting to shoot did not end the Poynings players turn.
Earthworks
The outer bailey of the castle was defended by earthworks. These gave +2 armour for any unit defending them and counted as difficult terrain to cross or fight in.
Sir James FitzGerald's defenders
The outer bailey of Carlow castle included many outbuildings and the FitzGerald player could hide up to four units within these. At the start of the game the FitzGerald player would note which units were in which buildings. The Poynings player did not know where the hidden units were. During the FitzGerald turn a hidden unit could then exit the building they were hiding in with a shooting, skirmish, attack or move activation. In the attack, skirmish or move activation they would leave the building to carry out the action. If they shot they were also placed outside of the building in the direction of who they were shooting at to represent them emerging from cover to shoot. If a unit failed an activation whilst hidden in a building it was placed outside of the building in front of the direction it would have acted. This represented the troops giving away their position but failing to act. Once out of a building a unit was committed to the fight and could not re-enter. A challenge could not be called from the secret location.
 |
| Sir Edward Poynings and Sir James Ormond prepare to storm the earthworks of the outer bailey and take Carlow Castle. |
The Armies
As this game represented a fight between a small royal army in Ireland and an Anglo-Irish lord both forces were a mixture of English and Gaelic troops. Stuart took control of Sir Edward Poynings and his men whilst I took on the role of the defender taking command of the FitzGeralds.
Sir Edward Poyning's besieging force
1 Unit of Foot Knights (Sir Edward Poynings - retinue leader)
1 Unit of Foot Knights (Sir James Ormond)
2 Units of Shire Archers
2 Units of Shire Bill
2 Units of Galloglass
3 Units of Kern
Sir James FitzGerald's garrison
1 Unit of Foot Knights (Sir James FitzGerald - retinue leader)
1 Unit of Shire Archers
1 Unit of Garrison Bill
1 Unit of Shire Bill
1 Unit Kern with arquebus
2 Units of Galloglass
2 Units of Household Kern
1 Unit of Horseboys
1 Culverin
Stuart chose to put two units of kern in the row boats and a unit of shire archers and bill in the carrack. I hid both units of household kern, the kern with arquebus and the garrison bill in the buildings in the outer bailey. A brief description of the game follows.
 |
| Sir James Ormond, on the left, leads galloglass and kern into the outer bailey. |
 |
| A bloody melee takes place as the FitzGerald defenders attempt to fight off Poynings's attack. |
.
.jpg) |
| A unit of kern with firearms emerge from the water mill and attempt to bring Sir James Ormond down in a hail of shot. |
 |
| The outer bailey is the scene of a savage battle. |
 |
| Galloglass loyal to the FitzGeralds clash with Galloglass in the employ of the Crown. |
 |
| Sir James Ormond and his bodyguard drive back the kern who ambushed them. |
The attack on Carlow castle began with Sir Edward Poynings and Sir James Ormond leading a mixed force of English and Irish troops over the earthworks and into the outer bailey. It was here, beneath the stone walls of the castle, that a savage melee took place as galloglass clashed with heavily armoured billmen and men at arms. Initially it looked as though the FitzGerald garrison would easily see off the attack as units of kern and galloglass in the royal army were quickly slain and Ormond's household men suffered badly when the FitzGerald kern emerged from the mill and fired a hail of shot into them.
As the battle of the outer bailey continued the quality of Poynings's troops began to tell as the FitzGerald forces were slowly driven back. Sir James Ormond lead the attack and despite losing men to the arquebusiers he soon took revenge and slaughtered the men who had ambushed him. As they were being pushed back to their walls things went from bad to worse for the defenders as a couple of row boats full of kern crossed the River Burren. Yelling their war cries the kern splashed ashore and joined the fight.
.jpg) |
| Poynings has tasked the kern in his army to land from the River Burren via some row boats... |
.jpg) |
| ...they disembark and open a new front in the attack. |
a.JPG) |
| The FitzGerald defenders are being driven back in the outer bailey. The kern can be seen landing from the river in the top left of the photo. |
b.jpg) |
| From the larger Barrow river a carrack lands a force of English bill and bow... |
.jpg) |
| ...they surge over the earthworks of the bailey and attack Carlow Castle from another direction. |
 |
Back on the other side of the castle Sir James Ormond is brought down in a clash with some of Sir James FitzGerald's galloglass.
|
As the battle raged on one side of the castle a new attack was launched on the other as English forces disembarked from a carrack on the Barrow river. Some of the kern who had landed in the row boats also slipped along the walls and joined with this second assault. Kern who had been positioned in the castle's outbuildings emerged to defend against the new front but the combination of newly landed English archers and supporting fire from the guns on the carrack drove the FitzGerald kern off.
Back on the other side of the walls it was not all going Poynings's way as his fellow commander, Sir James Ormond, fell in battle with some of the FitzGerald galloglass. With the fighting taking place all around the castle walls it was hard to see which side would prevail.
 |
| The English troops that landed from the carrack drive back some of the defending kern... |
 |
| ...but they are eventually driven back by Sir James FitzGerald and his bodyguard. |
With the routing of his kern Sir James FitzGerald was left with no option but to personally take on the English troops that had landed from the Barrow river. Accompanied by his retainers he was successful in driving them off but at the cost of allowing Poynings to drive off all of the FitzGerald troops who had opposed the initial attack over the earthworks. As Poynings and his English troops made for the gates FitzGerald's gunners were put to work firing hailshot at close range into the oncoming attackers but it was not enough.
Sir James FitzGerald rushed back to defend the gates clashing with Sir Edward Poynings as he attempted to storm the castle. Fate was not to be with Sir James FitzGerald and he was slain by Poynings in a dramatic one on one duel. With their leader slain the FitzGerald garrison capitulated and Carlow castle was back in royal control. Poynings's "long and paynefull lying at the siege" was over.
 |
| Sir Edward Poynings mops up the remaining FitzGerald troops on the other side of the castle... |
 |
| ...and pushes around to the gatehouse driving back some of FitzGerald's remaining galloglass. |
 |
Sir Edward Poynings clashes with Sir James FitzGerald in front of the castle gates. FitzGerald is defeated in a brief clash and Carlow Castle falls to Poynings and his small army.
|
So two victories to Stuart. One game being over all of a sudden due to my rash movement of Perkin Warbeck into all kinds of disaster in the streets of Exeter and the other being a very close game the result of which hung in the balance for its entirety. They were both so much fun. It is quite a lot of work setting up all the buildings for the city games but we always enjoy them and they have a very different feel to them. It was also great to see loads of the newly painted peasants on the table, they have opened up the potential for new scenarios and are really useful figures.
The Carlow game was exciting and the element of both of us being able to attack from different directions at different times really added to the decision making and dramatic tension. I will definitely try and use the rules about landing troops at different locations in other naval attack scenarios as they made the game a lot of fun. Sir Edward Poynings was involved in a naval blockade and siege of Sluys in 1492, aiding Maximilian I against the rebel Philip of Cleves, Lord of Ravenstein. This will certainly be an event we cover in the future using some of the same ideas from the Carlow game.


.jpg)
.jpg)
.jpg)


.jpg)


.jpg)


.jpg)
.jpg)
a.JPG)
b.jpg)
.jpg)


