
 |
It's been two gaming weekends in a row here with Stuart visiting this weekend. Having focused on the Scots a lot in our recent games we decided to play two scenarios following on from our "Assault on Bray" games of 2019,
http://camisado1500s.blogspot.com/2019/12/the-assault-on-bray-1523.html. We wanted to get Stuart's French and English armies on the tabletop and include his newly painted unit of landsknecht, https://stuartsworkbench.blogspot.com/2023/05/landsknecht-pike.html.
Hearing sounds in the darkness Captain Thomas Palmer and his men rode to investigate. The mounted archers flanked their captain, holding slightly back, whilst Palmer and his demi-lancers advanced into the night. Discovering a unit of mounted French archers Palmer charged his demi-lancers into them, driving them back, only for Palmer himself to be charged by one of the de Crequy family leading a force of gendarmes. His scouts had unwittingly advanced into an oncoming French relief force and the unfortunate Palmer was slain.
The noise caused by the fighting roused the English encamped before Montdidier. English and landsknecht troops headed towards the shouts and cries in the dark. Flushed with success the Lord of Pontdormy's brother led his men onwards towards the walls where he was caught off guard by some border horse and another unit of demi-lancers arriving to support the scout watch. Pontdormy's brother was unhorsed and killed by the English.
More English and Imperialist units arrived in front of the French relief force and a melee began with landsknecht pike and shot attempting to force the attackers back. The French routed the landsknecht whilst Pontdormy himself took on a group of English knights who had ridden into the fray. His gendarmes pushed through them allowing his less heavily armed men at arms and lancers to reach the town ditch. Here the French dropped off gunpowder and other supplies for Montdidier's garrison before disappearing into the night, their mission accomplished.
Spotting a small band of English cavalry riding along their walls, calling for them to come out and fight, the garrison of Saint-Quentin armed themselves and opened their gates. They issued out of the town and immediately began skirmishing with the English, pushing back their border horse and charging into the demi-lancers. The small English force was shocked by the fury of the garrison's attack and attempted to escape by riding back along the walls.
As the garrison's cavalry gave chase the English waiting in ambush saw their chance and emerged from hiding to cut off the French. The Burgundian heavy horse also lying in wait were more cautious and remained stationary. They would see how things went for their English allies before committing to the attack.
As the English ambushers bore down on them the pike armed infantry who had emerged from Saint-Quentin marched back inside seeking the safety of the town's walls. The town's cavalry were much further from the gate and could not get back inside the walls in time. Yes they had scattered the English horsemen who had initially taunted them, as they jeered and rode along the walls, but it was now the garrison's turn to panic.
The ambushing English demi-lancers and border horse reached the gate before the returning French cavalry. Seeing this the Burgundian heavy cavalry also sprung into action and charged into the panicked French horsemen. In a series of chaotic cavalry melee's Saint-Quentin's cavalry suffered a heavy defeat. The English had lost some of their cavalry but the ambush had worked and the town's garrison was dealt a severe blow.
These were two fast paced and action packed games with the cavalry style skirmishes being very different from the infantry battles and assaults that we have played recently. The night rules in the first game really changed the nature of that clash as well. It was a spectacular sight to see Stuart's French and English back in action on the table top and we did have a classic wargaming moment when his newly painted landsknecht completely routed after their first round of combat in our Montdidier game. The curse of new units still lives on!
As is always the case these games have given us lots of inspiration for future games and I think we will revisit this 1523 campaign for our next clash, focusing on what happened to Bourbon's ill fated landsknecht army that was meant to be linking up with Suffolk in 1523.
The Siege of Montdidier
The Summer of 1523 had seen Charles Brandon, Duke of Suffolk, land at Calais with an English army of around 9,000 men. Here they were joined in September by Imperial Allies under Floris van Egmont, the Count of Buren, in command of 500 Burgundian horse and 3,000 landsknecht. With the main French force occupied in the south the Anglo-Imperial force marched into France storming Bray, https://camisado1500s.blogspot.com/2019/12/the-assault-on-bray-1523.html, and forcing Roye to surrender. The highlight of the campaign for the English was the surrender of the French town of Montdidier. Following a bombardment by the English guns Montdidier's captain made terms on the 28 October, his garrison of 2,000 departing from the town. Prior to this surrender local French forces attempted to relieve the town as described in Hall's Chronicle:
"The lorde Pountdormy, or Pountreny hearyng Mountdedyer was besieged, called to him divers great lordes & capitaines to the nomber of. v. C. menne of armes and dimy launces, and a great nomber of fotemen, entendyn to bryng gunnepouder and other necessaries to the toune of Moutdedier, & as they were thither comyng by night, Thomas Palmer, capitin of the skout watche of thenglishe army them askried and skyrmished with them although they wer more in nomber: manfully fought the Frenchemen, but for all that they were compelled to flee backe and then Englishemen them folowed and slewe divers, and two speres were broken on the brother of lorde Pountdorny, but by the swyftnes of his horse he saved himselfe, and in this chase were C. prisoners taken whiche muche rejoysed the Englishmen."
Whether it was as large a skirmish as Hall describes is hard to tell. The Welsh soldier Ellis Gruffyd, in his account of the campaign, simply states "they came to Montdidier near which the English horsemen took some of the French horsemen prisoner". A further anonymous account from a journal of the campaign states that "upon Saynt Symond Daye and Jude Eve, before the ost ther was takyn l. men of armes, l. demylawnces and l. pages comyng to the towne with gonne powder, and ther was not one of them that eskaped, but the captayne, and yet he had ii. staves broken upon hym, but his horse was so good that he bare hym clere away".
Following the surrender of Montdidier the situation deteriorated for Suffolk and his Anglo-Imperial army. The main French war effort had been focused on the Duke of Bourbon who had betrayed his king, Francis I, and allied with Charles V. Bourbon's landsknecht had been defeated by Claude de Lorraine, Duke of Guise, and the treacherous Bourbon had been forced to withdraw. Learning of this Suffolk understood that he could not continue to campaign into the winter with the forces at his disposal. On the retreat Suffolk conducted raids into Santerre and Vermandois capturing Nesle and Bohain. Elis Gruffydd describes an event outside the gates of Saint-Quentin which occurred during the retreat:
"The host stayed in and around this place (Cateau Cambresis) and the next morning they marched towards the town of Saint Quentin which belongs to France, from which a certain number of men in harness emerged to skirmish with the Englishmen. The latter in order to begin the play rode along the wall of the city and past the bailies of the gate in order to entice them out to the field away from the town so that some of the English and Burgundian horsemen who were waiting in ambush to see what the French soldiers would do, whether come out of the town or not, could take them in the flank as they were coming past the town. This they would have done if there had been enough time for as soon as the horsemen of the rearward heard that some of the horsemen from the town had come out to skirmish and that the English archers were not able to stand against them they ran backwards fast which the French espied, and since they had not come far enough from the fortress for the Burgundians to break from their ambush and strike at them the plans of the Burgundians failed for which they blamed the Englishmen."
Henry VIII flew into a fury over Suffolk's withdrawal and ordered him to remain in the field. With the weather already becoming bitterly cold the army had begun to disband with troops seeking passage back to England via Antwerp, Nieuwpoort and Sluis. By December Suffolk had reached Calais from where he returned to England to face Henry's wrath. Luckily he was a favourite of Henry's as well as his brother-in-law and as such survived the debacle. He would be one of the principle commanders when Henry himself returned to France in the 1544 campaign.
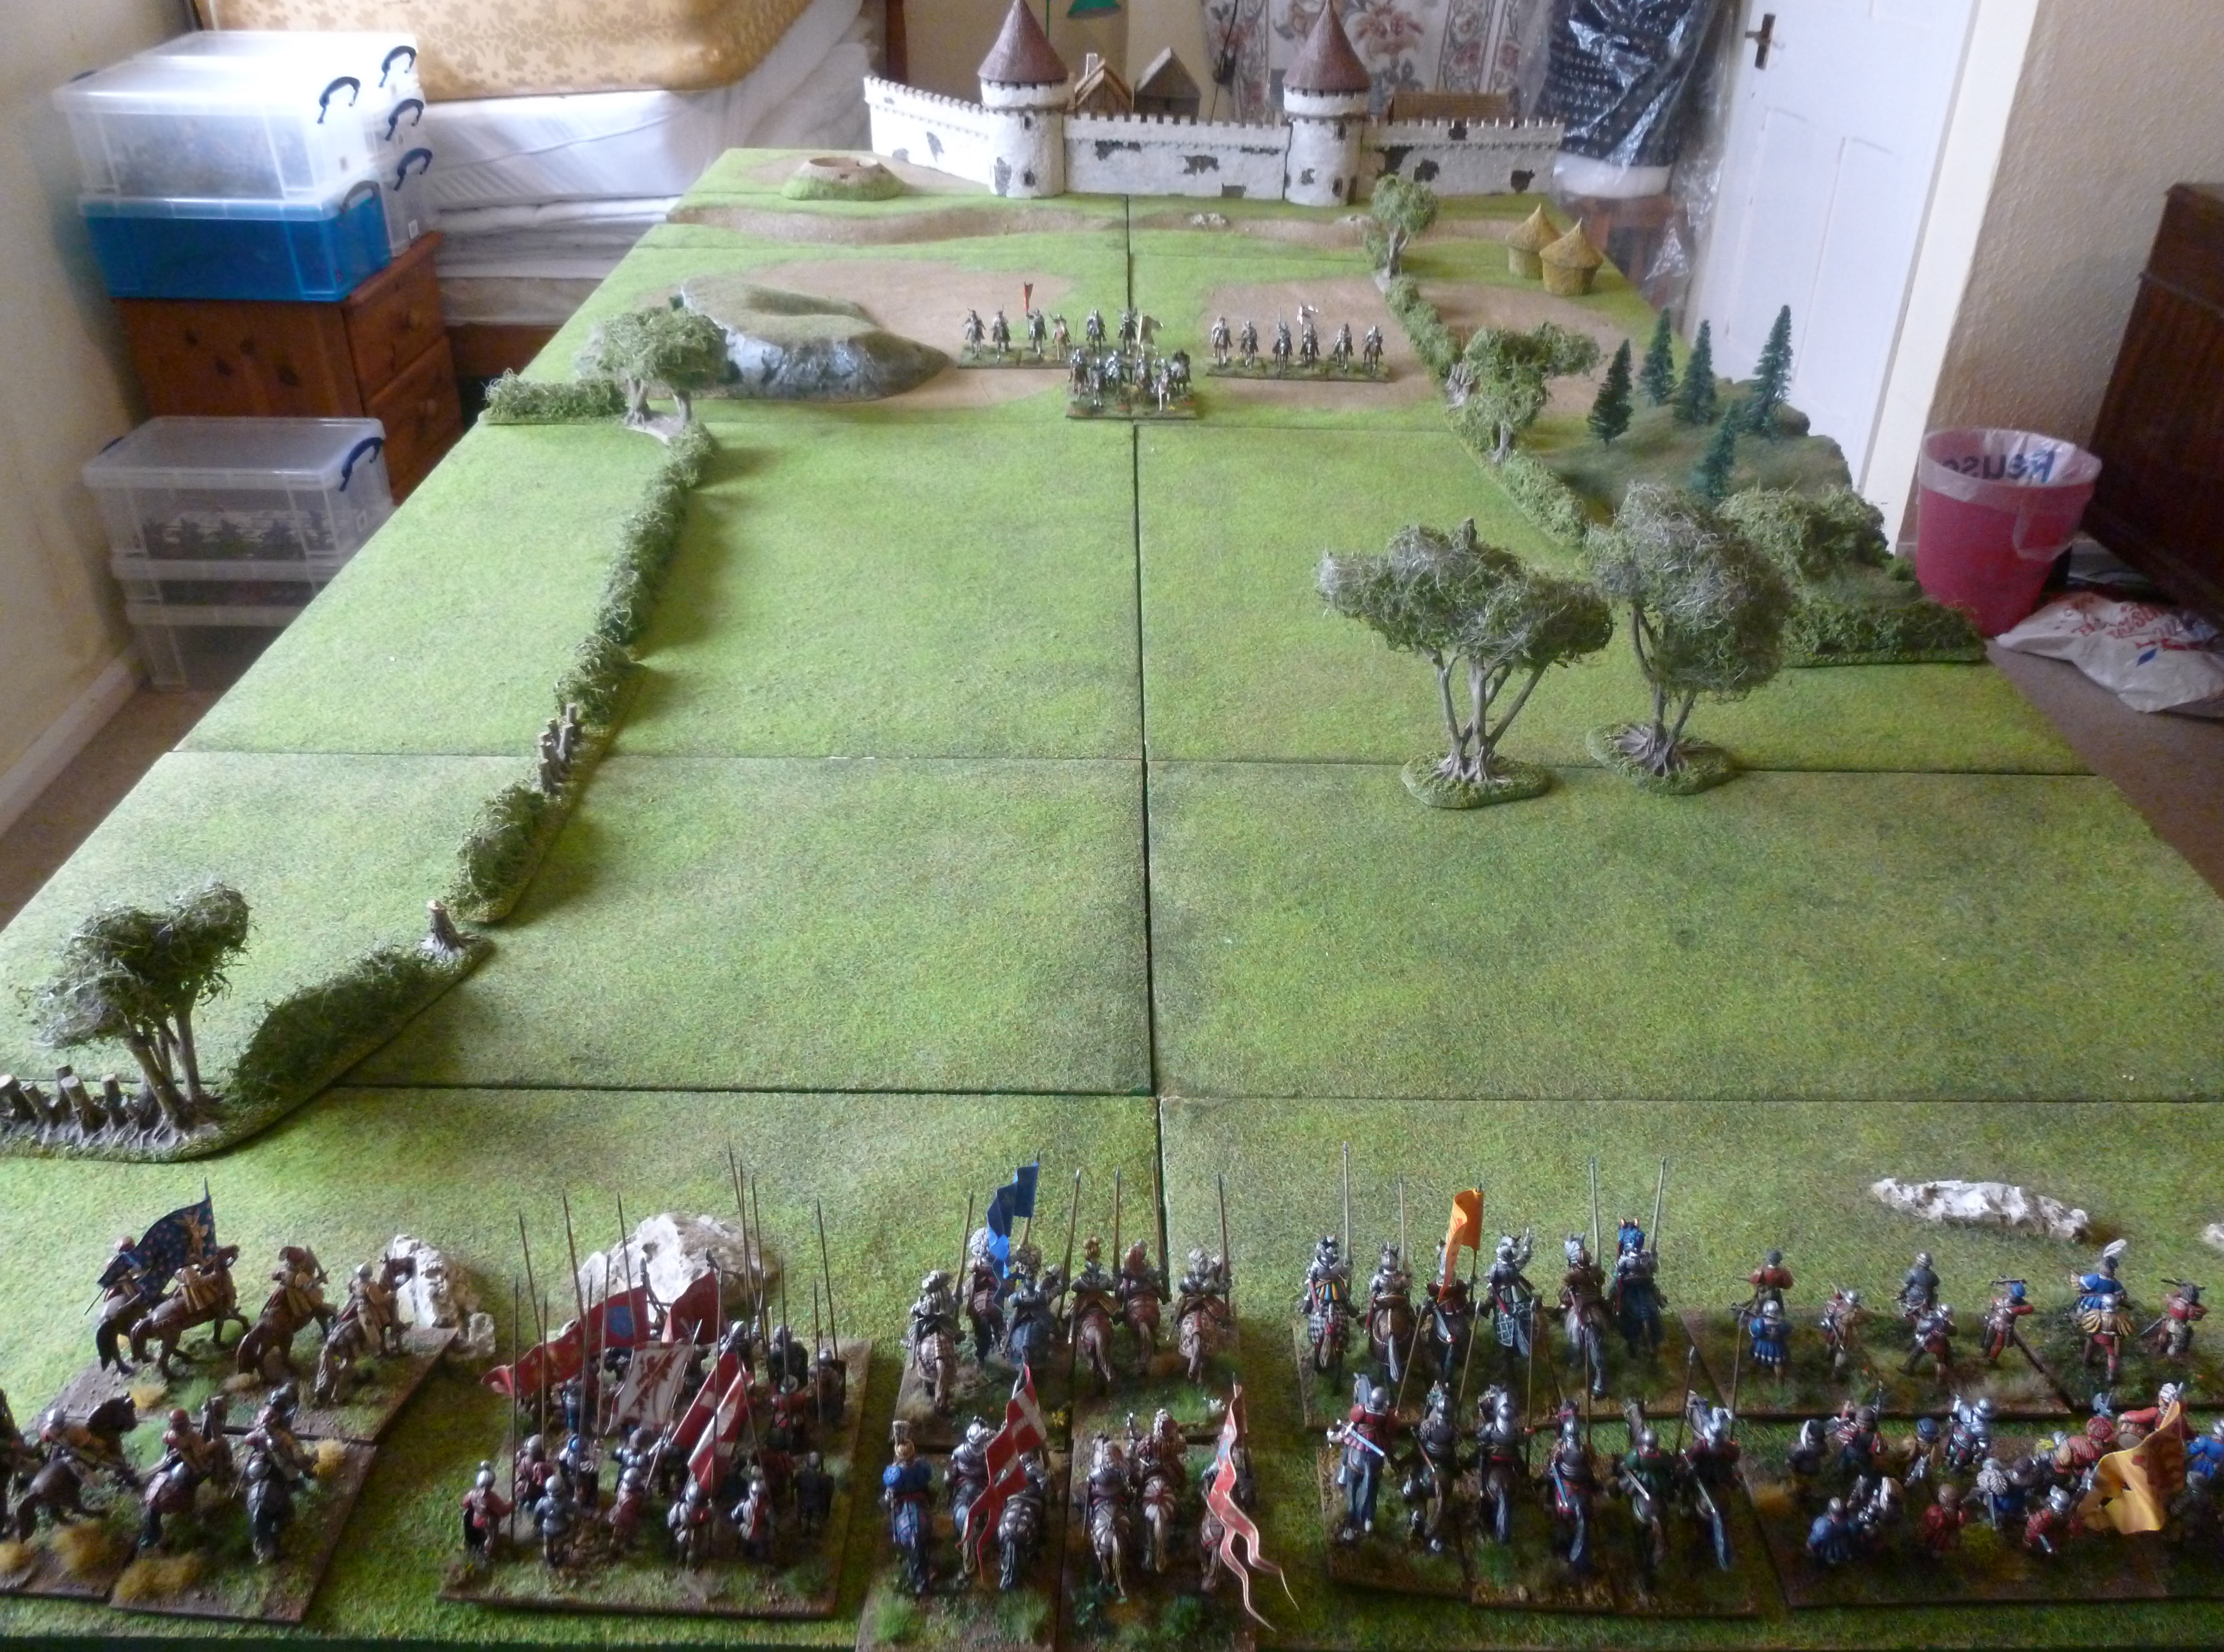 |
| The table set up - The walls of Montdidier are in the background with Thomas Palmer and the "skout watche of thenglishe army" in the centre of the table. In the foreground is the Lord of Pontdormy and the French relief force. |
 |
| Captain Thomas Palmer and the scout watch hear the French relief force heading towards Montdidier in the night. |
We played two scenarios based on the events described in the accounts above. As always both games were played using our Renaissance Rampant rules. Stuart took command of the English in both with myself captaining the French.
"entendyn to bryng gunnepouder and other necessaries to the toune of Moutdedier"
"entendyn to bryng gunnepouder and other necessaries to the toune of Moutdedier"
Our first scenario represented the Lord of Pontdormy's attempted relief of Montdidier and was played longways along the table with the French starting at one end and attempting to reach the ditch of Montdidier with the "gunnepouder and other necessaries". The English aim was to stop them.
Deployment
The French force deployed up to 6" from their table edge whilst Captain Thomas Palmer and his "skout watche" deployed in the centre of the table (see the full table photo above). The French took the first turn.
The turn after the first missile or combat clash between the French and the Scouts the rest of the English force could attempt to arrive from the English half of the table (this was from the ditch up to the middle of the table where the Scouts were initially deployed) however once the English player had decided a unit was arriving the side of the table they arrived from was randomly rolled for. This was to represent the chaos of more troops arriving from the English camp during the night attack.
The remainder of the English force could only enter the table via a move activation and could not shoot, attack or skirmish when first arriving.
Night Rules
As this attack took place at night the following rules applied.
All missile attack ranges were halved - modifiers applied at normal range however.
The range for adding the Retinue Leader's +1 modifier to morale checks was halved to 6".
Wild Charge distances were halved - although units could still charge their normal full move if they wished to.
Victory Conditions
Victory was based on victory points these being awarded as follows:
The Lord of Pontdormy's French relief force
2 Points for every unit that reached the ditch
1 Point for every unit that subsequently exited the table - from any side - once it had reached the ditch
3 Points if Captain Thomas Palmer was killed or routed
1 Point for every English unit killed or routed
Captain Thomas Palmer's "skout watche"
1 point for every French unit killed or routed
3 points it no French units reached the ditch
3 points if the Lord of Pontdormy was killed or routed
2 points if the Lord of Pontdormy's brother was killed or routed
The Forces
The Lord of Pontdormy's French relief force
1 Unit of Gendarmes (The Lord of Pontdormy Retinue Leader)
1 Unit of Gendarmes (The Lord of Pontdormy's brother, another member of the de Crequy family)
2 Units of Men at Arms
1 Unit of Ordonnance Archers Lance
1 Unit of Ordonnance Archers Bow
1 Unit of Franc Archer Foot
1 Unit of Picard Pike
1 Unit of Aventuriers
Captain Thomas Palmer's "skout watche"
The Scout force that started on the table:
1 Unit of Demi-lancers (Captain Thomas Palmer Retinue Leader)
2 Units of Mounted Archers
The English forces that could join after contact was made:
1 Unit of Landsknecht
1 Unit of Landsknecht Arquebusiers
1 Unit of Kings Spears
1 Unit of Shire Longbowmen
1 Unit of Border Horse
1 Unit of Demi-lancers
A brief description of the action follows and the photo captions are a good way to follow the game.
 |
| In the darkness the English mounted archers from the scout watch dismount, listening for any movement. |
 |
| Sensing danger in the dark Captain Thomas Palmer charges ahead and drives off a force of French mounted archers... |
 |
| ...only to then be caught himself by a force of Gendarmes under the Lord of Pontdormy's brother. Palmer is slain. |
 |
| Pontdormy's brother is then attacked by a force of border horse who have heard the disturbance from the English camp and ridden to the aid of the scout watch. |
 |
| More demi-lancers arrive from the English camp and Pontdormy's brother is killed in the cavalry battle. |
 |
| A view down the field as more English and Imperial units arrive and attempt to stop the French from reaching the walls of Montdidier. |
Hearing sounds in the darkness Captain Thomas Palmer and his men rode to investigate. The mounted archers flanked their captain, holding slightly back, whilst Palmer and his demi-lancers advanced into the night. Discovering a unit of mounted French archers Palmer charged his demi-lancers into them, driving them back, only for Palmer himself to be charged by one of the de Crequy family leading a force of gendarmes. His scouts had unwittingly advanced into an oncoming French relief force and the unfortunate Palmer was slain.
The noise caused by the fighting roused the English encamped before Montdidier. English and landsknecht troops headed towards the shouts and cries in the dark. Flushed with success the Lord of Pontdormy's brother led his men onwards towards the walls where he was caught off guard by some border horse and another unit of demi-lancers arriving to support the scout watch. Pontdormy's brother was unhorsed and killed by the English.
 |
| The main part of the French relief force under the Lord of Pontdormy, a member of the de Crequy family, are yet to engage... |
 |
| ...but a fight develops in the dark as the English and Imperialists block the path of the oncoming relief column. |
 |
| A force of Stradiots has joined the French as reinforcements. They combine with the French heavy cavalry to drive off some of the Count of Buren's landsknecht. |
 |
| Pontdormy has "staves broken upon hym" as he clashes with English knights but he manages to push through them... |
More English and Imperialist units arrived in front of the French relief force and a melee began with landsknecht pike and shot attempting to force the attackers back. The French routed the landsknecht whilst Pontdormy himself took on a group of English knights who had ridden into the fray. His gendarmes pushed through them allowing his less heavily armed men at arms and lancers to reach the town ditch. Here the French dropped off gunpowder and other supplies for Montdidier's garrison before disappearing into the night, their mission accomplished.
It was not such an easy escape for all of the French. Keen to seek revenge for the death of their captain the mounted archers of the scout watched tracked Pontdormy and captured him before he could make good his getaway. The French relief column had been followed by a unit of local militia infantry. Being abandoned by their cavalry these troops were also caught by the vengeful English archers and killed as they tried to flee.
 |
| ...some of the relief force reach the ditch of Montdidier and are able to drop off the "gunnepouder and other necessaries" they were carrying to supply Montdidier's garrison. |
 |
| The Lord of Pontdormy is not safe yet... |
 |
| ..he is pursued by some of the English archers who capture him before he can escape. |
 |
| The French horse have all ridden off after bringing supplies to the town. A force of local French levies has been left behind and is picked off by some of the English archers. The French have provided succour to Montdidier but it has not been without cost. |
 |
| The walls of Saint-Quentin with a Burgundian and English ambushing force waiting close to the town gate. The gate is visible in the top right of the photo whilst the English attempting to lure the garrison out will arrive from the table edge at the top of the photo. |
"in order to begin the play" the attempted ambush outside Saint-Quentin
We based our second game on Elis Gruffydd's account, quoted above, of the English and Burgundian attempt to lure the horsemen from Saint-Quentin and ambush them. This game was played along the walls of Saint-Quentin. A force of mounted English would attempt to draw the French garrison out of the town gate and into battle.
The walls of St Quentin with a gateway were set up along one long table edge. The only figures to start on the table were the ambushing force (see the photo above).
The English force attempting to tempt out the French would arrive from the other side of the table (the top of the photo above). The game started with them entering the table from this deployment area. They could enter via a move activation and could not shoot, attack or skirmish when first arriving.
Once at least one unit of this English force had entered the French could deploy from the gate. They could enter via a move activation and could not shoot, attack or skirmish when first arriving.
The English player could decide when to spring the ambushing force by activating one of the ambushing units. Once this was done the French player could gain victory points by re-entering the gates. If a French unit got close enough to the ambushing force to shoot at or attack it then the ambush was to have been considered spotted and thus sprung as well.
The French forces could only attempt to go back through the gate once the ambushing force had launched.
Victory Conditions
As with our first scenario this was based on victory points awarded as follows:
The French
2 Points for every unit of the English force attempting to tempt them out that was killed or routed. They got no points for killing units in the ambushing force
2 Points if the English Retinue Leader was killed or routed
1 Point for every unit that was out of the gate when the ambush was sprung that got back through the gate once the ambushing force was launched or spotted
The English
3 Points for every unit from the force attempting to tempt the French out that managed to move into base to base contact with the city gate
1 Point for every French unit killed or routed
The Forces
The English
The force riding along the walls:
1 Unit of Kings Spears (Retinue Leader)
1 Unit of Demi-lancers
1 Unit of Border Horse
2 Units of Mounted Archers
The Ambushing Force:
2 Units of Burgundian Men At Arms
1 Unit of Demi-lancers
1 Unit of Border Horse
1 Unit of Shire Archers
1 Unit of Landsknecht Pike
The Defenders of Saint-Quentin
2 Units of Gendarmes (One unit is the Retinue Leader)
2 Units of Men at Arms
2 Units of Ordonnance Archers Lance
1 Unit of Ordonnance Archers Bow
2 Units of Mounted Crossbowmen
1 Unit of Aventuriers
1 Unit of Picard Pike
 |
| Seeing a small force of English horse riding along the walls troops from the garrison of Saint-Quentin leave the safety of the town to attack the Englishmen. |
 |
| The small English cavalry force riding "along the wall of the city and past the bailies of the gate in order to entice them out to the field" . |
 |
| English border horse skirmish with French men at arms. |
 |
| English mounted archers prepare to dismount to support the border horse and mounted knights. |
 |
| The English border horse are defeated by much heavier armoured French gendarmes. |
Spotting a small band of English cavalry riding along their walls, calling for them to come out and fight, the garrison of Saint-Quentin armed themselves and opened their gates. They issued out of the town and immediately began skirmishing with the English, pushing back their border horse and charging into the demi-lancers. The small English force was shocked by the fury of the garrison's attack and attempted to escape by riding back along the walls.
As the garrison's cavalry gave chase the English waiting in ambush saw their chance and emerged from hiding to cut off the French. The Burgundian heavy horse also lying in wait were more cautious and remained stationary. They would see how things went for their English allies before committing to the attack.
 |
| Demi-lancers and men at arms clash outside the walls of Saint-Quentin. |
 |
| The mounted archers shoot into the French cavalry from the cover of a hedgerow. |
 |
| The English knights who had ridden along the walls "in order to begin the play" are driven back by the garrison's heavy cavalry... |
 |
| ...and defeated outside the walls of Saint-Quentin. |
 |
| Seeing the garrison distracted the English spring the ambush with demi-lancers and border horse charging the gate. |
 |
| The French infantry withdraw back inside the town but the garrison's horse are all still outside the gate... |
 |
| ...seeing this the demi-lancers and border horse race to the gate to prevent a French retreat to safety. |
 |
| A view of the table as the ambush is sprung. |
 |
| The Burgundians are yet to act - they want to see how the English do before committing to the fight. |
 |
| The garrison captain looks on in dismay as much of his cavalry are caught outside the walls. |
 |
| A force of mounted crossbowmen are defeated as they try to get back through the town gate. |
 |
| Sensing that the heaviest fighting is over the Burgundian heavy horse commit to the ambush and emerge from behind the trees. |
 |
| The gate is blocked by English demi-lancers. |
 |
| A series of cavalry clashes take place outside the gate. |
As the English ambushers bore down on them the pike armed infantry who had emerged from Saint-Quentin marched back inside seeking the safety of the town's walls. The town's cavalry were much further from the gate and could not get back inside the walls in time. Yes they had scattered the English horsemen who had initially taunted them, as they jeered and rode along the walls, but it was now the garrison's turn to panic.
The ambushing English demi-lancers and border horse reached the gate before the returning French cavalry. Seeing this the Burgundian heavy cavalry also sprung into action and charged into the panicked French horsemen. In a series of chaotic cavalry melee's Saint-Quentin's cavalry suffered a heavy defeat. The English had lost some of their cavalry but the ambush had worked and the town's garrison was dealt a severe blow.
 |
| The panicked French cavalry are trapped outside the walls and outnumbered. |
 |
| Even the Burgundian heavy cavalry have joined the fray. |
 |
| The Burgundians ride down the remaining French forces. |
 |
| The ambush has been a mixed success. The small English force that rode along the walls has been broken but most of the garrison's horsemen have been lured out of the town only to suffer defeat at the hands of the English and Burgundian cavalry lying in wait. |
These were two fast paced and action packed games with the cavalry style skirmishes being very different from the infantry battles and assaults that we have played recently. The night rules in the first game really changed the nature of that clash as well. It was a spectacular sight to see Stuart's French and English back in action on the table top and we did have a classic wargaming moment when his newly painted landsknecht completely routed after their first round of combat in our Montdidier game. The curse of new units still lives on!
As is always the case these games have given us lots of inspiration for future games and I think we will revisit this 1523 campaign for our next clash, focusing on what happened to Bourbon's ill fated landsknecht army that was meant to be linking up with Suffolk in 1523.
.JPG)


