
.JPG)
At the end of last month my friend Tom visited and we gamed a scenario set during the siege of Belgrade in the summer of 1521. It turned out to be quite a clash as the tide of battle swung back and forth before the walls of the city.
The Siege of Belgrade, 1521
When the Ottoman Sultan, Suleiman the Magnificent, and his army headed west in May 1521 it seemed unlikely that Belgrade was the target. The new and inexperienced Sultan probably had a deep strike into Hungary in mind whilst his more experienced advisers explained to him that the key fortresses on the Kingdom's southern borders would first need to be taken. When the Ottoman host had assembled at Sofia, Hain Ahmed Pasha, the beylerbey of Rumelia, argued for an attack on Šabac whilst the grand vezir, Piri Mehmed Pasha, argued for an attempt to take Belgrade. A compromise was reached with Hain Ahmed Pasha, followed by the Sultan, heading for Šabac with the Rumelian contingent and Piri Mehmed Pasha taking a force of janissaries and irregular troops to blockade Belgrade. At the same time forces of akinji also crossed the border at different points to disrupt the Hungarian defence. This had the desired effect and the Hungarian King Louis II's forces were stretched, his situation being worsened by a lack of funds.
On 3 July 1521 the first Ottomans arrived outside Belgrade whilst days later Hain Ahmed Pasha's forces took the castle of Šabac, possibly during the first assault. Belgrade was under the command of two Bans (the Hungarian title for the military governors of the Kingdom's outlying territories) Ferenc Hédervári and Bálint Török, but they did not have a surrounding territory from which to raise troops to defend the city. This was a different situation from the famous 1456 siege when János Hunyadi had been in control of the entire border. Following disputes over the payment of troops the two Bans attempted to reach Belgrade but were prevented from doing so by the Ottoman blockade. This left Belgrade in command of two deputy Bans, Balázs Oláh and Mihály Móré, with a force of under 1,000 veteran troops who were reported as being low on gunpowder and supplies.
Having taken Šabac Suleiman told Piri Mehmed Pasha to abandon the blockade of Belgrade and rejoin the main army but the grand vezir ignored this command. Instead he ordered his forces to assault and storm the nearby castle of Zemun, garrisoned by around 350 men. This prevented the Hungarians from using it as a base to relieve Belgrade or disrupt Ottoman progress. Again the Sultan ordered the grand vezir to rejoin the main Ottoman army but Suleiman's plans were suddenly changed when his camp was put at risk by the flooding of the Sava river. It seems rather than taking Šabac or Belgrade the Sultan's true objective may have been to provoke the Hungarian King Louis II into sending a relief force which he could defeat in battle. This would explain why Suleiman was keen for Piri Mehmed Pasha to abandon Belgrade and rejoin the main army. Louis II, who turned 15 on 1 July 1521, had left Buda in mid July but was struggling to raise sufficient troops due to his dire financial situation and lack of experience. When it became clear to Suleiman that the Hungarians were not about to send a relief army he led the main Ottoman force to Belgrade, arriving on 1 August.
Belgrade was bombarded from both the river and land sides. Attempts were made to undermine the walls but these were stopped by the countermining of the defenders. Initially the garrison had been successful in sallying out of the city to attack the Ottoman guns. During one of these sorties they captured a large Ottoman gun that was drawn by 30 horses. The arrival of the main Ottoman army and the Sultan in August changed the situation but despite numerous assaults the Ottomans were unable to breach the defences. Piri Mehmed Pasha and the troops of Mustafa Pasha, sanjak of Bosnia, held the landward sides accompanied by large numbers of janissaries whilst Hain Ahmed Pasha, now returned from his success at Šabac, and the Sultan were located closer to Zemun. To aid the communication between the Ottoman contingents a pontoon bridge was built across the Sava.
On the 8 August an assault was launched on the city from three sides. The walls had been breached in numerous places whilst the flooding of the Sava and Danube rivers had decreased to such an extent that the Ottoman troops could cross on boats and then position themselves on the river banks beneath the city walls. This attack on the riverbanks allowed the Ottomans to successfully storm the breaches in the wall along the Sava whilst the janissaries took the eastern and south-eastern gates. The city fell leaving only the fortress to the defenders and retreating Serbs.
As they moved into the city the Ottomans built new gun batteries facing the citadel. Cannon were hauled up into the tower of a Franciscan church that was of a similar height to the fortress. At the same time new mines were dug under the citadel's towers in an attempt to topple them. Despite these efforts assaults on 16 and 26 August were successfully repelled. On 27 August a mine brought down the "Nebojsa tower" which critically weakened the citadel and an immediate assault was launched which left 72 defenders under the leadership of deputy ban Balázs Oláh who was suffering from an arrow wound. On 28 August Oláh and his surviving men surrendered, initially being cared for and their lives spared. It seems Oláh was later murdered under the instructions of one of the regional commanders, Malkoçoğlu Bali Bey, with whom there may have been scores to settle. The raids and counter raids of this era led to complicated loyalties and connections between the commanders of the opposing sides. The surviving Serbian population of Belgrade were rehomed in Istanbul whilst, having garrisoned the city, Suleiman led his main army back to his capital on 18 September 1521. Suleiman would of course return to his western border with even greater consequences in the coming years.
 |
| Near contemporary image of the Siege of Belgrade in 1521 showing Ottoman rowing boats controlling the Sava and Danube rivers. |
 |
| Another very similar depiction of the 1521 Siege of Belgrade from the first half of the 16th Century. |
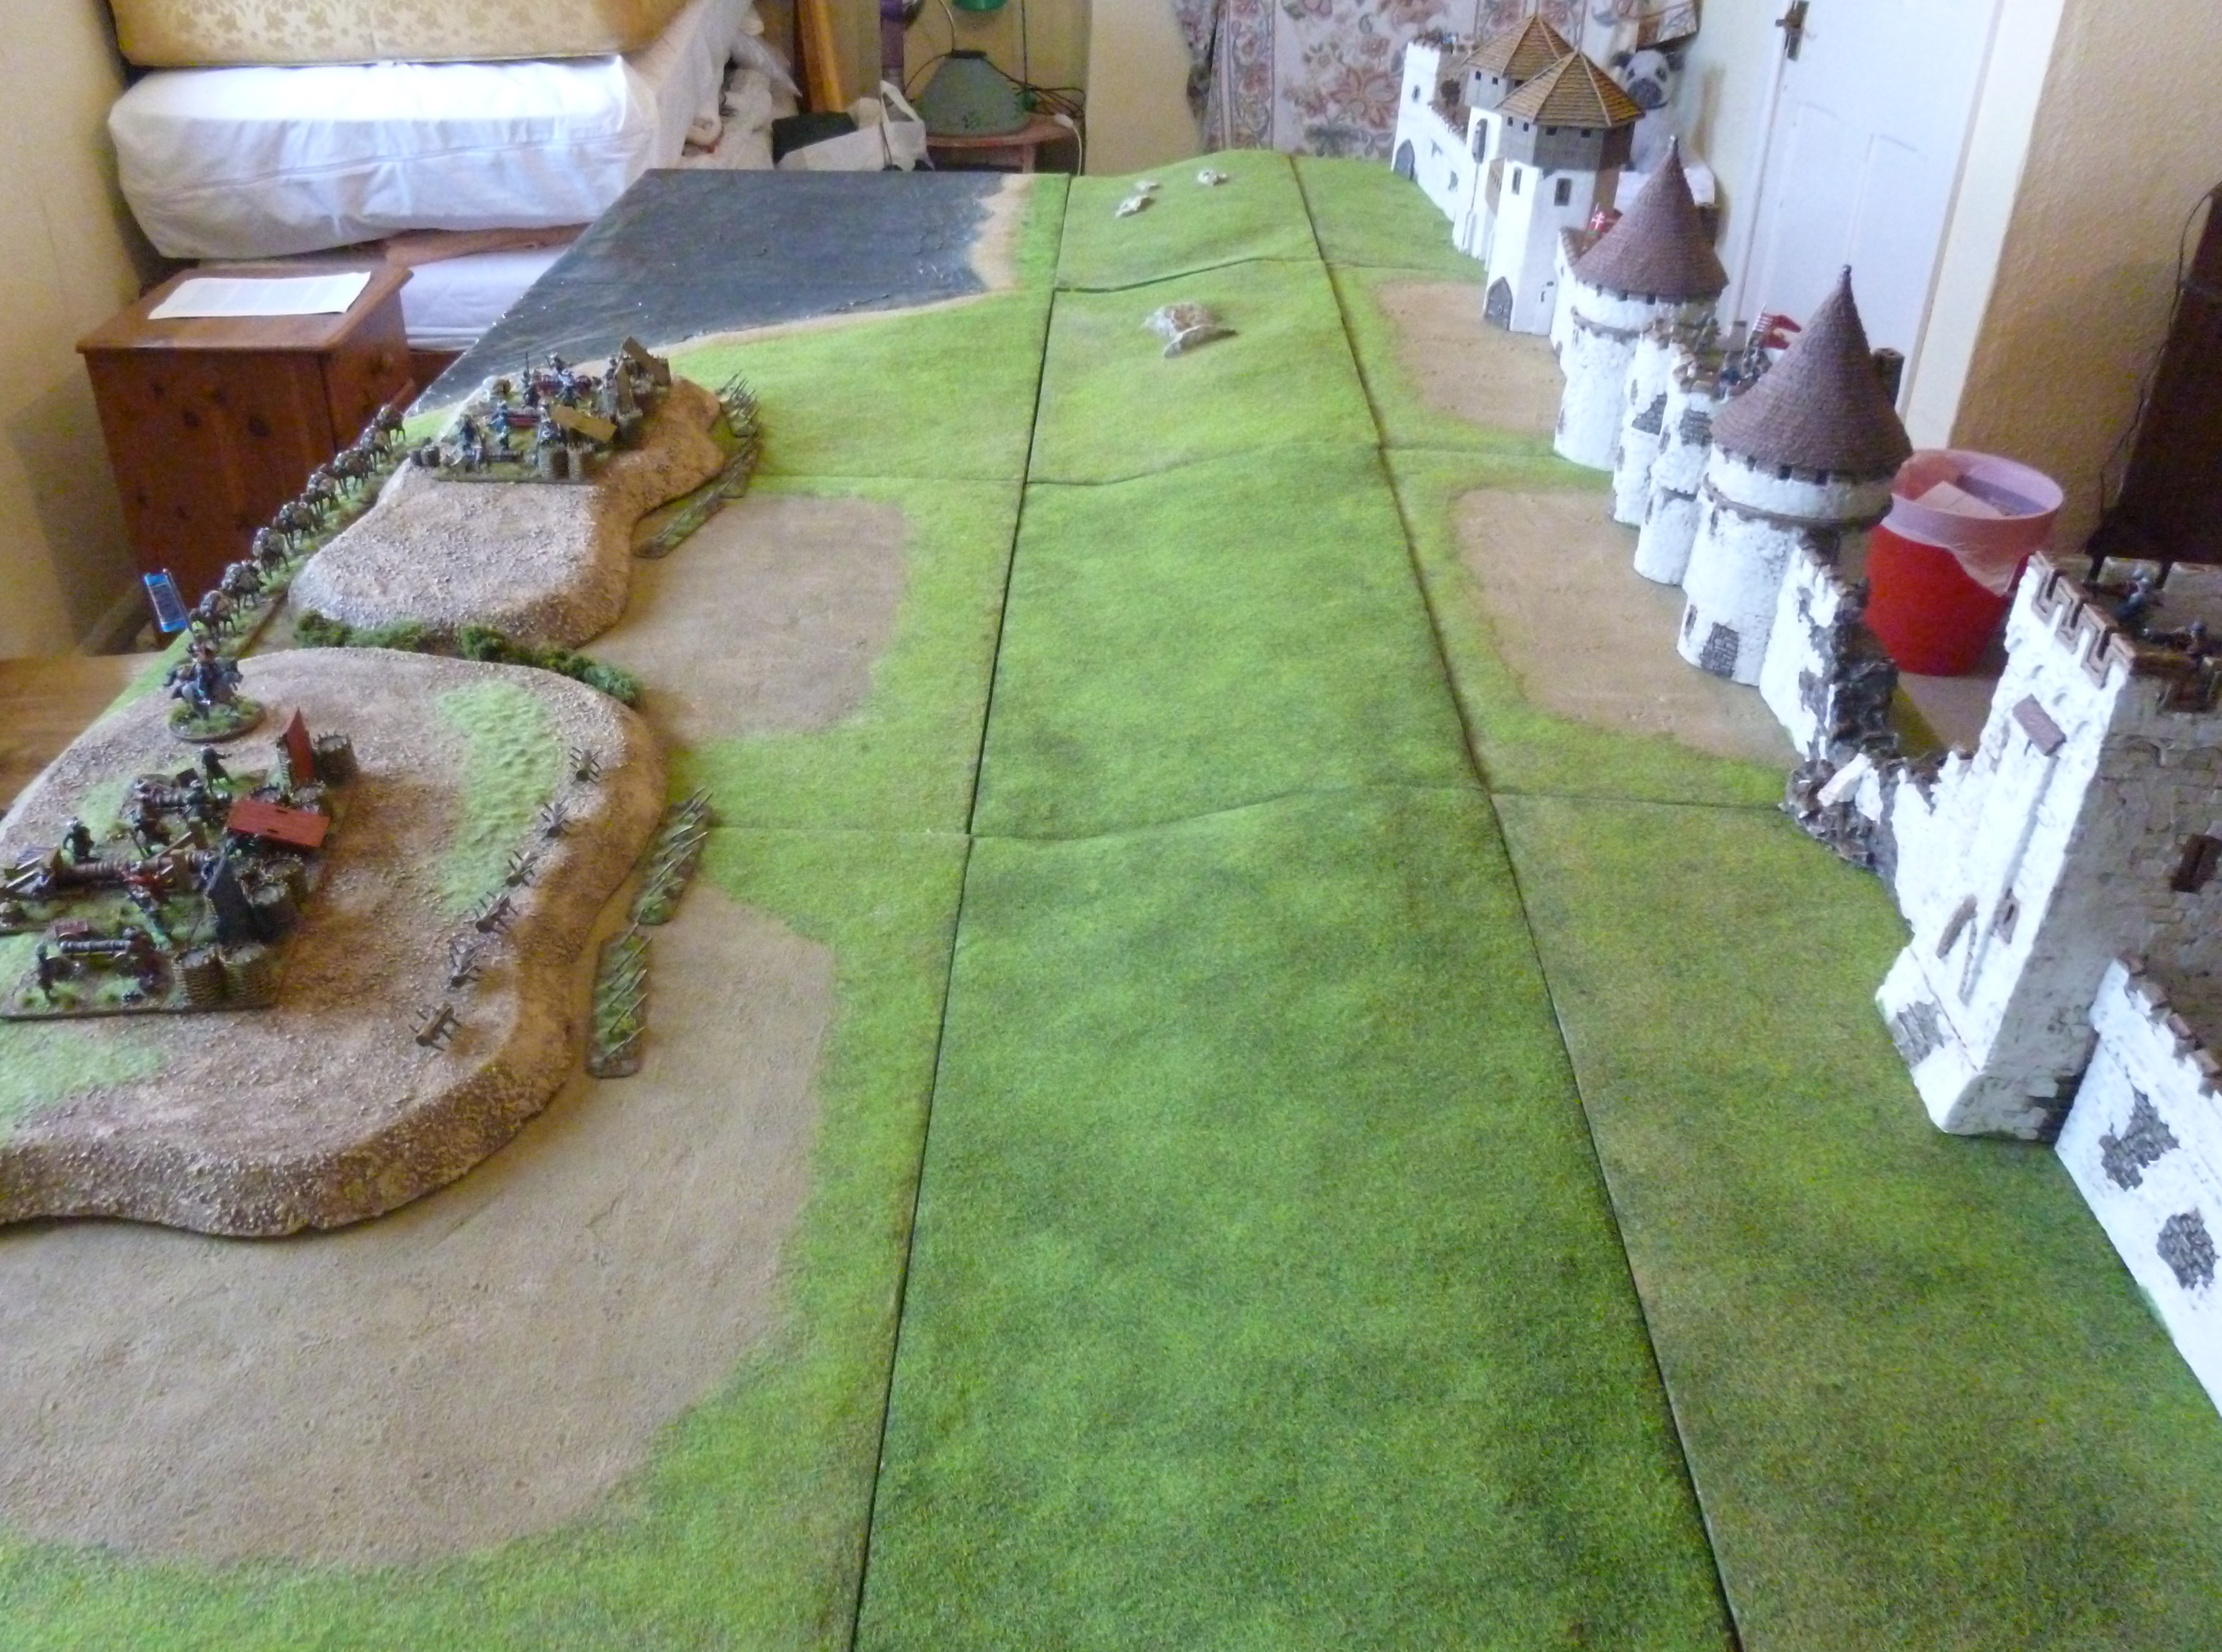 |
| A view of the table. The defending Hungarians can emerge from the two sally ports, which can be seen in the towers at the top right of the photo, and the main gate which is between the two round tiled towers on the right. The two Ottoman gun batteries can be seen on the left along with a section of the river at the top left. |
Scenario
The game was set after grand vezir, Piri Mehmed Pasha, had arrived at Belgrade but before the arrival of the Sultan and Hain Ahmed Pasha and centered around a sally from the defenders as they attempted to destroy two of the gun batteries of Piri Mehmed Pasha. The aim of the Hungarian defenders was to destroy the gun batteries whilst the Ottomans could counter attack the sally and try to storm the walls and plant their flags on them.
As normal we used our adapted Lion Rampant rules for the game. Each army was comprised of two retinues, which could act independently.
As normal we used our adapted Lion Rampant rules for the game. Each army was comprised of two retinues, which could act independently.
Deployment
Hungarian defenders
The Hungarian defenders started the game by issuing out of the town walls. Their forces arrived via move activations from the main gate or from either of the two sally ports (see the photo above). Before the start of the game the Hungarian player wrote down which of his units would arrive from which of the gates. The units then had to arrive from that gate when activated.
The Hungarian defenders could only arrive via move activations, they could not skirmish, attack or shoot on their first turn.
Ottomans
At the start of the game the gun batteries were be deployed as objectives (see the photo above) and the Ottoman player could place 2 other units on the table as defenders of the gun positions. Most of the Ottoman force would arrive from behind the gun batteries but some units would land in boats from the river. At the start of the game the Ottoman player wrote down which units would arrive via boat, up to 3 units could be carried in each of the two boats that would land. At least one unit had to be placed in each of the boats, so from 2 to 6 Ottoman units could arrive from the river.
The units arriving from land could only arrive via move activations, they could not skirmish, attack or shoot on their first turn. No Ottoman units could arrive until at least one Hungarian unit had moved from the walls.
To bring the boats on the Ottoman player had to roll a 5-6 on a D6 at the start of their turn. He could choose to bring them both on together or separately declaring if he was rolling for both or for only one arrival before he made the roll. If a 5-6 was rolled the boat(s) were placed on the board. The following turn the boat(s) could land anywhere on the shore and the units within could attempt any activation they were capable of out of the boat(s) - moving, shooting, skirmishing or attacking. If a unit activating from a boat failed its activation it was placed on the shore and that retinue's turn ended. The two boats could land at different points of the shore.
The guns of Belgrade and the Ottoman besiegers
Both sides in the game had support from either the cannon in their towers in the case of the defenders or from their gun batteries in the case of the Ottoman attackers. Both players started the game with 5 playing cards. Every turn each played a card and the player who played the highest would get artillery support. The player placed a template and decided where he wanted the shot to land. This could be anywhere on the board. He then rolled a scatter dice and 2D6. The shot deviated by that amount and the template was then placed. Any unit with a base under the template took a 6 dice attack hitting on 5+ with a minus one to armour. Units in the boats that had not yet landed could not be hit. We would then replace the played cards and take another to add to our remaining 4 cards ready for the next round. When the deck ran out all cards were replaced and a new 5 cards taken.
Destroying the Ottoman gun batteries
To destroy a gun battery the Hungarians had to have at least one base from a unit in contact with it at the start of their activation phase. As an ordered activation, they could use that unit to try to destroy the objective (instead of Moving, Attacking, or Shooting). If there were 7 or more models in the unit the battery was destroyed on a roll of 8+ on 2D6; if there were 6 or fewer models in the unit the battery was destroyed on a roll of 9+ on 2D6.
Storming the Walls
The Ottoman player could give 4 of his units ladders to assault the walls. Units within boats could be given ladders but the 2 units that started on the table as guards could not be given ladders. The ladders were placed by the units to represent this. The units carrying ladders could move, shoot and attack as normal. If the unit was broken or destroyed it would loose the ladder. To pick up the ladder an Ottoman unit needed to move into contact with it and next turn it was considered to be carrying the ladder. Hungarian units could not pick up the ladders.
The Ottoman units carrying ladders could storm the walls to plant the Crescent flag of the Ottomans! They did this by moving into contact with the walls. They could not storm the towers. On the following turn a successful attack activation by the unit would mean they had stormed the walls with ladders but the unit then had to roll a D6. On a 1-2 the unit took D6 casualties in the attack. On a 3-4 D3 casualties and on a 5-6 no casualties. The unit could then act as normal but could not place another flag on the walls. Once a ladder had been used to storm the walls it could not be reused.
The breach could also be stormed in exactly the same way although any unit could storm the breach, a ladder was not required. Only one unit could successfully take the breach and if it did so the result was the same as if a flag were planted on the walls.
Victory
Victory was based on victory points at the end of the game. Once all retinues had lost half their points or over or if all the retinue leaders of both sides were killed or routed the game would end.
The victory points were awarded as follows:
Hungarians:
1 point for every enemy unit killed or routed.
5 points for each of the gun batteries destroyed.
3 points if Piri Mehmed Pasha was killed or routed.
2 points if Mustafa Pasha was killed or routed.
Ottomans:
1 point for every enemy unit killed or routed.
2 points for every flag planted on the walls or if the breach was stormed.
3 points if Balázs Oláh was killed or routed.
2 points if Mihály Móré was killed or routed.
 |
| The Ottoman gun battery that has managed to breach the walls of Belgrade is protected by a unit of janissary handgunners... |
 |
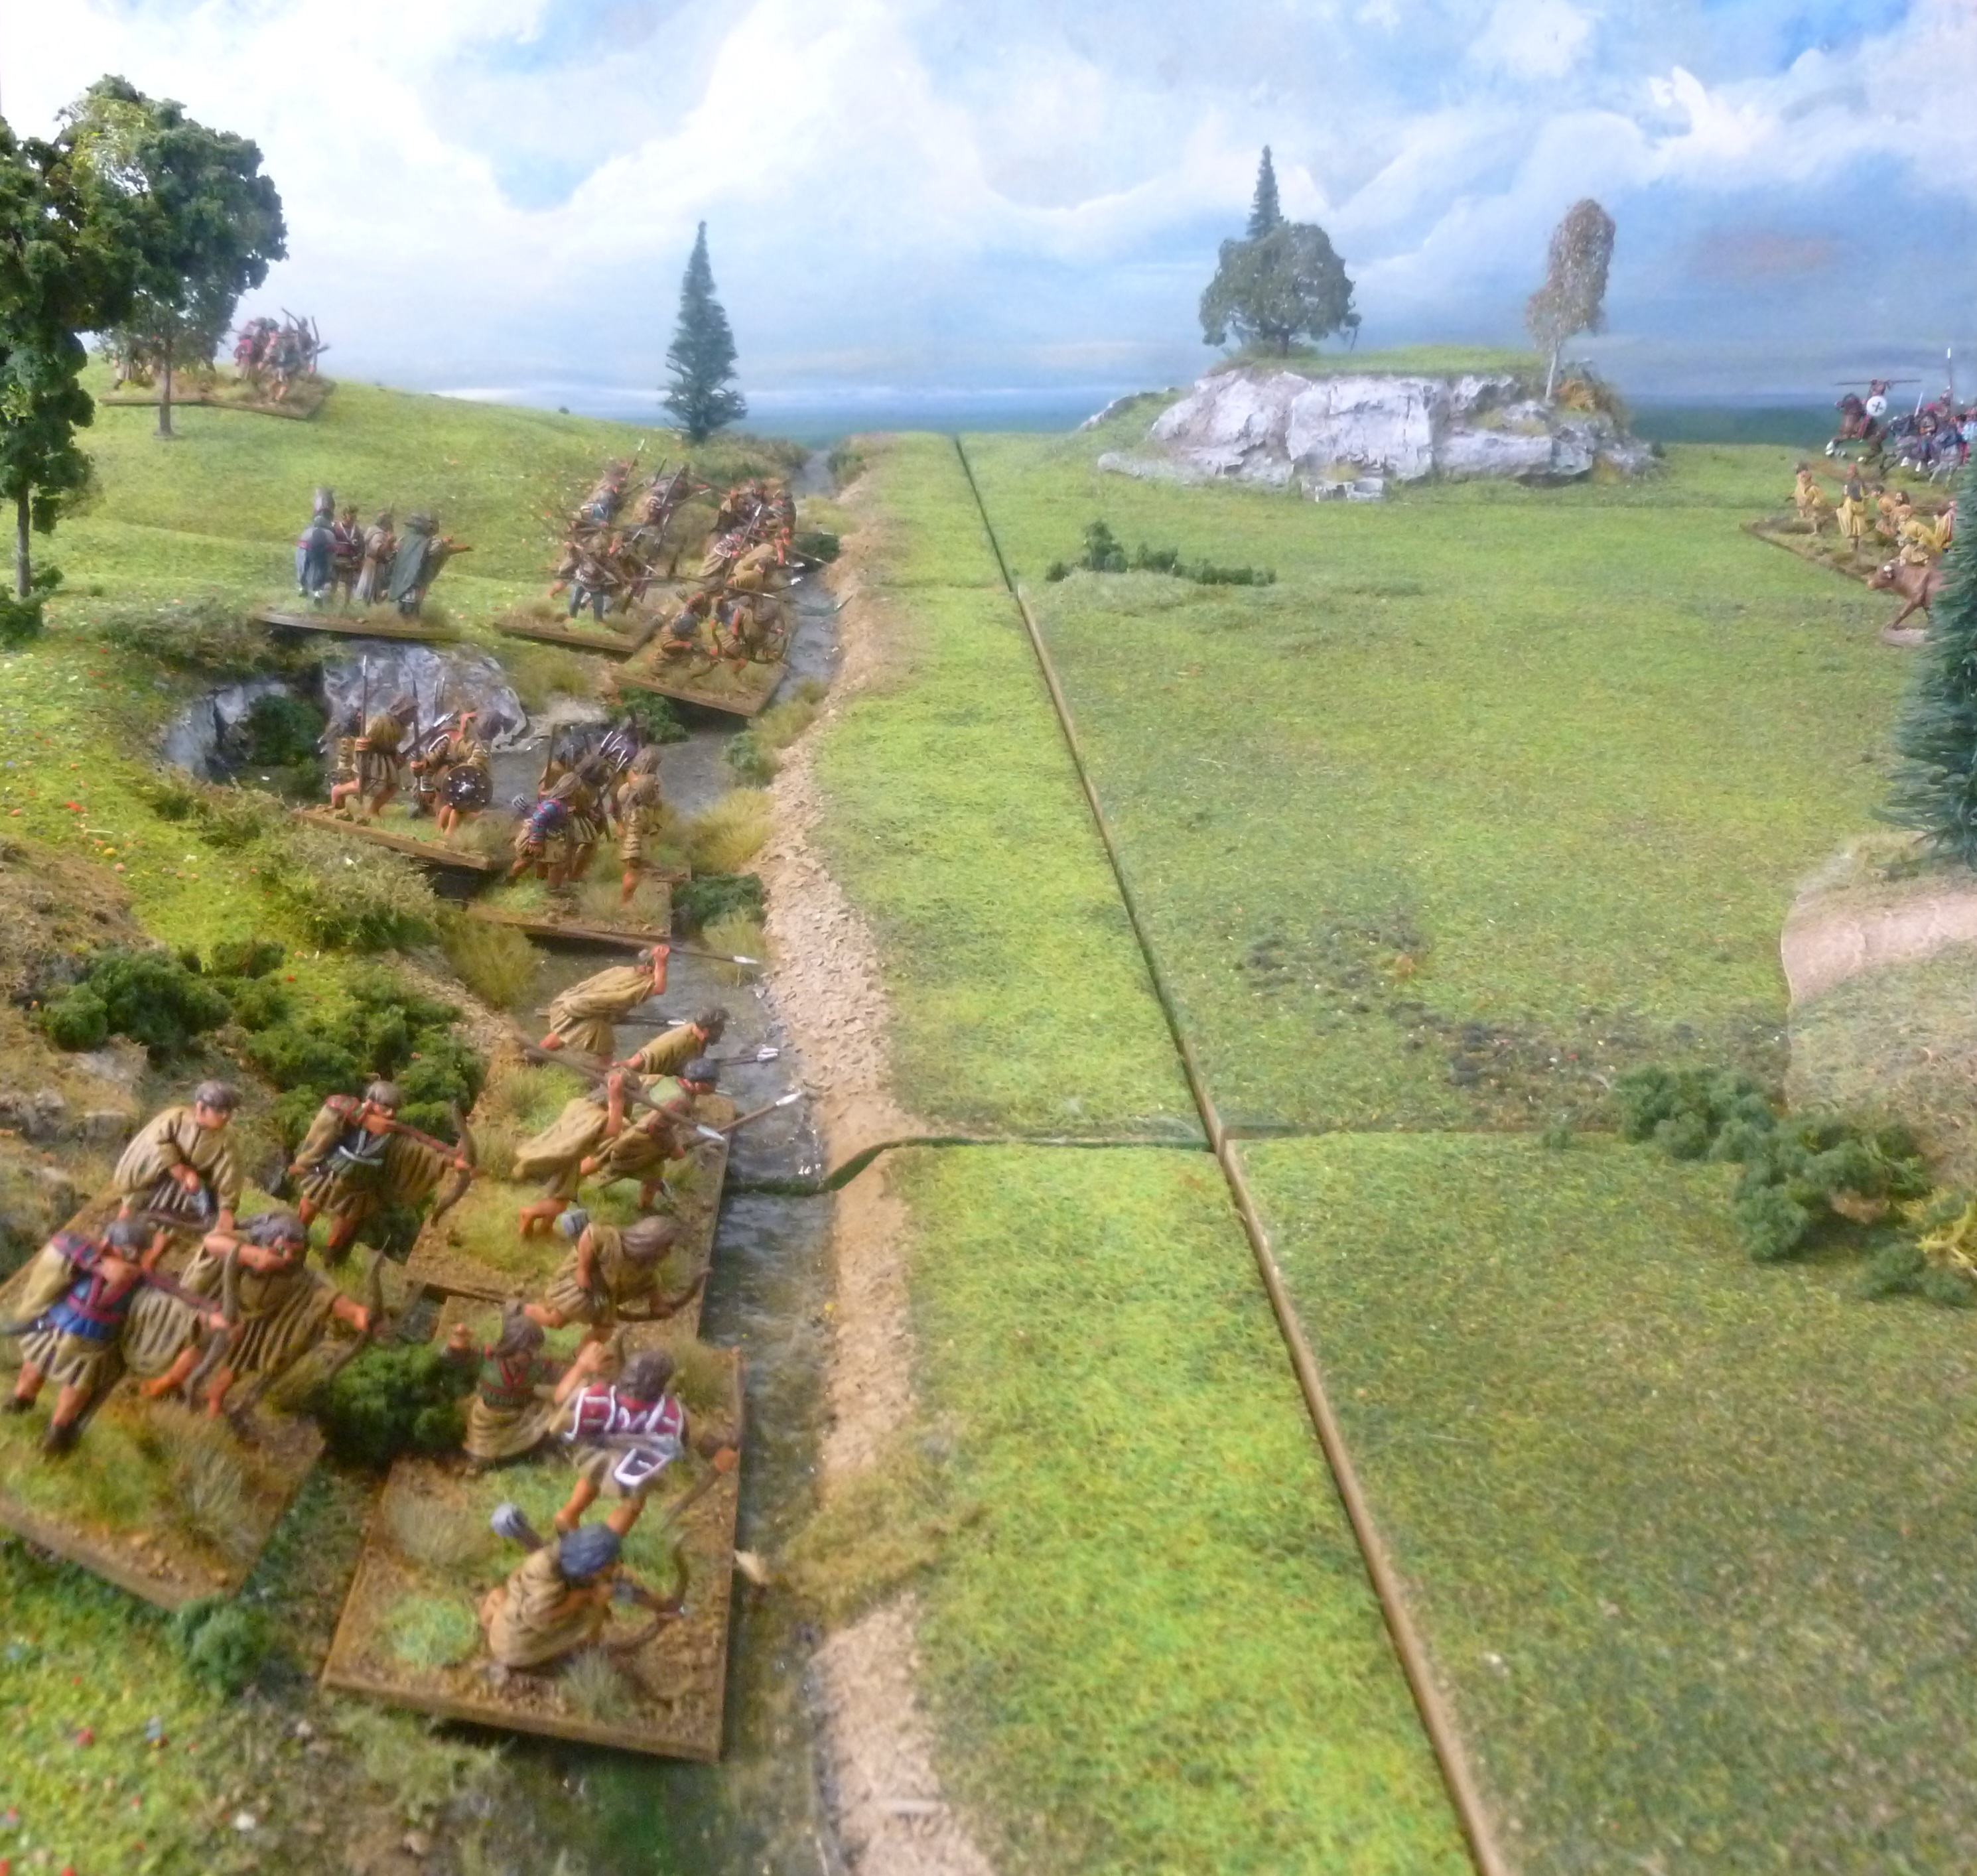
| ...whilst the Ottoman battery on the river bank is protected by a unit of janissary archers. |
The Armies
Tom chose to command the defenders of Belgrade under Balázs Oláh and Mihály Móré and I took command of the Ottoman janissaries and irregulars under grand vezir, Piri Mehmed Pasha and the Sanjak of Bosnia, Mustafa Pasha.
Tom chose to command the defenders of Belgrade under Balázs Oláh and Mihály Móré and I took command of the Ottoman janissaries and irregulars under grand vezir, Piri Mehmed Pasha and the Sanjak of Bosnia, Mustafa Pasha.
The Ottomans
Grand Vezir, Piri Mehmed Pasha
1 Ottoman Captain (Piri Mehmed Pasha - retinue leader, same rules as the Janissary Agha)
3 Units of Zirhli Nefer
1 Unit of Janissary Arquebusiers
2 Units of Janissary Infantry
3 Units of Janissary Archers
Sanjak of Bosnia, Mustafa Pasha
1 Ottoman Captain (Mustafa Pasha - retinue leader, same rules as the Janissary Agha)
1 Unit of Janissary Archers
2 Units of Janissary Infantry
1 Unit of Voynuks
3 Units of Azab Archers
1 Unit of Azab Handgunners
4 Units of Azabs
The defenders of Belgrade
Balázs Oláh
1 Unit of Foot Knights (Balázs Oláh -retinue leader)
1 Unit of Foot Knights
2 Units of Pavise/Arquebus Infantry
1 Unit of Levy Pike
1 Unit of Crossbowmen
3 Units of Halberdiers
Mihály Móré
1 Unit of Foot Knights (Mihály Móré -retinue leader)
1 Unit of Serbian Heavy Infantry (same as Voynuks)
2 Units of Pavise/Crossbow Infantry
1 Unit of Arquebusiers
2 Units of Hussars
1 Unit of Halberdiers
1 Unit of Levy Pike
A brief account of the game follows but the captions under the photos are also an ideal way to follow the action.
 |
| The gates of Belgrade open and Balázs Oláh leads the garrison in an assault on the Ottoman siege works. |
 |
| More of the garrison emerge from a postern gate. |
 |
| Within minutes a large force has emerged from within Belgrade's walls and is heading towards the Ottoman guns. |
.jpg) |
| Pikemen and a handful of dismounted men at arms from the garrison join the attack. |
.jpg) |
| The besieging Ottomans are caught off guard as the defenders sally forth! |
 |
| A view of the table showing the extent of the Hungarian sally. |
 |
| As the guns from the Ottoman siege works and the walls of Belgrade begin to fire more Ottomans are drawn from their camp to defend their gun batteries from the Hungarians. |
 |
| Balázs Oláh leads the garrison towards the Ottoman siege works. |
To the sound of drums the city gates opened and Balázs Oláh led out his small but determined garrison. Two of the postern gates in nearby towers also swung open and yet more troops emerged. They quickly formed up and began descending the slopes heading straight for the siege lines of Piri Mehmed Pasha. The Ottomans in the siege lines opposite were taken completely off guard and reinforcements were slow to arrive. Whilst the guns in the earthworks opened fire and brought down some of the advancing garrison it looked as if the garrison's sortie would be able to quickly overwhelm the Turkish troops in front of them.
Before any help could arrive the janissaries guarding the gun battery on the river bank were put to flight and a troop of the garrison's hussars charged at the battery driving back a force of azab handgunners. The hussars hacked through the siegeworks and managed to attack one of the Ottoman commanders, Mustafa Pasha, sanjak of Bosnia. Mustafa Pasha survived the melee but he had seen enough, he fled the oncoming Hungarians and Belgrade's garrison cheered as they saw his banner disappearing back into the Ottoman camp.
.jpg) |
| The garrison of Belgrade have emerged from the city with banners flying and drums beating. |
 |
| Janissaries rush to defend the guns but also sense this may be a chance to attack the walls at the same time. |
 |
| The two sides are ready to clash. |
 |
| The first melee takes place when a unit of hussars charges down some Ottoman handgunners... |
 |
| ...the handgunners are put to flight and the hussars then engage with the Sanjak of Bosnia, Mustafa Pasha. |
 |
| Mustafa Pasha flees from the battle, an early blow to the morale of the Ottomans. |
.jpg) |
| The garrison quickly defeat the Ottoman defenders of the gun battery on the river bank. |
.jpg) |
| Further along the walls of Belgrade Piri Mehmed Pasha has commanded a force of janissaries to attack the walls and the breach. |
With few men to defend it the gun battery on the river bank was doomed. Halberdiers from the garrison charged the guns, taking a few casualties in the process. The smaller Ottoman guns were quickly manhandled back into the walls of Belgrade, along with any powder or shot that could be found, whilst the larger pieces were spiked and damaged.
Whilst this was taking place along the river further up the walls it was clear the Ottomans had launched a counter attack. Armoured janissaries, the zirhli nefer, rushed forward from Piri Mehmed Pasha's camp, and were followed by more janissaries carrying scaling ladders. They were aiming for a breach in the walls caused by the guns of the second Ottoman battery over the last few days. Seeing this threat develop Balázs Oláh ordered his men to intercept them. A fierce battle developed in front of the breach as the janissaries clashed with hussars, heavily armoured Serbian troops and pikemen.
 |
| A view along the Ottoman siege lines. |
.jpg) |
| The Ottoman gun battery on the river bank is stormed... |
.jpg) |
| ...and the guns captured or spiked. |
 |
| Under the watchful eyes of grand vezir Piri Mehmed Pasha more janissaries rush to the fighting. |
 |
| Hussars and armoured zirhli nefer clash outside the walls... |
 |
| ...whilst heavily armoured Serbs from the garrison also join the melee. |
 |
| Patrolling Ottoman troops arrive from the Sava. |
A patrolling Ottoman riverboat landed its crew to aid in the fight but this had little effect. The sallying garrison simply swept them aside. Around the breach the Ottomans had more success with the armoured janissaries storming into the breach whilst their comrades scaled the walls with ladders making it onto the city's ramparts. Many janissaries were slain in the fighting but their flags waved from the battlements providing a morale boost for the besieging troops.
The success of the janissaries was short lived as the counter attack had been too weak to really press home any advantage. They were quickly forced back from the breach and the ramparts whilst outside the walls Balázs Oláh and Mihály Móré organised the sallying troops behind a solid wall of pavises. This wall then advanced and pushed back attacks launched by the janissaries and the grand vezir's voynuk auxialiaries.
 |
| With Belgrade's garrison distracted by their sally the janissaries make a rush for the breach... |
.jpg) |
| ...under both of the garrison captains, Balázs Oláh and Mihály Móré, the garrison wheel around and attempt to stop the janissaries... |
.jpg) |
| ...but some of the armoured janissaries successfully storm the breach... |
.jpg) |
| ...whilst others scale the walls with ladders and plant their flags on the ramparts of the city! |
 |
| The fighting continues in front of the main gate... |
 |
| ...as a unit of voynuks is driven back by the garrison. |
 |
| Both the garrison and the Ottoman's redress their lines. |
.jpg) |
| The garrison has taken heavy casualties... |
 |
| ...and the janissaries launch another attack in an attempt to drive the garrison away from the surviving gun battery. |
 |
| Further along the walls another river boat arrives with a force of janissaries. |
The fighting before the walls of Belgrade swung back and forth as more units arrived from the Ottoman camp and the city's garrison pushed forwards towards the second gun battery. From the city's towers the defenders could see a unit of janissaries heading across the Sava river whilst further along Belgrade's walls fighting broke out as a unit of azabs attacked with scaling ladders only to be driven back with casualties. Sensing his counterattack was failing the grand vezir himself, Piri Mehmed Pasha, entered the fray and took on Balázs Oláh. For a moment it looked as if the garrison could be routed but Balázs Oláh defeated Piri Mehmed Pasha. The Ottoman's had lost both of their commanders.
The final act of the day saw boat of janissaries land only for them to be pushed back in a brief but bloody fight with a unit of the garrison's pikemen who had stayed in reserve to ensure the garrison's retreat was not cut off. Having defeated both of the Ottoman commanders and successfully destroyed one of the gun batteries Balázs Oláh and Mihály Móré led a disciplined withdrawal back to the safety of the city walls. It had been a fierce fight and the garrison had proved defiant. They were not ready to surrender yet.
The final act of the day saw boat of janissaries land only for them to be pushed back in a brief but bloody fight with a unit of the garrison's pikemen who had stayed in reserve to ensure the garrison's retreat was not cut off. Having defeated both of the Ottoman commanders and successfully destroyed one of the gun batteries Balázs Oláh and Mihály Móré led a disciplined withdrawal back to the safety of the city walls. It had been a fierce fight and the garrison had proved defiant. They were not ready to surrender yet.
 |
| A second round of fighting begins in the shadow of Belgrade's battered walls. |
 |
| The janissaries charge the Hungarians but are unable to break them. |
 |
| More attacks on the walls are made by azabs in the besieging army. |
.jpg) |
| In the chaos outside the walls Piri Mehmed Pasha is defeated by Balázs Oláh and the Ottomans begin to withdraw to their camp. |
.jpg) |
| In the final stage of the engagement the janissaries that landed from the river find their attack blocked by pikemen from the garrison. The janissaries are driven back. Belgrade's garrison returns to the safety of the walls in triumph having destroyed an Ottoman gun battery and bested both of their commanders, Piri Mehmed Pasha and Mustafa Pasha. |
This turned out to be an epic game. We played from 10am to just after 7pm with a stop for lunch and a tea break in the afternoon. The final victory point tally was 26 to the Hungarians and 19 to the Ottomans, so a well earnt victory for Tom. He managed to defeat more of my units, killed or routed both of my retinue leaders and destroyed one of the gun batteries. I didn't do badly with the ladders and the breach, in fact I managed to successfully attack the walls with three of the four ladders and got a unit into the breach, but lots of my units fell to the garrisons onslaught!
This was such a fun and absorbing scenario, with lots of different objectives and ways it could have played out. I chose not to commit to the river attack, putting the minimum number of units in the boats, but I wonder how it would've played if I had sent six of my toughest units to attack that section? We have both enjoyed these clashes between the Ottomans and Hungarians and have lots of ideas for other games in this theatre in the future, but I think for our next battle we will have a break from them, possibly returning to the Italian Wars.
This was such a fun and absorbing scenario, with lots of different objectives and ways it could have played out. I chose not to commit to the river attack, putting the minimum number of units in the boats, but I wonder how it would've played if I had sent six of my toughest units to attack that section? We have both enjoyed these clashes between the Ottomans and Hungarians and have lots of ideas for other games in this theatre in the future, but I think for our next battle we will have a break from them, possibly returning to the Italian Wars.


.jpg)

.jpg)
.jpg)


.jpg)
.jpg)
.jpg)
.jpg)


.jpg)


.jpg)
.jpg)


.jpg)
.jpg)

.jpg)


