
Recently I have had the luxury of being able to leave my gaming table set up for a couple of months, hence the spate of battle reports on the blog. The final game, before putting it all away for a while, was played out this weekend with three of my fellow reenactors. Following on from the "Stoke 1514?" scenario with Jason, Phil and Sven were also keen to have a game. As we are an Anglo-Irish 15th Century reenactment group this set me an interesting challenge of coming up with a four player scenario set in the early 16th Century, as I don't have any specific Wars of the Roses figures, that would see lots of Kern and Galloglass taking the field.
I was looking for something that at least gave a nod to historical events but also a scenario that would be fun for us all to take part in. Then I remembered a plate from the Opsrey Elite series "Scottish Renaissance Armies 1513-1550" (surely having this title in the Elite series is an oxymoron right?) that shows the Earl of Arran and the Scots fleet attacking Carrickfergus in 1513 in support of an O'Donnell rebellion. This was an event that provided plenty of scope for an unsual scenario.
 |
| The deployment areas, going clockwise from the top right the O'Donnells, bottom right the Anglo-Irish, bottom left the Earl of Arran and top left the English Garrison. The building with the red roof and the large building behind the tower in the street are the target buildings to be burnt down. The four cattle counters are marked out in the centre of the table. |
The Raid on Carrickfergus, 1513
In June 1513 Henry VIII landed at Calais to lead his army in an invasion of France. It was the young Kings first military campaign and he was keen to emulate Henry V's glorious campaign of nearly a hundred years before. As part of the "Auld Alliance" the Scottish King, James IV, had agreed to aid Louis XII against the English. The Scottish invasion of England a few months later ended in James' death at Flodden.
As part of the alliance between Scotland and France, the French king had agreed to pay James IV 50,000 francs and to victual the Scottish Fleet if it was sent to the aid of the French. James Hamilton, Earl of Arran, a man already experienced in commanding a fleet, having led a Scots naval expedition to aid the Danes in 1502, was put in charge of the Scots navy. The fleet left Scotland in July 1513 and included the "Michael", an enormous 240 foot long vessel which had been commissioned by James as an attempt to put Scottish power well and truly on the European stage.
Instead of sailing straight for France Hamilton first sailed for Ulster and attacked Carrickfergus which had an English Royal Garrison. The O'Donnell of Tyrconnell had rebelled against the English in Ulster and the O'Donnells were ostensibly allied to the Scots. Hamilton failed to take the castle but did loot and burn the town.
Deployment
The scenario involved a naval landing from the Scottish fleet led by James Hamilton which was supported by Hugh O'Donnell and his Gaelic followers attacking from the Ulster countryside. The English Garrison would sally out of Carrickfergus Castle to defend it while their own Anglo-Irish allies arrived to defend the town as well. There were four retinues each commanded by a different player.
To add to the confusion the four retinues would each deply from a corner of the field via move activations. Units could enter with a move activation, they could not attack or skirmish on the turn they entered. The deployment areas were set out so that each player would enter opposite his allied player and so have enemies on either side as he tried to accomplish his objectives. The photo above shows where each retinue would enter, the Scots from the shore, the English from the castle and the two Irish contingents from the countryside. The objectives would represent the fact that this was an attempt to loot and burn Carrickfergus rather than a head on clash.
 |
| The O'Donnell Warriors enter the fight. |
 |
| The Earl of Arran's troops deploy from the Scots Fleet. |
Loot...
Four "tokens" of cattle were placed in the centre of the table, two in the main street of Carrickfergus and two just outside the fields, see the photo above, apologies for the labels! Once all players had troops on the table these "tokens" would move in a random direction 2D6 inches at the start of each turn, simply stopping if they hit obstacles. The tokens could be looted or saved, depending on the retinue. All of the retinues, English, Irish or Scots could attempt to take a cattle token. A unit had to move up to the base to take control of it (as long as it was not already in the control of another unit). The cattle token could then be moved by a unit and would stop moving randomly while in the unit's possession. A unit could only move one cattle token at a time and could not enter rough terrain with a token
If a unit in possession of a cattle token moved into contact with its entry point the cattle were removed and would count towards Honour Points. The unit could then continue in the game.
...and Burn
For this scenario two of the buildings in Carrickfergus were targets of the raid and could be burnt. The Scots and O'Donnells had to attempt this. To try to set fire to a building, the Scots or O'Donnells had to have least one base from a unit in contact with it at the start of their activation phase. As an ordered activation, they could use that unit to try to set fire to the objective (instead of Moving, Attacking, or Shooting). If there were 7 or more models in the unit the fire started on a roll of 8+ on 2D6; if there were 6 or fewer models in the unit the fire started on a roll of 9+ on 2D6.
Honour Points
The winner of this game was to be decided via Honour Points which were awarded accordingly:
2 Honour Points for every cattle token looted/rescued.
3 Honours Points to the Scots and O'Donnell Retinue for each of the 2 buildings burnt.
3 Honour Points to the English Garrison and Anglo-Irish for each of the 2 buildings that was saved.
2 Honour Points for each enemy retinue Leader the retinue defeated.
2 Honour Points if a retinue ended the game with half or more of the points value of its retinue left.
As always the rules were adapted Renaissance Rampant rules and the photos are of the actual game. As you can probably imagine with four different players and retinues this was a pretty chaotic and bloody game and I have provided a brief highlight of events whilst the photographs and captions also give a good idea of how things developed. Sven took control of The Earl of Arran's Scots with Jason playing the "Wild Irish" under O'Donnell. Phil commanded the Anglo-Irish FitzGeralds while I took command of the English Garrison in Carrickfergus Castle.
The retinues were as follows:
James Hamilton, 1st Earl of Arran and his naval raiding party
1 Unit of Foot Knights (James Hamilton, Earl of Arran)
2 Units of Shire Billmen
2 Units of Shire Archers
1 Unit of Scots Marines with Crossbows (a little nod to the Opsrey colour plate by Graham Turner)
1 Unit of Scots Pike
Hugh O'Donnell of Tyrconnell and his Gaelic troops
2 Units of Noble Irish Cavalry (one is Hugh O'Donnell and his male family members)
3 Units of Galloglass
1 Unit of Redshanks (the O'Donnell were using Scots troops from the late 15th Century onwards)
3 Units of Kern
1 Unit of Horseboys
The English Garrison
1 Unit of Foot Knights (Garrison Captain)
1 Unit of Garrison Billmen
2 Units of Shire Archers
1 Unit of Border Horse
1 Unit of Demilancers
1 Culverin
The Anglo-Irish FitzGeralds and Gaelic Allies
1 Unit of Garrison Billmen (Anglo-Irish Captain)
2 Units of Border Horse (Anglo-Irish Cavalry)
1 Unit of Shire Archers
1 Unit of Galloglass
4 Units of Kern
1 Unit of Horseboys
 |
| Some of the Scots head into Carrickfergus whilst others move to engage the Anglo-Irish. |
 |
| The Anglo-Irish Archers begin to shoot at the Scots Crossbowmen. |
 |
| The Scots Pike push back the Anglo-Irish Archers and head into the Anglo-Irish force. |
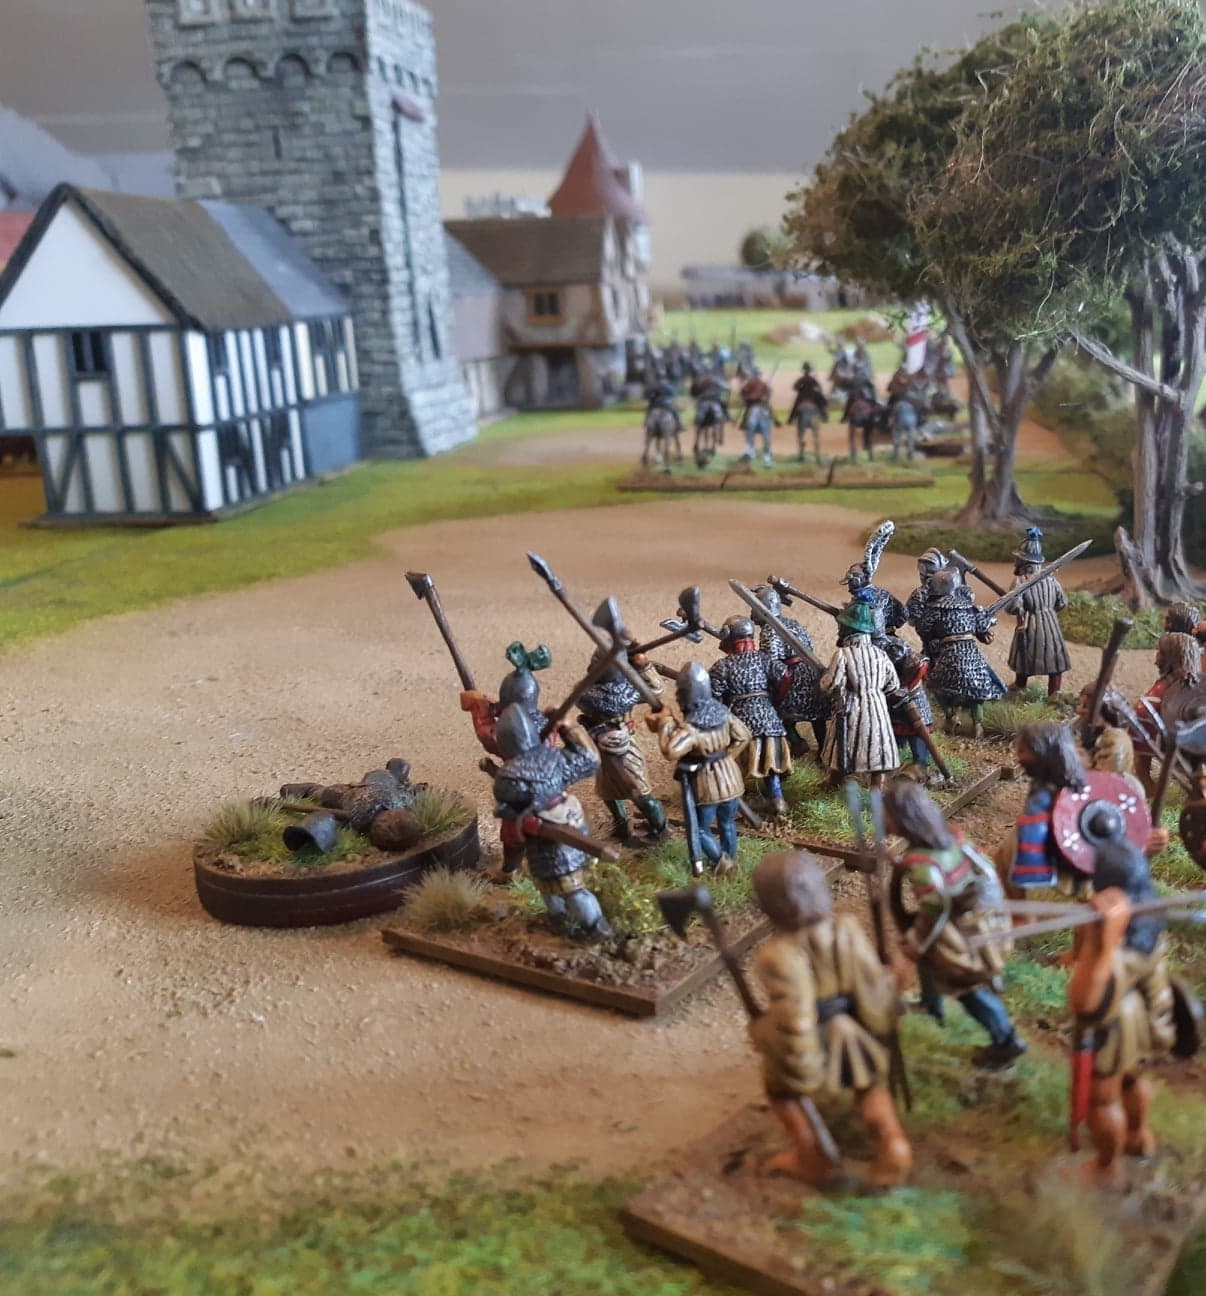
It didn't take long for the action to start. The Scots and their O'Donnell allies were the first to enter the scene, quickly arriving in numbers. The Anglo-Irish followed closely and were soon engaged in a ferocious battle against the Scots around the shore. The Scots Pike pushed into the Anglo-Irish retinue being defeated in a series of clashes, while some of the naval party started to enter the town itself. At the other end of the town the O'Donnell forces halted around the castle giving the garrison time to sally out and launch a rain of arrows into them. The English archery wrought havoc amongst the O'Donnell soldiery and caused some of them to fall back and flee.
Whilst his troops battled the English, Hugh O'Donnell and his Noble Cavalry rode towards the town, pushing back the Anglo-Irish cavalry before them, and getting into a position where they could attempt to burn one of the towns largest buildings. They failed to set the building alight however, giving the Anglo-Irish enough time to send Kern and more Light Horse to defend the town. Hugh O'Donnell was knocked from his horse in a skirmish with the Anglo-Irish Light Horse. The first major casualty of the day had gone to the FitzGeralds.
 |
| The view into Carrickfergus. The Scots attempt to take the town but the Garrison's Cavalry have already begun to bring some of the cattle in. |
 |
| Hugh O'Donnell and his Noble Cavalry ride into Carrickfergus... |
 |
| ..they drive a group of Anglo-Irish horsemen away from the cattle and attempt to set fire to one of the larger town buildings. |
 |
| Around Carrickfergus Castle the O'Donnell troops are suffering at the hands of the Garrison's Archers. |
 |
| From left to right the Scots Naval Crossbowmen attempt to sneak around the town to burn one of its buildings; in the main street the Scots advance while the Garrison attempt to herd the cattle back to the castle; on the outskirts the O'Donnell Noble Cavalry push back the Anglo-Irish Cavalry. |
 |
| A view down the main street with the castle in the background. |
 |
| A view from above showing the main street with the English and Scots in it and the Irish and Anglo-Irish Cavalry skirmishing outside the town. This is one of Jason's photos, I am too short to take photos like this! |
 |
| Hugh O'Donnell and his retinue repeatedly attempt to burn the town. He is about to be knocked from his horse by the skirmishing Anglo-Irish cavalry and take no further part in the battle. |
 |
| The rest of Hugh O'Donnell's men are suffering in an attempt to take on the English Garrison. |
 |
| A view from the walls of Carrickfergus Castle: the O'Donnell men lead the assault. |
 |
| The Anglo-Irish Galloglass charge the Scots Pike... |
 |
| ...and succeed in defeating them before... |
The fierce fighting between the main Scots and Anglo-Irish forces continued with unit after unit being broken in the series of melees that were taking place. James Hamilton himself sort out the FitzGerald Captain and defeated him in a one on one combat. The Earl of Arran's victory over the Anglo-Irish seemed complete but, like his pikemen earlier, he had pushed too far into the enemy ranks and was eventually overwhelmed and brought down, meaning the Anglo-Irish had now defeated both of the enemy retinue leaders, although their own captain had been slain.
Things were starting to look bad for the Scots and their Gaelic allies. The English Garrison had fended off the O'Donnell attack and were collecting the cattle from the town, herding them back into the Castle gates for safety. At the other end of the town the Anglo-Irish had also succeeded in "rescuing" some of the cattle. None of the town buildings had been set alight, Hugh O'Donnell having failed and an attempt by the Scots "Marines" to sneak around the side of the town being seen off by a sally from the Garrison's small number of Demilancers.
 |
| ...launching into the Scots Archers. Both units flee after this fierce melee. |
 |
| With the Anglo-Irish and Arran's forces at each others throats the FitzGerald Captain and Arran engage in single combat. The FitzGerald Captain of the Anglo-Irish is slain. |
 |
| As Arran's Crossbowmen attempt to set fire to the town the English Garrison's Demilancers sally out from the castle and ride them down. |
 |
| The mortal combat between the Scots and Anglo-Irish contines with the units of polearmed troops taking each other on. |
The English Garrison had failed to notice that in the chaos some of the O'Donnell Kern had slipped past them and into the town. The Anglo-Irish could no longer stop them as all their troops had been drawn into the battle on the shore. With Garrison troops chasing them the fleet footed Kern rushed to the buildings and succeeded in setting one of them ablaze. In an even more ridiculous turn of events another unit of Scots arrived from their fleet floating offshore (Sven rolled a double 6 to activate and then rolled "reinforcements" on the event chart! This is exactly what happened in one of the Venlo 1511 games). With the arrival of a fresh unit of pikemen the English Garrison's Light Cavalry attempted to stop them, the Demilancers having been routed in an earlier clash, but could not prevent them from landing and setting the other major town building alight.
With the town ablaze and all the cattle either herded to safety or looted, the Scots had managed to capture one group of them, the raid ended. The Scots that were left embarked in their rowing boats to return to the fleet while the O'Donnell raiders melted back into the countryside. The Garrison Captain was the only retinue leader to have not been killed or downed in the fighting but although the Garrison was still at over half strength the town was in flames.
 |
| From the walls of the castle the English Garrison observe the running battle. Note the Kern in the top left. |
 |
| O'Donnell himself may have failed to set the town alight but some of his Kern manage to sneak past the English Garrison and set it ablaze. |
 |
| It looks like Arran's naval landing has failed to burn Carrickfergus until another boat load of Pikemen arrive from the anchored fleet. |
 |
| The Garrison's Cavalry attempt to stop the Pikemen but to no avail. The reinforcements storm off the beach and succeed in setting Carrickfergus's second large building alight! |
The Final Scores
So using the Honour Point system set out above the final scores were:
Jason as the Hugh O'Donnell and the Gaelic Irish: 3 points for setting alight one of the buildings and 3 points as the Scots had set alight the other building. Total 6 Honour Points
Sven as the Earl of Arran and the Scots: 3 points for setting alight one of the buildings and 3 points for the O'Donnells setting alight to the other building. 2 points for one cattle token and 2 points for slaying the Anglo-Irish Captain. Total 10 Honour Points.
Phil as the Anglo-Irish Captain: 4 points for downing Hugh O'Donnell and The Earl of Arran. 2 points for one cattle token. Total 6 Honour Points
Myself as the Garrison Captain: 4 points for 2 cattle tokens. 2 points for having over half of the retinue left at the end of the game. Total 6 Honour Points.
So the Scots, true to the historic raid on the town, successfully looted and burnt Carrickfergus and were the victors!
This was a really fun game and something a little different from the styles of scenario I have played before. There is a lot to be said for the carnage created by having four players around the table each with their own retinue. It was great to use nearly my whole Irish collection in the game and helped me to think a bit more about the rules for the Gaelic Irish, they are still something of a work in progress. Once the reenacting season is over there could well be more visits to Ireland on the games table.
 |
| "The Generals", from left to right: The English Garrison's Captain, The Ferocious Hugh O'Donnell, The FitzGerald Anglo-Irish Captain and last but not least the Dastardly Scots Sea Captain, James Hamilton, Earl of Arran! |
fantastic battle report,plus, great photos of stunning looking miniatures/units - thanks for the posting!... cheers
ReplyDeleteTerrific setup, a Oli! Beautiful terrain, figures, and storytelling.
ReplyDeleteGreat narrative and pictures... and, nice hats!
ReplyDeleteGreat write up Oli as always and what a marvellous looking board, I really like the way the whole set up looks, the town not being too large and the surrounding countryside. You could do similar scenarios for the scots borders in the 1540's. I hope there was enough cider to go round too
ReplyDeleteGreat looking game, super terrain, love the town and castle,I know what you mean about Rennaisance Scottish elite?! Flodden/Ireland on my to do list so this is great!
ReplyDeleteBest Iain
Wow you've had quite the start to Wargaming this year, another excellent report. Some of the claymore (antedeluvian) and Perry Irish look like a lot of fun to paint.
ReplyDeleteFantastic and superb as ever! The headgear (last pic) I liked the most!!! :)
ReplyDeleteFabulous! Beautiful command stands AND a wonderful wargame with friends to cap it off. Brilliant.
ReplyDeleteSo glad the book was inspirational....plenty more small skirmishes like that in the Rough Wooing
ReplyDelete