Over the festive break Stuart and I had the chance to get a couple of games in before the end of 2023. The first gave me another excuse to field my newly completed peasants in a refight of Hemmingstedt, at the very start of the 1500s, whilst the second gave Stuart the opportunity to field some of his newly painted landsknecht in a refight of Claude de Guise's daring crossing of the Bidasoa in 1521.
Hemmingstedt, 17 February 1500
There is an interesting You Tube video by History Marche on this battle,
https://www.youtube.com/watch?v=jF72Gyf4eeA, but a summary of what is thought to have taken place in this unusual clash follows:
At the turn of the 15th century the region of Dithmarschen, a district in Schleswig-Holstein, Germany, was a peasant republic formed of a confederation of merchants, fisherman and farmers. Situated on the North sea it was a fertile marshy land with much of its pasture and fields protected from the sea by dikes. At the far northern reaches of the Holy Roman Empire it neighboured the Kingdom of Denmark. Since the 12th century attempts had been made to subdue the semi-autonomous district but the Ditmarsians had always been able to prevent themselves from being fully subjugated by the neighbouring feudal overlords of both Denmark and the Empire.
1499 saw the Danish monarch, John II, who also jointly ruled the duchy of Schleswig-Holstein with his brother, attempt to enforce his authority over the Ditmarsians. The peasant republic refused his demands to pay him subsidies or to allow him to fortify and garrison their lands leading the Danish king to recruit an army to invade the region. In preparation for the campaign King John raised a force of 2,000 Imperial and Danish Knights, 4,000 landsknecht of the "Black Guard" under the leadership of a captain named Thomas Slentz, 5,000 infantry from his domains and an artillery train.
The Danish army entered the region of Dithmarschen on 11 February 1500, sacking and burning the principal town of the region, Meldorf, on 14 February. From Meldorf King John headed for the town of Heide on 16 February. The Ditmarsians had not been idle in their defence and a force of between 1,000 to 6,000 peasant militia had been raised under the leadership of Wulf Isebrand. Although some of the merchant and landowning classes may have been well armed the Ditmarsian forces were hopelessly outnumbered by the far better equipped Danish army. Learning that the invaders were approaching Heide from Meldorf the Ditmarsians fortified the one road between the two towns by builing a large earthwork fortification across it. This earthwork was further augmented by the few artillery pieces the Ditmarsians were able to field. Due to the marshy nature of the landscape the road was on a slightly raised causeway above the fields. Wulf Isebrand ordered the sluice gates that kept the sea from flooding these fields to be opened turning them into a waterlogged marsh. As the Danish army approached on 17 February the weather took a turn for the worse with a combination of snow, rain and hail falling. This made the flooded fields even more impassable.
It seems the battle was proceeded by the Black Guard's captain, Thomas Slentz, challenging the strongest man in the Ditmarsian force to a duel. When this failed to happen the engagement began with an assault on the earthworks by Slentz's Black Guard landsknecht. The terrible weather conditions rendered the Danish artillery ineffective whilst the freezing flooded fields on either side of the raised road meant that the Imperial and Danish Knights were unable to make any effective flank attacks. Countercharges by the Ditmarsians forced the Black Guard to give ground but the chaos caused by the rest of the Danish army pushing closely up the road behind them meant the landsknecht were unable to retreat and suffered terribly. Around 800 of the landsknecht were killed, including their leader Thomas Slentz. Legend has it Slentz was slain by Reimer von Wiemerstedt, although Reimer seems to be a fictional character and does not appear in any historical records.
The collapse of the Black Guard led to a general rout of the entire Danish army. The Ditmarsians pursued the fleeing Germans and Danes of whom many attempted to escape across the freezing waterlogged fields. This led to high casualties as men drowned in the flooded fields or were hacked down by the lighter equipped peasant militia pursuing them. King John's army may have lost as many as 7,000 men to comparatively few casualties amongst the Dithmarschen army. The capture of the Danish national standard, the Dannebrog, added further insult to injury. Dithmarschen remained autonomous until 1559 when Count Johan Rantzau conquered the region in the service of King Frederick II of Denmark.
 |
| Armed with crossbows and handguns the Dithmarschen army prepares to defend the earthwork fortification built across the road to Heide. |
 |
| The Ditmarsians await the attack of the Danish army. |
Scenario
We decided just playing this as an attacker/defender style scenario would not be that interesting as the Ditmarsian player would be able to hang back and destroy the Danish army as it attacked. To make it more interesting we revisited an idea we have used in a couple of our games already where one of the armies behaves in accordance with a set of preordered instructions (see
https://camisado1500s.blogspot.com/2021/11/wenzenbach-1504.html and
https://camisado1500s.blogspot.com/2021/07/this-is-like-no-house-of-praier.html). We each took control of part of the defending Dithmarschen army. The Danish army would simply continue to move forward and attack each turn whilst Stuart and I would have objectives that we would compete to achieve and involved us being more proactive in the defence.
As always the game was played using our adapted version of Lion Rampant.
The Danish Army
For the game the Danish force was divided into two retinues, one under the Danish King, John II, and the other under the landsknecht captain, Thomas Slentz. These two retinues acted independently and any failed activation by the retinue resulted in the turn for that retinue ending.
For each of the Danish retinues turns the nearest unit to the Ditmarsians would attempt to activate first, followed by the second nearest and so on. If a unit was not within shooting or attacking range it would move towards the nearest Dithmarschen unit. If it could attack in combat it would attempt this. If the unit could shoot with ranged weapons it would attempt to do this instead of moving or attacking. The Danish units would leave the causeway and move into difficult terrain in an attempt to reach the Ditmarsians if the route forward was blocked or if the Ditmarsians nearest to them were in the flooded fields.
If Thomas Slentz was within range of a Dithmarschen retinue leader at the start of his retinue's turn he would automatically challenge that retinue leader to a duel. If both Dithmarschen retinue leaders were in range he would challenge the nearest to a duel. King John II, commander of the other Danish retinue, would not attempt this but would accept challenges as would Thomas Slentz.
The flooded fields
The flooded fields were either side of the causeway, see the overhead photo below, and counted as difficult terrain for combat for both forces and difficult terrain for movement of the Danish army only.
The earthworks
The earthwork defences of the Ditmarsians gave +1 armour to the Ditmarsians sheltering behind them against shooting and if they were attacked from the front across them. They did not count as rough terrain for movement or combat.
The foul weather
When a Danish arquebus or artillery unit successfully activated to fire at a Dithmarschen unit we rolled a D6 before making the shooting roll. On a 1 or 2 the unit was unable to fire due to the powder having got wet whilst the Danish army was marching in the bad weather. This did not mean the unit could not attempt to fire again next turn.
Victory
As both of us were playing on the same side in this game victory was based on who could get the most victory points. We set three clear objectives. As soon as the last of these three objectives was achieved the game would end. If this did not happen and the Ditmarsians were routed before they could achieve the objectives then the Danish army would've won.
The player who made the activation that caused the objective to be achieved would get the point.
The victory points were awarded as follows:
1 victory point if Thomas Slentz, captain of the Black Guard, was killed or routed.
1 victory point if John II, King of Denmark, was killed or routed.
1 victory point if the unit of Gendarmes carrying the Dannebrog was killed or routed.
 |
| The Ditmarsian defenders man the earthworks and watch as the Danish army marches along the road from Meldorf to Heide... |
 |
| ...and approaches the fortifications that they have built. |
 |
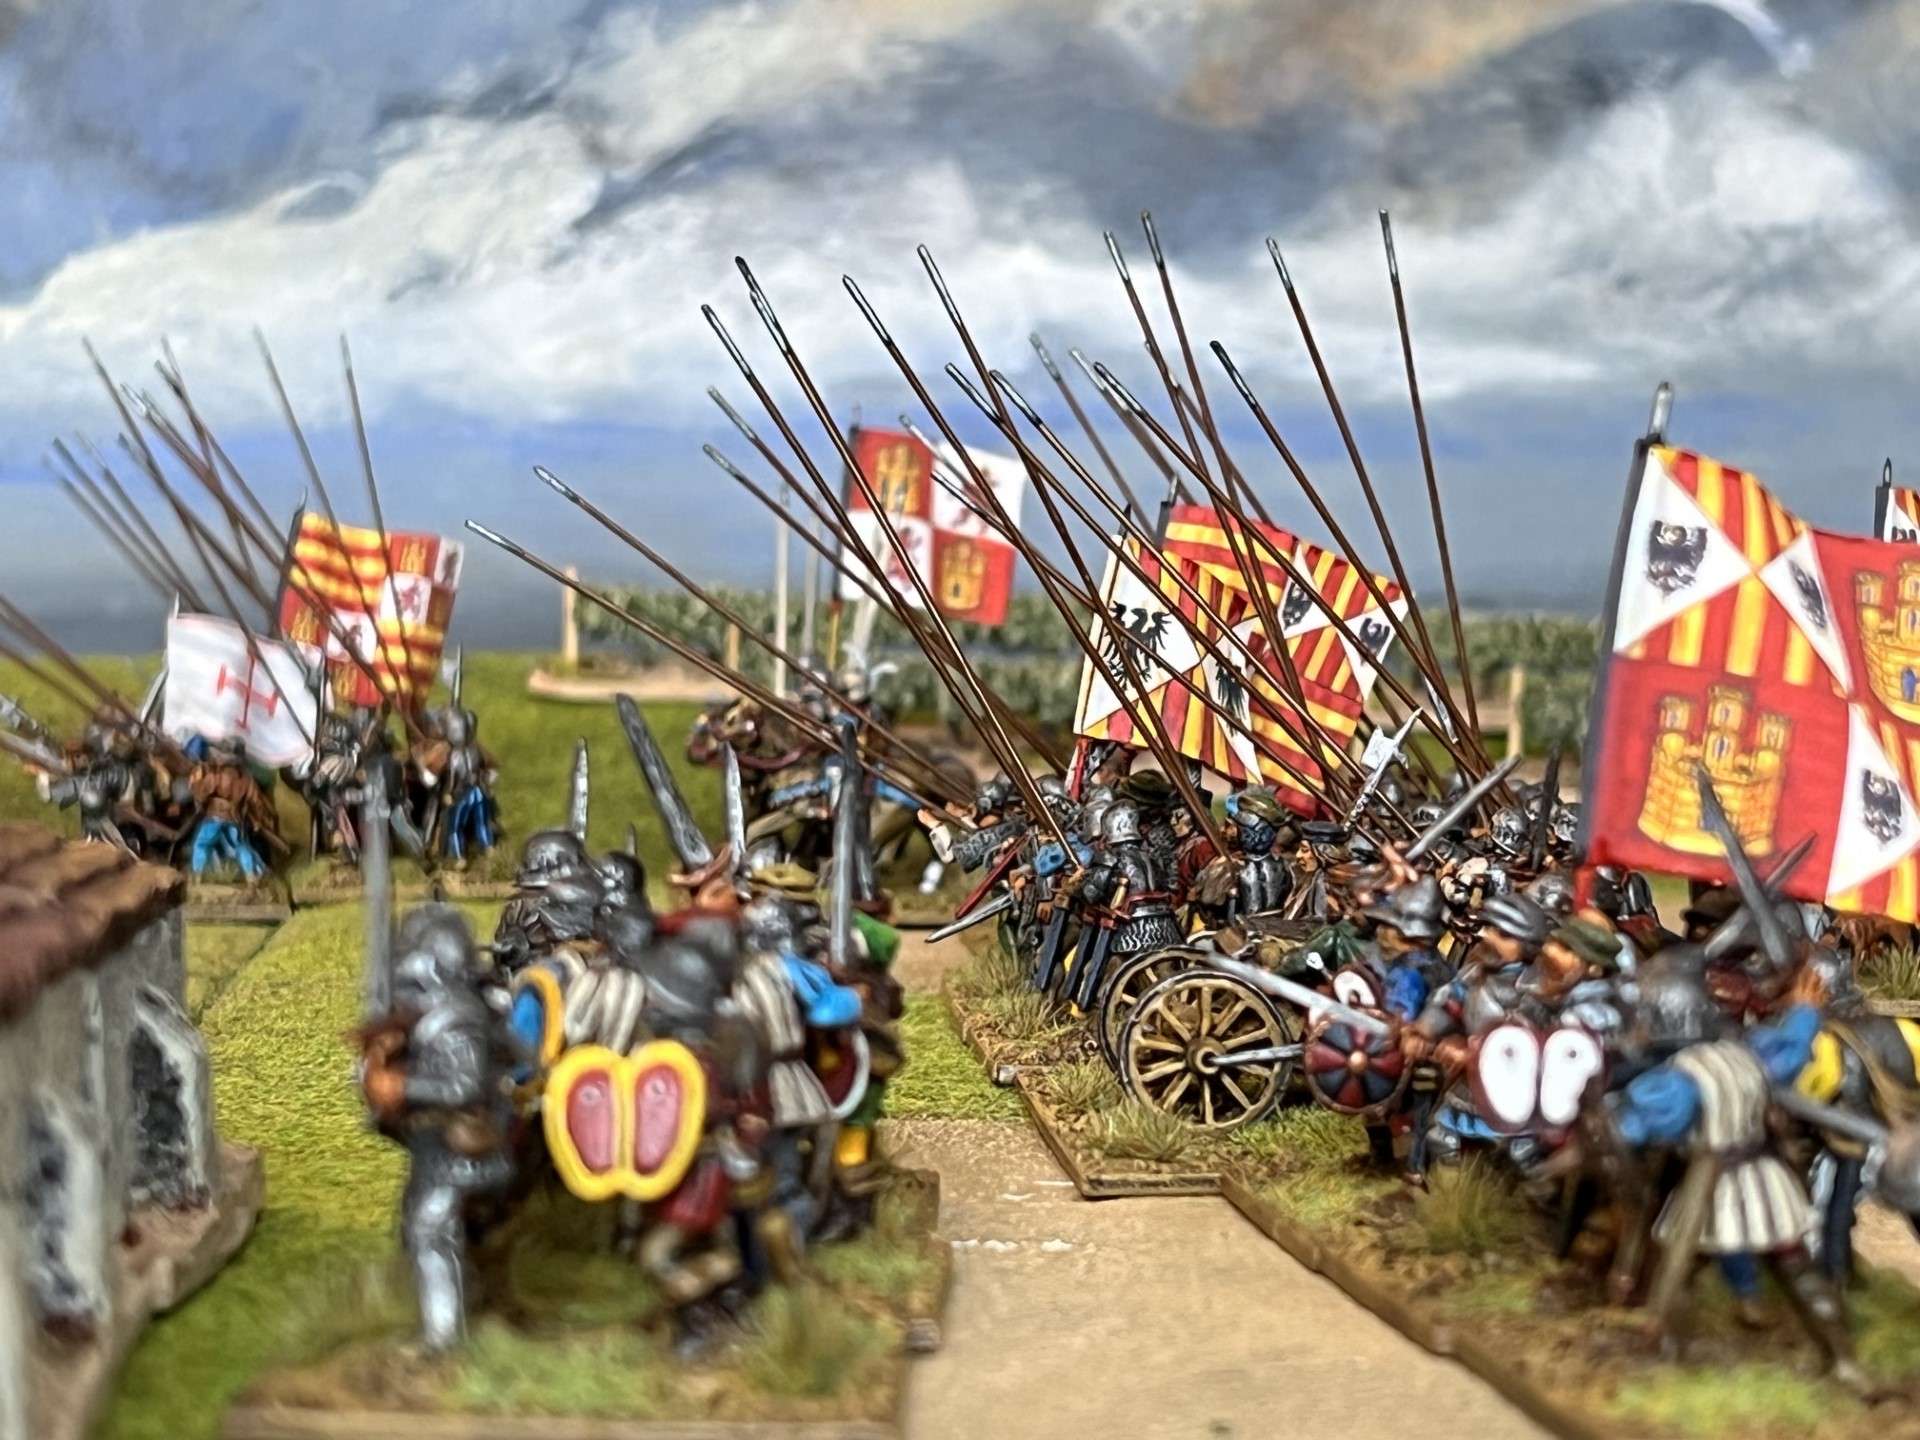
| A view of the table from above. To the left Stuart and myself each commanded one of the Dithmarschen retinues behind the earthworks. The retinue of the landsknecht captain, Thomas Slentz, commander of the Black Guard, is in the centre of the photo on the raised causeway, whilst to the right of the photo, marching behind the Black Guard, is the retinue of the Danish King, John II. These two retinues would automatically advance on the Dithmarschen position. The flooded fields surround the causeway. |
The Armies
As explained above for this game Stuart and I would both take control of an identical retinue of Dithmarschen troops. My retinue was under the command of the historical rebel captain, Wulf Isebrand, whilst Stuart's retinue was under the leadership of the legendary, and probably fictional, hero of the battle, Reimer von Wiemerstedt. The deployment of the armies is shown in the photo above.
We made the Dithmarschen army fairly tough to give it a chance against the advancing Danish army. So whilst the two captains, Wulf Isebrand and Reimer von Wiemerstedt, were not knights at all we represented them as "Foot Knights" in the game. Similarly the simple "Peasant" units in the Dithmarschen army actually counted as "Shire Billmen" from our Tudor rules for this game. This helped to visually give the impression of a weaker and heavily outnumbered force on the table but meant it could stand up to the Danish army in the battle.
The Dithmarschen Army
Wulf Isebrand's retinue
1 Unit of Foot Knights (Wulf Isebrand retinue leader)
2 Units of Crossbowmen
1 Unit of Arquebusiers
3 Peasant Units
1 Culverin
Reimer von Wiemerstedt's (the character of legend's) retinue
1 Unit of Foot Knights (Reimer von Wiemerstedt's retinue leader)
2 Units of Crossbowmen
1 Unit of Arquebusiers
3 Peasant Units
1 Culverin
The Danish Army of John II
John II, King of Denmark's retinue
1 Unit of Gendarmes (John II, King of Denmark, retinue leader)
1 Unit of Gendarmes (Unit carrying the Dannebrog)
3 Units of Men at Arms
2 Culverins
2 Units of Pikemen
1 Unit of Arquebusiers
1 Unit of crossbowmen
Thomas Slentz and the Black Guard landsknecht
1 Unit of Foot Knights (Thomas Slentz retinue leader)
1 Unit of Landsknecht arquebusiers
2 Units of Landsknecht Pike
1 Unit of Landsknecht halberdiers
2 Units of lancers
We revisited the snow table for this game which I tried previously for a refight of Pieve di Cadore,
https://camisado1500s.blogspot.com/2021/02/pieve-di-cadore-1508.html. Although this may have given the table an appropriately festive look it did make it hard to take photos as did the limited hours of daylight. As such a brief write up of the battle does follow as do some photos of the action although you may notice we didn't capture much of the later stages of the battle. It all went horribly wrong anyway as you will see!
 |
| The "Black Guard" landsknecht, under the command of Thomas Slentz. |
 |
| The Dithmarschen position, defended by handgunners, crossbowmen and some light artillery pieces. The Dithmarschen captain, Wulf Isebrand, is under the banner bearing the Virgin Mary in the centre while Reimer von Wiemerstedt is under the white banner bearing a scene of the crucifixion at the top of the photo. |
 |
| As the landsknecht assault the earthworks the Ditmarsians fight them back... |
 |
| ...and a fierce fight develops. |
 |
| The landsknecht attack the fortified position and melees develop along the earthworks. |
 |
| Some of the Ditmarsians leave the earthworks to attack the oncoming Danish army. |
 |
| A small cannon fires into the advancing landsknecht of the Black Guard. |
 |
| Landsknecht and lancers attack the Ditmarsians as they leave the safety of the earthworks. |
As the sleet and snow fell the Danish army advanced along the road to Heide only to find its path blocked by the Dithmarschen earthworks. At the head of the marching column Thomas Slentz ordered his Black Guard landsknecht into formation and they began to assault the position. The Dithmarschen artillery opened fire on the attackers and the landsknecht suffered losses. Before the Black Guard could even reach the Dithmarschen defences they were attacked and driven back in a fierce melee on the frozen muddy slopes.
Some of the Ditmarsians remained behind the safety of the earthworks and fired upon the attackers whilst others left the position in an attempt to attack the flanks of the Danish army as it advanced. This also drew Danish troops out of the column and into the freezing flooded fields on either side of the causeway. Fighting broke out all along the line of the earthworks as the Ditmarsians fought back against the landsknecht who were now supported by lancers. In the chaos the captain of the Black Guard, Thomas Slentz, challenged the Dithmarschen leader, Wulf Isebrand to a duel. Slentz was slain but Isebrand and his men also suffered losses as some of Slentz's halberdiers charged them in an attempt to avenge the death of their captain.
 |
| The landsknecht captain, Thomas Slentz, challenges the Dithmarschen leader, Wulf Isebrand, to a duel, and is slain by the peasant captain. |
 |
| Wulf Isebrand and his bodyguard are then attacked by the landsknecht halberdiers but manage to fight them off. |
 |
| As the Danish army struggles to advance along the causeway some of the Dithmarschen troops enter the flooded icy fields in an attempt to pick off the Danish King. |
 |
| Wulf Isebrand is shot by landsknecht arquebusiers severely dampening the Dithmarschen army's morale. |
 |
| Most of the Black Guard landsknecht have been defeated at the earthworks. The rest of the Danish troops halt their advance and, despite the bad weather, manage to use artillery to fire on the rebellious peasants. |
 |
| Some of the Ditmarsians are caught in the open and ridden down by Danish men at arms. |
The fight was not all going the way of the Ditmarsians as despite the foul weather the Danish artillery and landsknecht arquebusiers were able to keep up sustained fire on the earthworks. Wulf Isebrand was brought down by the shot of an arquebusier, a costly loss to the Dithmarschen defenders. The landsknecht contingent of the Danish army was soon destroyed but the Danish and Imperial troops behind them, under the command of King John II, did not push forward into the attack. Instead they let their artillery keep firing into the Ditmarsians.
The Ditmarsians continued to send troops into the frozen flooded fields attempting to lure out the Danish Knights and men at arms so they could easily be slain in the freezing waters. This tactic was successful to a certain extent as some of the men at arms were brought down. It allowed a unit of Dithmarschen crossbowmen to lure the Danish King into the waterlogged fields where he was unhorsed and defeated but the tactic also meant that more of the Danish troops could get to the Ditmarsians and eventually proved to be the undoing of the peasant army.
With Slentz and John II out of the fight all the Ditmarsians needed to do was bring down the
Danish national standard, the Dannebrog, in order to rout the Danish army. The legendary Dithmarschen, Reimer von Wiemerstedt, led his men into the flooded fields in order to get to the Dannebrog and seize it. The plan backfired and the knights protecting the standard charged Reimer and his men, riding them down despite the terrible condition of the ground. Von Wiemerstedt was slain and the Dithmarschen army was routed. From their incredibly strong defensive position the Ditmarsians had been defeated in their eagerness to attack the slow moving Danish column. |
| The Danish King, John II, surveys the battle... |
 |
| ...and is attacked by a unit of Ditmarsians. The Danish King is unhorsed in the bad terrain. |
 |
| Despite Thomas Slentz being slain and the felling of the Danish King it is not a Dithmarschen victory. The Danish national standard, the Dannebrog, does not fall. Instead the other captain, the legendary Reimer von Wiemerstedt, is defeated in the open and the Dithmarschen forces are routed! |
 |
| Having waited all night in battle formation Claude de Guise's landsknecht cross the Bidasoa as the sun rises. |
For our second game we returned to a character whose actions on the battlefield have been covered before on the blog, Claude, Duke of Guise. It was Guise who commanded the force which broke up the Duke of Bourbon's landsknecht army intended to meet the English invasion of France in 1523,
https://camisado1500s.blogspot.com/2023/08/bourbons-rebellion-neufchateau1523-and.html. For this game we chose an event that took place a couple of years before where Guise was in command of a force of landsknecht during a French attempt to take Navarre back from the Spanish in 1521.
Claude, Duke of Guise, crossing the Bidasoa, October 1521
Following the Spanish conquest of the Kingdom of Navarre in 1512 the Navarrese monarchy supported by the French made repeated attempts to wrestle the kingdom back. In the spring of 1521 with Spain distracted by the revolt of the Communeros in Castile a 12,000 strong French and Navarrese army invaded and reconquered Navarre under the command of André de Foix, Lord of Lesparre. The victory was short lived as the revolt in Castile was crushed and the Spanish forces turned their attention to Navarre crushing the Franco-Navarrese army at Noáin near Pamplona, on 30 June 1521.
This did not deter the French King, Francis I, or the King of Navarre, Henry II, as they assumed that Spain must now be militarily exhausted by its recent war efforts. In September 1521 Guillaume Gouffier, seigneur de Bonnivet, one of the French King's favourites, led an army of around 27,000 men into Navarre attacking the kingdom's northern borders. It was a mixed force of Navarrese, Norman, Gascon and landsknecht troops. As the French and Navarrese advanced into the Kingdom, Roncal and Roncesvalles fell with the Spanish garrisoning the fortress of Amaiur surrendering on 3 October 1521. From here Bonnivet took the army down from the Pyrenees towards the coast, investing the town of Fuenterrabía.
Fuenterrabía, or Hondarribia in Basque, is located where the River Bidasoa runs into the Bay of Biscay. The Lorraine nobleman, Claude, Duke of Guise, whose descendants would later become key figures in the French Wars of Religion, commanded a force of landsknecht in the Franco Navarrese army and had already distinguished himself during the battle of Marignano in 1515. He further enhanced his reputation during the attack of Fuenterrabía. Martin du Bellay, in his memoires, describes the action that took place in front of the town a translation of which reads:
"Now there were the enemies beyond the Behaubie (the Bidasoa) river, and our camp beyond, which was the cause (as I said) that we could not really recognize them.
The said river passes at the foot of the mountains which come from Navarre and falls into the sea in front of Hondarribia. All night long our army was in battle (formation), because it was the full moon, and the sea which refloated was so high that it was impossible for us and them to cross the river. But the next day, about eight o'clock in the morning, being the sea withdrawn, Monsieur de Guise, after having ordered his lansquenets, and with him the rest of the foot soldiers and the gendarmerie fell into battle on the edge of the water; then, the lansquenets having kissed the ground (as they customarily do when they march into battle), the said Lord of Guise, spear in hand, was the first to get into the water, accompanied by his troop, to go and fight his enemy. Which was so well followed that the Spaniards, who could be equal in number (with the advantage that those who wait in dry land may have over those who come to fight them, wet across a river), astonished at the fury and boldness of our people, fled through the mountains. And was the chief of this Spanish army, Dom Diegue de Vere, a part of which retired into Fontarabie."
Following Claude de Guise's dramatic attack through the water of the Bidasoa the town was besieged and fell into French hands by mid October 1521. Fuenterrabía was garrisoned with 1,000 Navarrese and 2,000 Gascons. The town would eventually fall back to the Spanish following a lengthy siege in 1524 after Charles V ordered a counterattack into Navarre in an effort to drive out the French forces of Francis I and Navarrese of Henry II. The kingdom of Navarre would remain permanently divided after this last campaign by Charles V with Henry II of Navarre only retaining a small portion of the kingdom north of the Pyrenees.
 |
| A view of the table from above. To the right are the walls of Fuenterrabía, with a Spanish force under Dom Diegue de Vere in front of them. On the left are the banks of the River Bidasoa out of which march the French and landsknecht forces under Claude, Duke of Guise. |
Scenario
For this game the banks of the Bidasoa were be set up in one corner of the table with the walls of Fuenterrabía at the other end of the table (see the photo above). The French deployed within the water whilst the Spanish were deployed beneath the walls of the town.
The game was played as a straight up battle with a couple of special rules as described below. As with the Hemmingstedt game we used our adapted Lion Rampant rules. Stuart took command of Guise and his landsknecht and French force whilst I played as the Spanish defenders of Fuenterrabía under the command of Dom Diegue de Vere.
Incidentally I think the Dom Diegue de Vere that du Bellay is referring to may be one and the same as Diego De Vera, a Spanish Admiral who commanded an unsuccessful military expedition in 1516 in an attempt to dislodge the famed Barbary corsair brothers, Oruc and Hizir Reis (who is better known as Hayreddin Barbarossa) from their control of Algiers.
The Waters of the Bidasoa
The water did not impede movement or count as cover but fighting in it counted as difficult terrain.
Claude, Duke of Guise
Any landsknecht unit within 12" of Claude, Duke of Guise's unit received +1 to their hit rolls when attacking in combat.
 |
| As the tide goes out and dawn breaks the landsknecht mercenaries of the Franco Navarrese army wade through the river Bidasoa... |
 |
| ...and prepare to drive back the defenders of Fuenterrabía. |
The Armies
The French vanguard under Claude, Duke of Guise
1 Unit of Landsknecht Pike (Contains Claude, Duke of Guise, retinue leader - see special rules above)
2 Units of Landsknecht Pike
2 Units of Landsknecht Shot
2 Units of Landsknecht Halberdiers
2 Units of Gascon Crossbowmen
2 Units of French Gendarmes
The Spanish defenders of Fuenterrabía
1 Unit of Foot Knights (Dom Diegue de Vere retinue leader)
2 Units of Spanish Pike
2 Units of Rodeleros
2 Units of Spanish Arquebusiers
1 Culverin
2 Units of Jinetes
1 Unit of Spanish Men at Arms
1 Organ Gun
The light was better for this second game and we managed to get more photos so a brief description of events follows but following the captions to the images is also a good way to follow the action.
 |
| The landsknecht are through the river and advance on Fuenterrabía. Some of the Spanish Jinetes skirmish with the landsknecht arquebusiers. |
 |
| The Guise banner flutters over Claude's unit of landsknecht. |
 |
| As the landsknecht wade out of the Bidasoa they come under fire from Spanish Arquebusiers. |
 |
| Landsknecht arquebusiers attempt to drive off the Spanish shot... |
 |
| ...and the Spanish arquebusiers withdraw whilst still firing at the landsknecht. |
Claude of Lorraine, Duke of Guise, waded into the waters of the Bidasoa. He was keen to get his mercenary landsknecht into action as they had stood all night in battle formation waiting for the tide to go out so the river could be crossed. The landsknecht kissed the ground before them, as was their custom, and followed Guise into the water accompanied by some of the Gascon infantry and Gendarmes of the French army. As they emerged drenched from the Bidasoa they were immediately fired upon by groups of Spanish arquebusiers whilst skirmishing Jinete light horsemen harassed them with javelins.
Guise's troops suffered casualties from these attacks but as more of his men reached the shore the arquebusiers and jinetes began to withdraw as they came under the fire of Guise's landsknecht arquebusiers and Gascon crossbowmen. The jinetes road away safely but the arquebusiers were caught and defeated in the open by landsknecht halberdiers and French Gendarmes. As Guise's troops prepared to continue the attack the were reinforced by a unit of stradiots who splashed across the Bidasoa to bolster the French ranks.
 |
| Reinforcements arrive for the French as a unit of stradiots splashes across the Bidasoa. |
 |
| The Spanish arquebusiers are driven back by a charge from the landsknecht halberdiers... |
 |
| ...before then being ridden down by the French gendarmes who have accompanied Guise across the river. |
 |
| Dom Diegue de Vere's Spanish defenders advance in an attempt to push back the French and landsknecht. |
 |
| A brutal melee develops in a Church courtyard just outside the walls of Fuenterrabía. |
 |
| The Spanish in the courtyard are forced back by French Gendarmes and Gascon crossbowmen. |
 |
| The Church courtyard is taken and the French and landsknecht continue to advance. |
 |
| The Spanish commander, Dom Diegue de Vere, attempts to lead a counter attack into the courtyard. He is slain by a shot from a landsknecht arquebusier. |
 |
A view of the battlefield with the French and landsknecht in the foreground and the Spanish troops forming a defensive line in the top right hand corner of the photo.
|
The fighting now moved from the shores of the Bidasoa to the suburbs of Fuenterrabía. Outside the town walls a walled churchyard became the scene of bitter fighting as Spanish rodeleros armed with sword and buckler supported by their jinete cavalry battled a force of Gascons, Gendarmes and stradiots. After a fierce back and forth the French were victorious, pushing the Spanish out of the courtyard. Foolishly the Spanish commander, Dom Diegue de Vere, attempted to win it back only to be shot by a landsknecht arquebusier as he entered the churchyard.
With their captain dead the remaining Spanish troops formed up around their artillery in the hope they could force the landsknecht and French back into the river if they made a determined stand against them. For a moment it looked like this would work as the defender's organ gun and culverin fired at close range into Guise's oncoming troops causing terrible casualties. Guise's troops were not deterred and whilst the surviving Spanish men at arms and jinetes fled, "astonished at the fury and boldness" of the French, the Spanish infantry were over run and defeated. Claude, Duke of Guise, had led a successful attack across the Bidasoa and the siege of Fuenterrabía could begin.
 |
| The Spanish fire an organ gun into the stradiots and put them to flight. |
 |
| The skirmishing is over and the main blocks on infantry prepare to clash. |
 |
| The Spanish defensive line is about to be attacked. |
 |
| Landsknecht halberdiers are successfully driven back by a unit of Spanish pike... |
 |
| ...only for the Spanish pike to then be driven back by the disciplined ranks of Guise's landsknecht pike. |
 |
| A Spanish cannon causes heavy casualties as it fires at close range into the landsknecht ranks... |
 |
| ...but this is not enough to decide the battle and the French win the field as the Gendarmes rout the final Spanish pike block. |
As you may be able to tell from the write up somehow Stuart and I managed to loose the Hemmingstedt game against an army with no one playing it, we were defeated by the AI! As we had to achieve victory points to win, and only 3 were available, the game became an attempt by the two of us to lure the units containing Slentz, the Danish king and the Dannebrog towards our own retinues where we could defeat them. This meant that we did not play the game defensively as it was a race to see who could get the victory points. We were successful to a certain extent with my retinue killing Slentz and Stuart then managing to defeat the Danish King in a manoeuvre that poached the target from under my nose! The issue was that in doing this we lost most of our troops in the fierce battle with the landsknecht or when they were caught alone and exposed in an attempt to outflank the Danes.
We put the Danish guns at the head of the Danish King's retinue meaning that they kept activating first and, despite the foul weather rules, managing to shoot our units. As the guns were at the front this stopped the rest of the Danish troops from advancing behind them. One of the guns would always fail an activation and thus end the Danish king's turn. The knock on effect of this was that in our eagerness to get the winning victory point Stuart and myself kept attempting to outflank the Danish column with more and more units which were then picked off. As our units disappeared one by one we were suddenly surprised to realise that we couldn't win as we only had our artillery pieces left and with the Dannebrog still flying over the Danish army, which had loads of units still intact, we had been defeated. As you can imagine we had a good laugh about this terrible result!
The second game initially looked like it was going to be a quick victory for the Spanish with the French taking a real pounding as they emerged from the river and the Spanish being completely unscathed. In command of the Spanish it was that damned churchyard that proved to be my undoing as unit after unit was fed into it only to be slain. My retinue leader,
Dom Diegue de Vere, rolled a blunder causing him to charge into the churchyard and instantly get shot! It was all downhill from there as the power of the French Gendarmes and disciplined ranks of the landsknecht sent the Spanish reeling despite them taking horrible losses from my two guns. It proved to be a very exciting game and a great one to end the year with.
Happy New Year!


