Stuart and I have continued our Tudor based series of wargames this time focusing on a raid across the West March by the Scots in the summer of 1524 and the Earl of Surrey's first aggressive move as Lord Deputy of Ireland. These games took place a week ago and Stuart filmed a series of videos for them which can be found on his "Army Royal" Facebook group, https://www.facebook.com/groups/1179255685825076/. You may wish to have a look at this as it features loads of Stuart's works in progress as well as discussions about Tudor warfare and modelling early 16th century armies. It may be worth joining just to see the videos for these games which feature my awful vests and a haircut that is not disimillar to that of an Irish kern!
"this was the chaunce of warre"
Following the English assaults on Ferniehurst, http://camisado1500s.blogspot.com/2020/04/dacres-attack-on-ferniehurst-1523.html, and Jedburgh, http://camisado1500s.blogspot.com/2021/05/the-english-attack-on-jedburgh.html in September 1523 and the Franco-Scots counterattack on Wark in October of that year, http://camisado1500s.blogspot.com/2020/08/the-siege-of-wark-1523.html the hostilities on the Anglo-Scots border had continued into 1524. The summer of 1524 saw around 1,000 English engage in a chance encounter with 2,000 Scots in the East March in a border clash in which the Bastard Heron was slain whilst in the West March Hall described the following encounter:
"The vii daie of Iuly the lorde Maxwell of Scotlande, and sir Alexander Iorden with banners displayed, and Scottes to the nombre of foure thousand, entered into England at the West Marches by Carleile, and began to burne of every side: then the Englishemen assembled on every side, and so they were in nombre ii. M men, and fiercely set on the Scottes, there was a great fighte, for the space of an houre, at the last the Englishmen brake the array of the Scottes, and them discomfited, and toke CCC Scottes prisoners, the Englishmen that had taken prisoners, went away with their prisoners. For sir Alexander Iorden and his sonne and diverse other were taken prisoners and by their departyng, the compaignie of the Englishemen was muche minished. The lorde Maxwell beyng a politique man, perceived that & sodainly called his people together, and them encoraged, and began a new skirmishe, and recovered all the prisoners almost, and toke diverse English men prisoners, this was the chaunce of warre."
4,000 Scots raiders under the command of Lord Maxwell, Warden of the West March, and Alexander Gordon were caught by a force of 2,000 English borderers who were called to arms as the Scots pillaged and burnt. In an hour long clash the speed of the English attack seems to have initially given them the advantage but as a substantial part of the English force withdrew with 300 or so Scots prisoners, including Alexander Gordon and his son, Lord Maxwell counter attacked, recovering most of the Scots prisoners and turning their English captors into prisoners themselves.
The Scenario
Based on the above the main aim of this game was to take prisoners, who could then be exchanged for ransoms as was common in the border raids. As always we used our heavily modified Renaissance Rampant rules for this game, Stuart took command of the Scots and I took command of the English defenders.
When entering hand to hand combat a unit could declare that is was attempting to take a unit prisoner rather than defeat them in the normal way. Units that counter charged could also make this declaration but units that were defending could not. If a unit that declared it was attempting to take a unit prisoner won a round of combat then the defeated unit still lost any casualties it suffered but instead of then retreating and taking a courage test is remained in base to base contact with the winning unit and was then considered "captured".
A unit with prisoners could still defend itself in attacks and shoot, if it had the ability to do so, but could no longer attack other units. A unit with prisoners could move 6" per turn as a maximum. The captured unit could do nothing. If the unit with the captured unit in tow was then beaten in a round of combat or battered the captured unit was considered freed and could act as normal during its next turn. The freed unit did not need to take a courage test - they were considered relieved to have escaped!
Retinue leaders could also be captured in this manner in a challenge. If they were defeated after the challenger had declared they were trying to capture them their whole unit became captured and was moved into base to base contact with the challengers unit. The receiver of the challenge could not declare they were trying to capture the challenger so they would kill them if they won the challenge.
To get the victory points for a captured unit the unit that had taken them prisoner had to either leave by their table edge with the captured unit or have them as prisoner at the end of the game when all of the opponents forces had been defeated.
Victory were based on points which would be awarded as follows:
6 points per enemy retinue leader and their unit captured
3 points per enemy unit captured
 |
| The Scottish raiding party under Robert Maxwell, 5th Lord Maxwell, and Alexander Gordon faces off against the locally raised English border force. |
 |
| Lord Maxwell and his retinue amidst the Scots pike blocks. |
 |
| English borderers defend the West March against the Scots raiding party. |
The Armies
The Scots
Robert Maxwell, 5th Lord Maxwell
1 Unit of Foot Knights (Lord Maxwell)
3 Units of Lowland Pike
2 Units of Border Foot
1 Unit of Bow
1 Unit of Arquebusiers
1 Unit of Border Horse
Sir Alexander Gordon
1 Unit of Foot Knights (Sir Alexander Gordon)
3 Units of Lowland Pike
1 Unit of Retinue Foot
1 Unit of Bow
1 Unit of Border Horse
The English
For the English I was unable to find who captained the local forces so for the English leaders in this scenario two of the local border captains who were active in 1524 were drafted in. Lord Thomas Dacre's son, William Dacre, who would be warden of the West March himself from 1527 to 1534 and Thomas Wharton, who was knighted in 1527 and was later to play a big part in the 1540s Anglo-Scots Wars. Their inclusion is pure speculation and they may well have played no part in the historical raid this scenario is based on.
William Dacre
1 Unit of Foot Knights (William Dacre)
2 Units of Garrison Archers
2 Units of Garrison Bill
1 Unit of Border Horse
Thomas Wharton
1 Unit of Foot Knights (Thomas Wharton)
2 Units of Border Foot
1 Unit of Border Horse
1 Unit of Shire Bill
2 Units of Shire Archers
 |
| "the lorde Maxwell of Scotlande, and sir Alexander Iorden with banners displayed, and Scottes to the nombre of foure thousand" |
 |
| The English advance on the Scots raiders. |
 |
| The first blood is shed as the English drive back some skirmishing Scots border horse. |
 |
| The lines draw closer. |
Initially the fighting was to the advantage of the English. A unit of Scots border horse was sent reeling back by English arrows and the whole of the English force moved purposefully towards the Scots lines. On the English right flank some English border horse harrassed some of Maxwell's pikemen whilst at the other end of the field, on the English left, the men under Dacre's command took up a position in a shallow stream.
The troops raised by Maxwell and Gordon for this raid were obviously veterans of border warfare, well enough equipped to suffer little harm from the English archers arrayed before them. Within a short time hand to hand fighting had broken out, one of the first melees being an inconclusive challenge between Wharton and Lord Maxwell as Wharton and his men tried to capture the Warden of the West March. Wharton and his men did succeed in taking a large body of Scots pikemen prisoner but their success was to prove short-lived.
 |
| English border horse outflank the Scots left wing. |
 |
| English and Scots archers trade arrows. |
 |
| The English left wing take up a position in a shallow stream. |
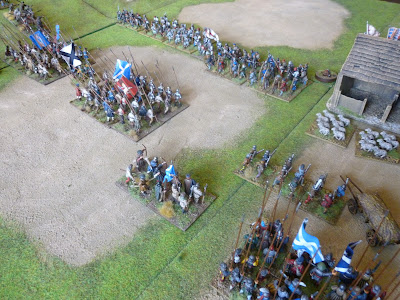 |
| In the centre of the field the English bear down on Maxwell and his men. |
 |
| Maxwell and Thomas Wharton, the local English captain, clash inconclusively. |
 |
| A large body of Scots is captured by the English Foot Knights. |
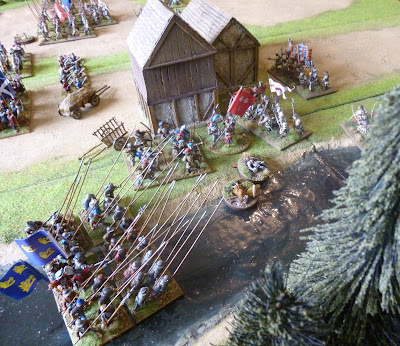 |
| On the English left flank William Dacre captures more Scots. |
 |
| The Scots strike back with a unit armed with polearms capturing some of the English archers. |
On the English left flank the forces under William Dacre were initially successful in pushing forward and capturing some of the Scots raiders but they soon met with disaster. Gordon's troops captured some of Dacre's archers and they were hurriedly taken behind the Scottish lines. Dacre attempted to capture Sir Alexander Gordon and was instead brought down in the shallow waters of the stream. Even worse was to befall the English in the centre of the field as not only were the large body of Scots prisoners freed as the English attempted to escort them off the field but Thomas Wharton himself was bested in a melee and captured.
With both of the English captains out of action the morale and organisation of the English forces crumbled. Those in the centre who had been under Wharton's command tried to put up a fight, with the border horse on the English left flank attempting to ride around and rescue Wharton as he was led from the field. Their path was blocked by the closely packed ranks of Scottish pikemen. Maxwell's borderers made short work of the remaining English forces in the centre which soon turned in flight. Dacre's men put up a stiffer fight but could not take any of the opposing Scots prisoner. They left the field in a more organised manner than Wharton's men but the day had been a victory for the Scots. Wharton had been taken prisoner along with a number of English archers from Dacre's forces, "this was the chaunce of warre".
This first game was a resounding victory for Stuart and his Scots, by capturing Wharton and the archers he had scored 9 victory points to my 0!
 |
| Alexander Gordon battles William Dacre in the shallow water and Dacre is brought down. |
 |
| In the centre of the field the Scots prisoners are freed. |
 |
| In a local border tower the English archers look on and can see that things are not going to plan! |
 |
| The Scots are overwhelming the English centre. Within minutes Thomas Wharton is captured. The English force now has one captain captured and the other incapacitated. |
 |
| Scots pike defend the stream against the English as their comrades escort the prisoners from the field. |
 |
| English archers put up a fight against the Scots pike but are put to flight as the English centre collapses. |
 |
| The Enlish left flank engages in a vicious melee with the Scots. |
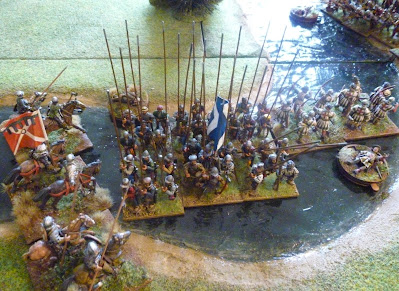 |
| Gordon's men drive the English back and the Scots are victorious having captured one of the English captains and some of the English archers. |
"in which space he had many battailes and skirmishes with the wild Irishe."
The spring of 1520 saw Henry VIII appoint Thomas Howard, Earl of Surrey, to the office of Lord Deputy of Ireland. He was replacing Gerald FitzGerald, the 9th Earl of Kildare who had been accused of maladministration and called to London. Having landed in Dublin with a force that included 100 men of the Royal Guard* on 23 May it was not long before he was sending a litany of complaints to England about his lack of money and troops. In June he wrote to Wolsey "to show my lord Cardinal that I have long ago told him that it is impossible for me to sign the indenture he has sent, binding me to serve the King with 50 archers and demi-lances on horseback, 50 footmen, all English, 100 Irish horsemen and 300 kerne. Cannot furnish more than the above number of English, 50 Irish horse and 150 kerne, which, with my other charges, will cost me more than I receive from the King and all the revenues of my lands in England. If war continue, it will be impossible to maintain that number."
Hall describes Surrey's time in Ireland as such "In this year the kyng beyng infourmed, that his realme of Ireland was out of ordre, discharged the erle of Kildare of his office of deputie, and thereunto (by means of the Cardinall as men thought) was appoynyted therle of Surrey lorde Admirall, to who the Cardinal did not owe the best favor. Wherfore the saied erle of Surrey in the beginning of Aprill, tooke leave of the kyng, and the duke of Norffolke his father, and passed into Ireland, and had with him diverse gentlemen, that had been in the garrison of Tourney, and one hundred yomen of the kynges garde, and other to the nomber of a thousande menne. Where he by his manhod and wisedom brought the erle of Desmonde and diverse other rebelles, to good conformitie and ordre: and there he continued in great hardnes two yere and more, in which space he had many battailes and skirmishes with the wild Irishe."
One of Surrey's first acts in an attempt to pacify the Irish clans or septs was to launch a raid to the Southwest of the English Pale into the territory of Connell O'More (also spelt as O'Moore in some sources)
*Sources differ on this as Anita Hewerdine in "The Yeomen of the King’s Guard 1485-1547" states that 220 Yeomen of the Guard accompanied Surrey.
The Scenario
In this game Surrey with a mixed force of English and Irish auxiliaries was attempting to raid and burn O'More territory whilst Connell O'More's forces would arrive and attempt to defend them.
The game was played down the length of the table and started with the English deployed at one far end with two units of Irish deployed in defence of their crops and cattle in the centre of the table. The English had to attempt to burn the crops and take the cattle. The Irish player allocated the rest of his retinue to be in hiding along either of the two long sides of the table, noting down in secret which units were hiding along which edge. These could then be brought into play using a move activiation by the Irish player.
The cattle were placed in a central location and could be picked up by a unit in base to base contact with them. The unit could then move a maximum of 6" per turn and would loose the "cattle counter" if the unit was defeated in combat or battered. The unit could not attack but could shoot whilst it had the cattle. Both the Irish and English units could move the cattle.
To burn the crops the English player had to have at least one base from a unit in contact with a field at the start of their activation phase. As an ordered activation, they could use that unit to try to set fire to the field (instead of moving, attacking, or shooting). If there were 7 or more models in the unit the fire was started on a roll of 8+ on 2D6; if there were 6 or fewer models in the unit the fire was started on a roll of 9+ on 2D6.
To make this game even more chaotic rather than using the normal Lion Rampant turn system we copied the Bolt Action order dice system. A bag was filled with two sets of coloured dice, each set having the correct number of dice for units in each retinue. Each turn a dice was pulled out of the bag and the army it represented could then take a turn with one unit. If that unit failed its activation this didn't end the turn but meant that unit alone could not act that turn and another dice was then chosen. As units were destroyed or routed the dice that represented them were removed from the bag. We also added a "joker" dice. If this was drawn the turn was immediately over. Challenges and rolls for battered units were made by both players at the beginning of each turn.
Victory points were awarded as follows:
3 points per cattle counter that left the field from an armies table edge
3 points per field burnt for the English
We also added the "boasts" from the original Lion Rampant game so that victory points could also be gained from achieving whatever boasts were randomly selected. We took three each from a set of printed out cards that had the boasts set out on them.
For this game Stuart played as the O'More and I played as Surrey's English.
For this game Stuart played as the O'More and I played as Surrey's English.
 |
| Yeoman of the guard, demilancers and kern in the service of the Earl of Surrey. |
 |
| The Earl of Surrey's small army launches its raid into O'More territory. |
 |
| Ahead of the English an O'More stronghold can be seen in the distance with the cattle herd in the centre. |
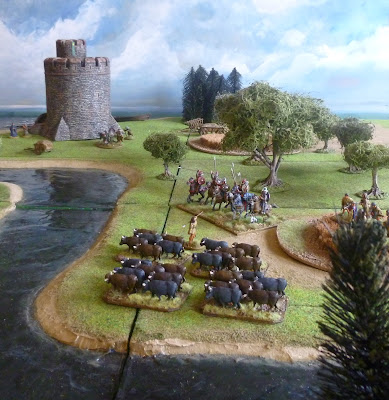 |
| The O'More cattle herd or "creaght" is defended by a small group of horsemen and some kern with arquebuses. |
 |
| Connell O'More views the English approach from the tower. |
The Armies
The Earl of Surrey's Army
2 Units of Demilancers (One is the Earl of Surrey)
2 Units of Border Horse
1 Unit of Irish Noble Cavalry
4 Units of Kern
1 Unit of Yeoman of the Guard
2 Units of Shire Archers
1 Unit of Shire Bill
Connell O'More
3 Units of Irish Noble Cavalry (1 Unit is Connell O'More)
5 Units of Galloglass
2 Units of Horseboys
1 Unit of Kern with shot
4 Units of Kern
 |
| English border horse and kern in the service of the Crown advance. |
 |
| The fighting starts as the O'More cavalry skirmish with the Crown's kern and border horse. |
It took no time for the action to start in this clash. Surrey's men had barely begun to advance when their path ahead was blocked by the arrival of skirmishing O'More cavalry. On either side of the English cries of "Aboo" rang out from the woods and galloglass, kern and horseboys charged into the flanks of Surrey's army. The English left was held by kern in the service of the Crown and northern border horse. These troops were little troubled by the ambush, instead putting up a stout defence and sending the O'More horse and kern back in flight.
On the other side of the English army the galloglass struck right at the heart of Surrey's small army and, supported by the horseboys, they caused chaos. Some of the galloglass were brought down by the archers only for more to emerge from the woods and replace them. As the fighting raged Connell O'More ordered some of his kern and their attendants to get his herd of cattle to safety.
 |
| As the English attempt to advance galloglass supported by horseboys ambush the English force. |
 |
| There is panic in the English ranks as the O'More ambush them. |
 |
| The ambush is from both sides with O'More kern, galloglass and cavalry attacking Surrey's border horse and kern. |
 |
| The kern from both sides skirmish in the woods. |
 |
| A running fight has developed between these lightly armed troops. |
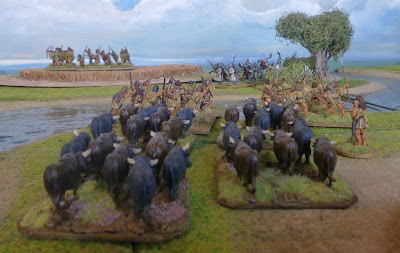 |
| As the English advance is stalled, kern and horseboys begin to lead some of the cattle to safety. |
 |
| The cattle are herded away from the advancing English. |
 |
| The O'More forces on Surrey's left have been driven back... |
 |
| ...meanwhile his right flank is still under pressure as more galloglass join the fray terrifying the English troops. |
 |
| The English archers are quickly put to flight. |
 |
| Surrey himself, with his mounted bodyguards, steadys his troops. |
In the woods on Surrey's left his kern were successful in keeping ambushing units at bay. On his right yet more galloglass charged forward. The English archers suffered badly in the melee with them and fled in all directions. It wasn't until the English billmen engaged that these professional Gaelic warriors were driven off, although the billmen themselves were spent as a fighting force after the bloody clash. The presence of Surrey admist the English part of his army meant some of the archers rallied and the line held.
Connell O'More entered the fray in an attempt to inspire his troops but he found himself surrounded by hostile kern who soon pushed his horsemen back as they launched arrows and darts in his direction. As he slipped back from the battlefield, many of his expensive galloglass having already been slain, the whole of the O'More force began to retreat. His men had succeeded in getting half of his cattle herd or "creaght" to safety but he was forced to abandon his fields and the rest of his cattle. A brave and resolute band of galloglass formed the rearguard and put up a stalwart defence against a charge by Surrey's demilancers, a unit comprised of the "diverse gentlemen, that had been in the garrison of Tourney". As these axemen sold their lives dearly the rest of the O'More army escaped, Surrey's men putting the septs' crops to the torch.
This game really was chaos, especially using the random dice bag method for activating units. The O'More under Stuart achieved victory points for saving two of the "cattle counters" and also for achieving a "boast" that meant they had to get a unit closer to my starting table edge than any of my units during a turn. Overall the game was a victory for Surrey's forces as once all the O'More warriors had gone the crop fields were left to the mercy of the raiding Lord Deputy and his men as were half of the cattle. The English also scored 5 points for achieving two "boasts" as Surrey had got through the entire game without attacking or ever being attacked and his army had killed the most costly O'More unit, defeating all 5 units of galloglass.
 |
| Connell O'More joins the fray surrounded by his mounted nobles. |
 |
| In the stream Irish horse in Surrey's service clash with some of the O'More nobility and drive them back. |
 |
| The galloglass that caused havoc amidst the English archers are finally stopped by a unit of billmen. |
 |
| Connell O'More and his nobles are pushed back and he leaves the field. |
 |
| Half of the cattle herd is driven to safety. |
I really enyoyed these two games. It was great to see all of Stuart's rapidly growing Scots forces on the table and it was a lot of fun to do a game set in Ireland with my Irish collection facing his Tudors. The Bolt Action dice bag method was something we haven't tried before and it was a lot of fun although it did manage to confuse us quite a bit. We kept forgetting which units had and which hadn't yet activated, I think we need to consider how to bring this method more effectivley into our games. As is normally the case these games are always a source of further inspiration. I feel there will be more raids across the Anglo-Scots border and more warcries of "Aboo" from the Gaelic Irish in the near future!


Excellent photographs on these ! The Irish game in particular looks suitably other doesn’t it.
ReplyDeleteGreat write up as always and I’m keen to try the bolt action dice again as it was fun.
Is there a way to share video content on this platform I wonder? I’ll happily send you the files next time if I can figure it out.
Great stuff Oli.
Cheers Stuart, it was great to get the early Tudors into Ireland for a game and I agree we need to develop the dice bag method further.
DeleteThe video clips were fun - we certainly have lots more we can ramble on about next time!
A couple of great looking games and write-ups. Lovely models.
ReplyDeleteThank you , I am glad you enjoyed them.
DeleteAs always a splendid AAR accompanied by lovely photos of the action.
ReplyDeleteCheers David, I think the background Stuart has painted up really worked well for the photos.
DeleteThanks, I greatly enjoyed the accounts and photos of the action.
ReplyDeleteI don't know if this helps but with activation chips - I've bought cheaply 'as new' poker chips from Charity Shops and used circular sticky labels with the name of the unit or leader etc. written on. The chips are already coloured so each army can have a different colour and the stickers are available in colours too. With one chip per unit it's clear which have already been taken from the bag and activated. The downside is that the random draw rather than the player decides the order of activation but as this is part of the rules I'm using that's fine.
Stephen
Cheers Stephen, that is a good idea but like you say it removes the decision on the order of activation - although it adds another element of randomness all together. That may well be an idea to try out.
DeleteAbsolutely amazing AARs. The detail, the pics- just awesome- the amount of effort you put in is just top notch. Thanks for sharing!
ReplyDeleteThank you John, I think the research and attention to detail we put in is why we do the hobby. Both Stuart and I definitely prefer the painting and history aspect to the gaming.
DeleteExcellent pictures and AAR. Well done to you and Stuart
ReplyDeleteCheers Peter, hopefully some more battle reports on the way soon.
DeleteSplendid looking pair of games! I really should try a game on the border or beyond the pale,even if it won't look as good as yours and Stuarts!
ReplyDeleteBest Iain
Thank you Iain, the Anglo-Scots border and the Irish Wars are a great source of inspiration for games, especially the various wars in Ireland where there were still many conflicts between Scots Clans from the Isles, Gaelic Irish Septs, Anglo-Irish and the Tudor Government.
DeleteWhat a wonderful pair of sixteenth century games...great action and beautiful pictures...thanks for posting!
ReplyDeleteCheers rross, I should have some more Tudor actions to post up in the next couple of days.
Delete