

The "Battle" of Deal
By the summer of 1495 Perkin Warbeck, most likely from the merchant classes of the Flanders town of Tournai and claiming to be Richard, Duke of York, the younger son of Edward IV and brother to Edward V, had already been at large for some years. A persistent threat and thorn in the side to Henry VII he had landed in Ireland in 1491, a place where the previous Yorkist pretender Lambert Simnel had found support. Being unable to start a rebellion Warbeck had returned to mainland Europe.
After first spending time with the French King, Charles VIII, Warbeck travelled to the court of Margaret of Burgundy, sister of Edward IV and his supposed aunt. Margaret, whether she believed Warbeck's claims or not, gave the pretender her backing along with Maximilian I (Maximilian was married to Margaret's step-daughter Mary) and by June 1495 he had been fitted out with a fleet of 15 Ships and a small army of foreign mercenaries and English rebels. Hall describes them in his chronicle as "a greate armye of valyaunt Capiteyns of all nacions, some banquerautes, some false Englyshe sanctuary men, some theves, robbers and vacaboundes".
Hall's comments seem to hold some truth as overall command of the invasion force fell to Rodigue de Lailang, an illegitimate son of Anthoine de Lalaing who had been Charles the Bold's Chamberlain in the 1470s. De Lailang had already fought for Maximilian in Utrecht and at the siege of Sluys where he may have met Edward Poynings who had also taken part in the campaign as an English auxilliary. Rodigue de Lailang was accompanied by his brother and a contingent of Burgundian lesser nobility as well as at least three Spanish mercenaries, Pedro and Don Fulano de Geuvara and Diego el Coxo (the lame) the last of whom was captured in Kent.
For the English in the army Ian Arthurson in his book "The Perkin Warbeck Conspiracy, 1491-1499" identifies Sir Richard Harleston as the likely commander. Harleston had led an expedition for Edward IV in 1468 to remove the French garrison of Jersey which had been occupied since 1461 and successfully retook the island after a six month siege. He looks to have participated in Simnel's rebellion for which he had been pardoned. First to land in England were a boatload of English troops lead by Henry Mountford a soldier who had served in Ireland in 1493 with a retinue of 100 men. Over 50 Englishmen were captured at Deal, after Warbeck's first abortive attempt at a landing, these men being a mix of labourers, grooms and chaplains and including a merchant and a goldsmith.
Leaving Flushing at the end of June it seems Warbeck had intended to land in East Anglia, where co-conspirators would rally support, but the channel crossing was difficult. One of the boats did not make it across with the rest of the fleet but was spotted off the Normandy coast by another English vessel. With their original plans upset by the crossing conditions the rebels landed at Deal in Kent. Jean de Molinet in an early account describes how around 300 men, including the 50 Englishmen mentioned above, were landed. With banners displayed they moved into three villages and were approached by a mounted man at arms. When the invaders told him they were men in the service of the Duke of York the man at arms offered his support. Believing the ruse the landed men sent word to Warbeck and the other rebel commanders that they had found friendly forces and that the pretender should land.
Suspecting a trap Warbeck and De Lailang refused to disembark, a decision proven to be well founded. The lone man at arms rode off under the excuse that he was going to fetch two barrels of beer as a goodwill gesture and the 300 landed rebels were immediately attacked. Well armed forces that had gathered at Sandwich in response to the invasion surrounded them and after a short time 150 of the rebel force lay dead on the beach whilst many drowned as they tried to get back to the ships. Henry Mountford and what was left of his advance party were forced to surrender.
The incident is also described by Hall as "The Kentyshmen hearynge that this feyned duke was come, and had heard that he was but a peinted ymage, doubtyng a space what to do, whether to helpe him or to resist his power, at the last remebryng what evell chaunces thier forefathers had, and how smal a profite such as have rebelled have gained, thought it neither expedient nor profitable for theim to aide & assyst hym that came rather to spoyle, destroye & wast the country, then to conquere it for their wealthe & comodity. And this thei firmely conjectured because he had none other with him but Alienes and straunge people, which would take & accompte every churche toune, chapell, house & every private man as a pray and a lucre, and not as their natyve countrey. Wherfore they fearing the sequele, determyned still to abide trewe to their kynge and prince, & to fall upon suche as were new come to land out of their shippes. And while thei were assemblyng of theimselves together, other should by fayre promises & fredly woordes allure & calle unto theim the great nombre out of the shippes, and so geve theim bataill. And so usyng this guyle and imposture, they promised all to folowe him and to fight undre his banner: Howbeit the proloning of time draue Perkyn into a suspicion, which wel remebred the a comminaltie is not accustomed sagely to cosult, but sodeinly & temerariously to ronne hedlyng ever into rebellion & newe stirred comocion. Wherfore Perkyn determing not once to set foote out of his ship till he sawe al thing sure wout any scruple or ambiguitee. And although he minded not to take land him selfe, yet he permitted certeyne of his souldiours to go on land, which persones beyng a prety waye fro their shippes, were sodeinly circuvented and compassed by the Kentyshmen, & at one stroke vanquyshed and dryven backe to their shippes, and ther was take prisoners an hundred and lx persons, whereof v were named capiteins Mountforde, Corbet, white belt, quyntine otherwyse Genyn."
Along with Henry Mountford, Ian Arthurson identifies five captains captured by the Kentishmen as Richard White, a man who had already narrowly escaped execution, being pardoned on the scaffold for his part in a previous plot in 1491, two yeomen John Belt and John Corbet and Quyntyne a Spanish soldier. John Corbet was taken alive but severely wounded, taking a month to die of his wounds. In all 163 men were taken prisoner a third of whom were English. The foreign mercenaries were treated as pirates and hung at various ports around the country. Amongst the captured foreign contingent was a company of Flemish arquebusiers and a Breton or French mercenary named Genyn (who Hall seems to have confused with the Spaniard, Quyntyne).
 |
| The Yorkist pretender's advance guard has landed under the command of Henry Mountford and the Spanish mercenaries, Quyntyne and Diego el Coxo. They march into Deal under the white rose of the house of York. |
 |
| The row boats of the advance party on the pebble beach of Deal. |
 |
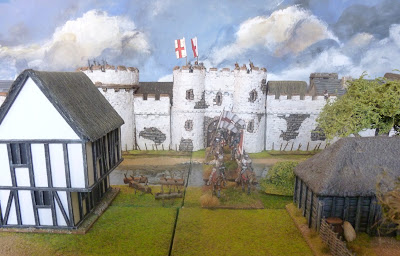
| The table from above. The two small retinues of Henry Mountford and Quyntyne can be seen on the right inside the village. Realising that the parley with a lone man at arms was a ruse the troops must make their way back to the boats in the top left whilst the Kentish militia will be arriving from every table edge, except the left hand edge representing the sea, in an attempt to stop them. |
The Scenario
For this game we each took control of part of the 300 strong force that Warbeck landed. One retinue under the command of Henry Mountford, including Richard White, John Belt and John Corbet and one retinue under the command of Quyntyne, including Diego el Coxo and the Flemish. The two retinues started in the village of Deal in discussion with the mounted men at arms. The game began following his departure as the landed rebels realised that a trap had been set and that they must head back to the boats on the shore to escape.
The Kentish levy retinue was controlled by both of us. We started the game with a hand of 5 playing cards each. Each turn we would play a card and whoever played the highest card got to control the first Kentish Levy unit of that turn and then the next unit would be controlled by the loser of the hand and so on until the Kentish levy retinue failed it's activation. These units behaved like a normal retinue and a failed activation would end their turn. We would both then take another card ready for the next round. Whoever's turn it was to activate a unit could decide where to bring on the Kentish levies using a move activation. A levy unit could arrive from any table edge accept the one that represented the sea (see the overhead photo above).
We each had five units and the aim of the game was to get as many of these five units to safety as possible whilst controlling the Kentish militia units to stop the other players five units from reaching the sea. We had to get a unit to the beach using a move activation to get them to safety but only the first five units to reach the beach could do this, not that this mattered at all in the end! After that the rest of the force was considered trapped. Victory would go to the player who got the most units to safety.
A note on the flags and figures
The two games we played were set in 1495 so fitted our early 16th century collections reasonably well. You will note from the pictures below that we tried to use as many late 15th century figures as possible. The rag tag nature of Warbeck's forces allowed us to field all kinds of foreign mercenaries and even meant that my very early landsknecht from the Assault Group could see action as some of Rodigue de Lailang's Germans.
For Warbeck's flags we decided to use Pete's excellent set of Edward IV's Yorkist flags, https://www.ebay.co.uk/itm/254763142135?hash=item3b51110bf7:g:ZDsAAOSwPYZU7Ixh as Warbeck was after all claiming to be the Duke of York, Edward's son. It seems the rebels had intended to use the White Rose as a badge. One of Warbeck's conspirators, John Kendall, Prior of the Order of the Hospitallers in England, had stockpiled liveries for his retinue in the event of a rising. According to his servant, who informed on Kendall, he ordered a set of red and green jackets with red rose badges to be made in such a way that the red rose could easily be swapped with a white one. With regards to Warbeck's banners we do know that when he landed in Whitesand Bay in 1497, in yet another attempted invasion, his men carried one showing a child escaping from a wolf and one with a boy emerging from a tomb, apparently signifying his early escape from death, whilst a third was a Red Lion of Flanders invoking a political prophecy that salvation would come from Flanders.
As always the games were played using our Renaissance Rampant version of Lion Rampant. For the "Battle of Deal" Stuart took the mercenary troops under the command of Quyntyne whilst I took the retinue under Henry Mountford comprised mainly of English renegades with some Breton crossbowmen under Captain Genyn.
The Armies
Warbeck's Landed Rebels
Henry Mountford
1 Unit of Foot Knights (Henry Mountford)
1 Unit of Shire Archers (John Belt)
2 Units of Shire Bill (John Corbet and Richard White)
1 Unit of Breton Crossbowmen (Captain Genyn)
Captain Quyntyne
2 Units of Foot Knights (Quyntyne and Diego el Coxo)
2 Units of Flemish Handgunners
1 Unit of Mercenary Pike
The Kentish Levies
3 Units of Foot Knights (one is the retinue leader Sir John Pecche, the Sheriff of Kent)
4 Units of Shire Archers
4 Units of Shire Bill
 |
| A lone man at arms rides out to talk with the landed rebels. |
 |
| The rebel leaders engage in a discussion with the mounted man at arms described by Jean de Molinet. When he is told they have landed in support of the Duke of York he says he will support them. He then rides off under the excuse that he is going to fetch two barrels of beer as a goodwill gesture. |
 |
| Rather than bringing back two barrels of beer the man at arms has simply bought enough time for the locally raised militia to gather and surround the landed rebels. They are attacked and the Flemish handgunners give fire as the fighting begins in the village. |
The Game
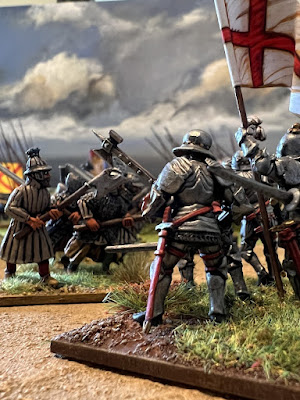
As soon as the lone men at arms had ridden off the rebel troops realised that they had been tricked. Levied archers and billmen under the command of local men at arms charged into the centre of the village where the small landing party had gathered. The Flemish handgunners fired a volley into the attacking men at arms whilst some of the English rebels under the leadership of the Yorkist die hard Richard White charged the Kentish billmen. This allowed the rest of Mountford and Quyntyne's troops to begin their escape and head back to the boats.
The mercenary Quyntyne was attacked by the commander of the local militia, the Sheriff of Kent, Sir John Pecche. Pecche was no match for the mercenary captain who slew the sheriff but this did little to dampen the spirits of the surrounding locals who feared the landed renegades and mercenaries would "spoyle, destroye & wast the country". Some of the Flemish handgunners were slain by Kentish men at arms whilst all of the units attempting to flee began to suffer casualties from the rain of arrows that the militiamen sent after them.
 |
| As locally raised billmen clash with English renegades under Richard White, a man who narrowly escaped execution in 1491 for his part in a previous plot, the rest of the Yorkist rebels flee the village. |
 |
| Local forces arrive in Deal and the "battle" begins. |
 |
| A view from above. The sides of the table show local forces arriving and surrounding Warbeck's advance party. |
 |
| The landed rebels make a run for their boats on the beach. |
 |
| The Spanish mercenary captain Quyntyne engages in combat with Sir John Pecche, the Sheriff of Kent, who is leading the local levies. Quyntyne defeats him and continues to make for the sea. |
 |
| Richard White and his men fight a rearguard action. Note the saints image carved in the beams of the building on the right. |
 |
| The Flemish handgunners are set upon by local men at arms. |
 |
| The rebels rush back through the village. |
 |
| A view from above with the shoreline being visible in the bottom left and the retreating Yorkist rebels visible at the top. Locally raised billmen can be seen attempting to cut off the retreat in the top right of the picture. |
 |
| The three hundred men that landed attempt to make good their escape but... |
 |
| ...find they are ambushed by local militia who emerge from both sides. |
The main road through Deal echoed with the sounds of panic and battle as Warbeck's advance guard made for their boats. Benefiting from their full armour the captains managed to avoid the arrow storm and kept on course to the beach. Abandoned by their leaders the rest of the ill fated 300 men began to be ambushed by men at arms and billmen who surrounded them as they attempted to get out of the village.
None of the Flemings made it anywhere near to the beach whilst the lightly armoured archers under the rebel John Belt were soon all killed or captured. Richard White, at the back of the retreating army, fought to the last with his fellow Yorkists whilst the Breton Genyn put up a good fight but was captured after being completely surrounded by militia billmen.
 |
| Kentish men at arms defeat the low countries pikemen. |
 |
| Henry Mountford has nearly made it to the beach... |
 |
| ...a mercenary captain points to the rowing boats. They don't have long. |
 |
| Genyn and his Breton crossbowmen find themselves surrounded by three units of billmen... |
 |
| ...they make a rush for the safety of Warbeck's fleet. |
 |
| Quyntyne and Mountford have made it back to the boats. They abandon the rest of the motley crew of bankrupts, false English sanctuary men and "theves, robbers and vacaboundes" to their fate. |
The two captains, Quyntyne and Mountford, made it to the boats and quickly rowed out to the 14 ships carrying the rest of the pretenders army. It looked as though they were going to be the only survivors but the other Spanish Captain, Diego el Coxo, was not ready to give in. Seeing the carnage on the main road he managed to get behind the cottages of Deal and into the gardens. His attempt at escape was spotted and militia billmen surrounded him. El Coxo refused to surrender and in a fierce melee broke through the local levies to reach the remaining row boats. In all three units of the ten that had landed had survived the ordeal.
 |
| Having tried to avoid the main street of Deal Diego el Coxo finds himself surrounded in the cottage gardens... |
 |
| ...along with his fellow Spanish mercenaries he puts up a valiant fight and manages to make it back to the safety of Warbeck's fleet. |
 |
| The walls and flooded ditches of Waterford. The Earl of Desmond's army has had little success in storming the town. |
The Siege of Waterford
Following the disastrous landing at Deal Warbeck and his fleet desperately sailed to Ireland which despite Sir Edward Poyning's best efforts in the wake of his arrival in 1494 (see http://camisado1500s.blogspot.com/2021/09/poynings-in-ireland.html) had still not been pacified by the summer of 1495. After the arrest of the Earl of Kildare, his brother James had taken Carlow Castle in the spring of 1495 forcing Poynings to lay siege to it. At the end of June 1495 another FitzGerald, Maurice the Earl of Desmond, lead a large army made up of both Anglo-Irish and Gaelic allies to besiege the town of Waterford. The town was defended on two sides by the rivers Suir and Johns and the townsfolk dug ditches and flooded them to surround the rest of the town walls. Poynings had managed to send Captain John Morton with Thomas Garth and a small force of Dubliners to reinforce the town.
Desmond blockaded the town and lead his men on raids into the surrounding area whilst the defenders engaged in skirmishes with the besiegers. Warbeck and his demoralised army now with 11 remaining ships arrived on 23 July 1495. Desmond and Warbeck camped to the south west of the town and attempted to take it in an assault in which two of Warbeck's ships landed troops at Lombard's Wear on the river Suir. They were attacked by a sally from the town whilst Desmond and Warbeck sent a second force to aid them from the camp but these reinforcements were blocked by the flooded ditches. The landed troops were defeated by the town garrison with some being captured and beheaded in the market place. The two ships were sank by by gunfire from a large fortification in the town, Reginald's tower.
Things went from bad to worse for Warbeck as Poynings arrived on 3 August 1495 at the head of a hastily assembled but large army made up of Anglo-Irish retinues from Leinster, Meath and Oriell, the Butlers and Gaelic Irish allies such as the MacMurroughs. Desmond and Warbeck were forced to retreat with Warbeck's fleet loosing three further ships to Poyning's artillery train. Warbeck disappeared next appearing in November in Scotland. Where his remaining 6 ships went is also something of a mystery but they at least got news back to Margaret of Burgundy and both Rodigue de Lailang and Sir Richard Harleston would continue in the service of the Flemish court.
 |
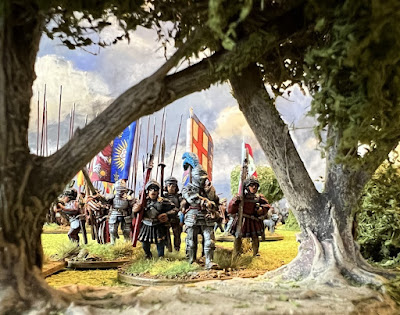
| On hearing that Sir Edward Poynings' relief army is close at hand the Earl of Desmond with his troops along with Perkin Warbeck and his landed force of renegade Englishmen and German and Spanish mercenaries decide to flee. The captains under the banners in the picture above represent, from left to right; Sir Richard Harleston, Perkin Warbeck, Rodigue de Lailang, Pedro and Don Fulano de Geuvara and Maurice FitzGerald, the Earl of Desmond. |
 |
| A view of the table from above. The two retinues, one under the command of the Earl of Desmond and the other under the "command" of Warbeck must make it past the walls of Waterford to safety at the other end of the table. Sir Edward Poynings and his troops will be chasing behind them whilst the defenders of Waterford can sally from the town walls in an attempt to cut off their escape. |
The Scenarios
In this game we each commanded two retinues, Stuart was in command of Sir Edward Poynings leading the relief army and the defenders of Waterford whilst I took the armies of the Earl of Desmond and Warbeck. The game started with both Warbeck and Desmond's armies deployed. Along one side of the table were the walls of Waterford and the flooded ditches (see above).
Warbeck and Desmond had to attempt to retreat in front of the walls and reach the other table edge with the defenders sallying out to block them from the town gates. Poynings and his forces would arrive from behind in an attempt to trap the Tudor pretender and rebellious Anglo-Irish earl.
Warbeck and Desmond took the first turn but from turn one the defenders of Waterford could enter the table from the gates via a move activation. Poynings could enter from turn two if a 9-12 was rolled on 2D6, from turn three on a 8-12, from turn four on a 7-12 and so on. Poynings' units could enter via move activations from the table edge behind Desmond and Warbeck.
Victory Points were as follows:
Desmond and Warbeck
5 Points if Warbeck escaped
3 Points if Desmond escaped
2 points if Rodigue de Lailang, Sir Richard Harleston or Pedro and Don Fulano de Geuvara escaped
1 Points for every other unit that left the table edge at the opposite end of the table
Poynings and the town's defenders
5 Points if they killed or routed Warbeck
3 Points if they killed or routed Desmond
2 points if they killed or routed Rodigue de Lailang, Sir Richard Harleston or Pedro and Don Fulano de Geuvara
1 Point for every other enemy unit destroyed
 |
| The gates of Waterford open and a troop of light horsemen cross the flooded ditches to sally out. |
 |
| The cavalry from the town ride out. |
The Armies
Perkin Warbeck
1 Unit of Foot Knights (Perkin Warbeck)
1 Unit of Landsknecht Halberdiers (Rodigue de Lailang)
1 Unit of Shire Archers (Sir Richard Harleston)
1 Unit of Spanish Arquebusiers (Pedro and Don Fulano de Geuvara)
2 Units of Landsknecht Pike
Maurice FitzGerald, Earl of Desmond
1 Unit of Foot Knights - (Maurice FitzGerald, Earl of Desmond)
1 Unit of Shire Archers
1 Unit of Galloglass
2 Units of Household Kern
1 Unit of Irish Cavalry
Sir Edward Poynings, Lord Deputy of Ireland
2 Units of Foot Knights (Sir Edward Poynings and Sir James Ormond)
2 Units of Shire Archers
1 Unit of Demi Lancers
1 Unit of Galloglass
1 Unit of Kern
1 Culverin
The Defenders of Waterford
1 Unit of Garrison Bill (Captain John Morton)
1 Unit of Shire Bill
2 Units of Shire Archers
1 Unit Border Horse
 |
| Knowing that Poynings' arrival is imminent Desmond's troops start to move whilst chain of command issues mean Warbeck's small army is slow to act. |
 |
| Sooner than expected Sir Edward Poynings arrives with an army of Anglo-Irish retinues and Gaelic Irish allies. |
 |
| A view of the table as the game begins and Poynings' retinue immediately clashes with Desmond's Gaelic infantry. |
The Game
Things did not start well for the rebels in this game! Desmond's forces began their escape whilst Warbeck's army was disorganised and slow to get moving. The pretender's troops were soon hurried by the sudden appearance of Poynings and his army which had arrived far quicker than expected. Luckily for Warbeck it was the FitzGerald army that bore the brunt of the attack and a fierce battle developed as the Desmond kern and galloglass fought off the Lord Deputy's Anglo-Irish and Gaelic troops. Desmond's men did manage to fight off Poynings' demi lancers and kern but they were soon surrounded and defeated by his men at arms and the galloglass in his employ.
This clash gave Warbeck's renegades and mercenaries time to flee from Poynings and they began to march around the walls of the town. Encouraged by Poynings' arrival the men of Waterford also sallied out crossing the flooded ditches on a makeshift wooden bridge. They were determined to stop the recently landed invaders from making an easy escape.
This clash gave Warbeck's renegades and mercenaries time to flee from Poynings and they began to march around the walls of the town. Encouraged by Poynings' arrival the men of Waterford also sallied out crossing the flooded ditches on a makeshift wooden bridge. They were determined to stop the recently landed invaders from making an easy escape.
 |
| A captain, possibly John Morton, leads the defenders of Waterford out to cut off Wabeck's retreat. |
 |
| Sir James Ormond and his fellow Butler men at arms attack Desmond's galloglass. |
 |
| The Butler men at arms clash with FitzGerald's galloglass. |
 |
| Desmond's kern are defeated by galloglass in Poynings' employ. |
 |
| Warbeck and Rodigue de Lailang behind him make a rush to escape Poynings' army. |
 |
| As Poynings' troops arrive Pedro and Don Fulano de Geuvara, with their Spanish arquebusiers, form a rearguard. |
 |
| Sir Edward Poynings himself catches some of the FitzGerald kern as they attempt to escape. |
 |
| The Lord Deputy's artillery train has arrived and they send shots into the retreating Desmond army. |
 |
| Whilst Desmond's forces have already had a mauling, Warbeck and De Lailang's men are still fresh. |
 |
| The Geuvara's fight a rearguard action, sending a hail of shot at Sir James Ormond and the Butler's as they attack. |
 |
| The Spanish arquebusiers are forced back by the advancing Anglo-Irish men at arms under Ormond... |
 |
| ...but Ormond is finally brought down in a fierce melee with a group Rodigue de Lailang's colourfuly dressed German pikemen. Surely this new breed of mercenaries will never catch on? |
 |
| Sir James Ormond is slain by Rodigue de Lailang's mercenaries. |
As Poynings' army continued to plough into the Earl of Desmond's forces, even bringing his artillery to bear on them, Sir James Ormond and his Butler men at arms turned their attention towards Warbeck's men. The Spanish captains, Pedro and Don Fulano de Geuvara, with their arquebusiers, formed a rearguard behind the hedges outside the town and attempted to fight off the oncoming Anglo-Irish but they were driven back after their initial hail of shot. The two Spaniards were defeated by Ormond and his men who were then counterattacked by a colourfuly dressed band of German pikemen. Having already fought through Desmond's forces and the Spanish this encounter with the mercenary pike was too much for the beleaguered Ormond who was slain with his Butler bodyguards.
From a distance and through the gun smoke Rodigue de Lailang thought he saw Poynings and the Earl of Desmond momentarily in discussion in front of the town walls. De Lailang sensed treachery and rushed to the scene. Whatever was discussed Desmond seemed to have disappeared from the fight leaving only a small band of his servants on the field. De Lailang and his men crashed into Poynings and his men at arms. A sharp fight ensued in which De Lailang was slain and Poynings was so badly injured that he had to be carried from the field.
 |
| The Earl of Desmond engages in a "duel" with Sir Edward Poynings or is perhaps a deal done? Whatever takes place the FitzGerald Earl vanishes from the battlefield leaving his bodyguard's to fight on. |
 |
| Rodigue de Lailang and his guard of halberdiers attack Poynings. In the ensuing fight de Lailang and his men are killed but Poynings is also severely wounded and has to carried from the field. |
 |
| Whilst the fighting is taking place Warbeck races to escape with a unit of German pikemen protecting him. Behind Sir Richard Harleston and a unit of rebel Englishmen still think they may be able flee the Lord Deputy's army. |
With Desmond and De Lailang gone Warbeck was even more desperate to reach safety. He still had some of the German pikemen with him along with the veteran captain Sir Richard Harleston and a band of archers. They had safely evaded Poynings' pursuit but now found themselves trapped as troops rushed from the gates of Waterford. The exhausted Germans and archers were seen off by the towns militia but it still looked as if Warbeck may escape to threaten the Tudor monarchy once again. As he was about to reach the cover of the woods horsemen from Waterford caught him and his band of loyal followers. They were slain by the cavalry. The townspeople could not think of a more suitable gift for their king back in England than the pretenders' head!
 |
| Reinforcements for Poynings are pouring out of Waterford and they succeed in stopping the remaining Germans and Harleston's Englishmen from reaching safety. |
 |
| It still looks as if Perkin Warbeck may get away but he is caught by the cavalry that sallied from the town. They slay the pretender and the rebellion is over. |
Despite two defeats (the second being a disaster!) these were really absorbing games. They were the kind of thing Lion Rampant is designed for. It was great to use such a different array of units from our collections and to jump from the beach in Kent to Desmond's siege in Ireland as we followed Warbeck's stricken invasion fleet. It also allowed Stuart and myself to get loads of our terrain on the table and really set the scene. Having the names of lots of the rebels really helped to add flavour and personality to Warbeck's forces and made the scenarios a lot fun. We will definitely be returning to Perkin Warbeck and his co-conspirators in the future!
Wonderful stuff, love the table top. And kudos for the historical research.
ReplyDeleteCheers Peter - I got a bit carried away looking into the background for this one. We intend to game out Warbeck's assault on Exeter in 1497 at some point as well.
DeleteFantastic! Love the photos, the background info and the reports!
ReplyDeleteThank you, the Tudor rebellions offer up some interesting scenarios.
Deleteкрасивая игра,красивые миньки,красивый террейн,все супер!
ReplyDeleteСпасибо, я рад, что вам понравились игры. В будущем Уорбека будет больше!
DeleteAs always- a game report, a history lesson and eye candy all in one. Thanks again for your outstanding BATREPS.
ReplyDeleteThank you John, I am glad you enjoy the reports. Hopefully there are more of these to come this year.
DeleteFabulous scenario and a stunning tabletop. Well done!
ReplyDeleteCheers Curt, have you been working anymore on the Malta project? I was really enjoying seeing that develop.
DeleteThe quality of the figures, terrain and overall table setting are absolutely outstanding! Fantastic stuff.
ReplyDeleteThank you, I am glad you enjoyed the games, they were a lot of fun to play through.
DeleteAwesome pair of games,entertaining,informative and of course lovely terrain and figures !
ReplyDeleteBest Iain
Thank you Iain, the Perkin Warbeck attempts to seize the throne from the Tudor regime are a great source for interesting scenarios.
Delete