

This weekend Stuart visited and we combined our miniatures and terrain to play out two scenarios from one of the key clashes of the first half of the 16th century, Suleiman the Magnificent's siege of Vienna in the autumn of 1529. Inspired by the detail in some of the contemporary woodcuts of the siege, it would allow us to pit landsknecht infantry and Spanish arquebusiers against my Ottoman collection.
The Siege of Vienna, 1529
The Ottoman victory at Mohács in August 1526 did not lead to an immediate push westwards by Suleiman and his forces. Buda was sacked but the Ottoman Sultan withdrew leaving a power vacuum in Hungary that set the scene for a war between Ferdinand of Habsburg, brother of the Holy Roman Emperor Charles V, and John Zápolya, Voivode of Transylvania, who was supported by the lesser nobility of the kingdom. Ferdinand had the better of Zápolya in this conflict which pushed Zápolya into the arms of the Ottomans. With the Habsburgs in control of much of Hungary Suleiman struck back in support of his new vassal, Zápolya, and in 1529 led an army to besiege Vienna.
The Sultan led the army himself, the second in command being his Grand Vizier, Ibrahim Pasha. Hampered by heavy rains the Ottoman army, numbering in excess of 120,000 fighting men, arrived at Vienna in late September 1529. The long journey west in poor weather conditions meant that supplies and artillery had been lost while many of the Ottoman troops were already in ill health. The defence of Vienna fell to a veteran of Pavia, Nicholas, Count of Salm, who had led Ferdinand's forces to victory against John Zápolya, http://camisado1500s.blogspot.com/2021/08/tarcal-1527.html. Wilhelm von Roggendorf (who would later die of the wounds he sustained at the Siege of Buda, http://camisado1500s.blogspot.com/2022/01/the-siege-of-buda-1541.html) commanded the heavy cavalry with Johann Katzianer commanding a force of light horse.
By 20 September 1529 the garrison consisted of 12,000 professional infantry and 2,600 cavalrymen. Most of the infantry were Hungarian or landsknecht mercenaries but they included a force of 700 Spanish arquebusiers. A further 5,000 infantry and 100 heavy cavalry under Philip, Duke of Palatinate-Neuburg, arrived just before the Ottoman force could encircle the city. The medieval walls of Vienna were reinforced and wooden gun platforms were placed behind them and atop buildings within the city. The suburbs were burnt and the ditch cleared. Despite this the experienced Count of Salm still feared the defences were too old and his numbers too low to successfully withstand the Ottoman siege.
The Ottoman vanguard of akinji and sipahi arrived on 23 September. A force of 500 Austrian heavy cavalry attempted to disrupt their arrival but was itself smashed by the Ottoman cavalry near the monastery of St Nicholas. The main force arrived on 25 September. The Ottomans had lost most of their heavy guns on the road to Vienna due to the appalling weather. This forced them to rely heavily on undermining the walls instead. The Kärtner Gate, on the south side of the city, became the focus of the besiegers attention. As the Ottomans established their siege lines the garrison of Vienna launched sorties to disrupt their entrenchments and prevent them from undermining the walls. The two woodcuts below show many of the details of the Ottoman siege.
 |
| Erhard Schön - Siege of Vienna 1529 |
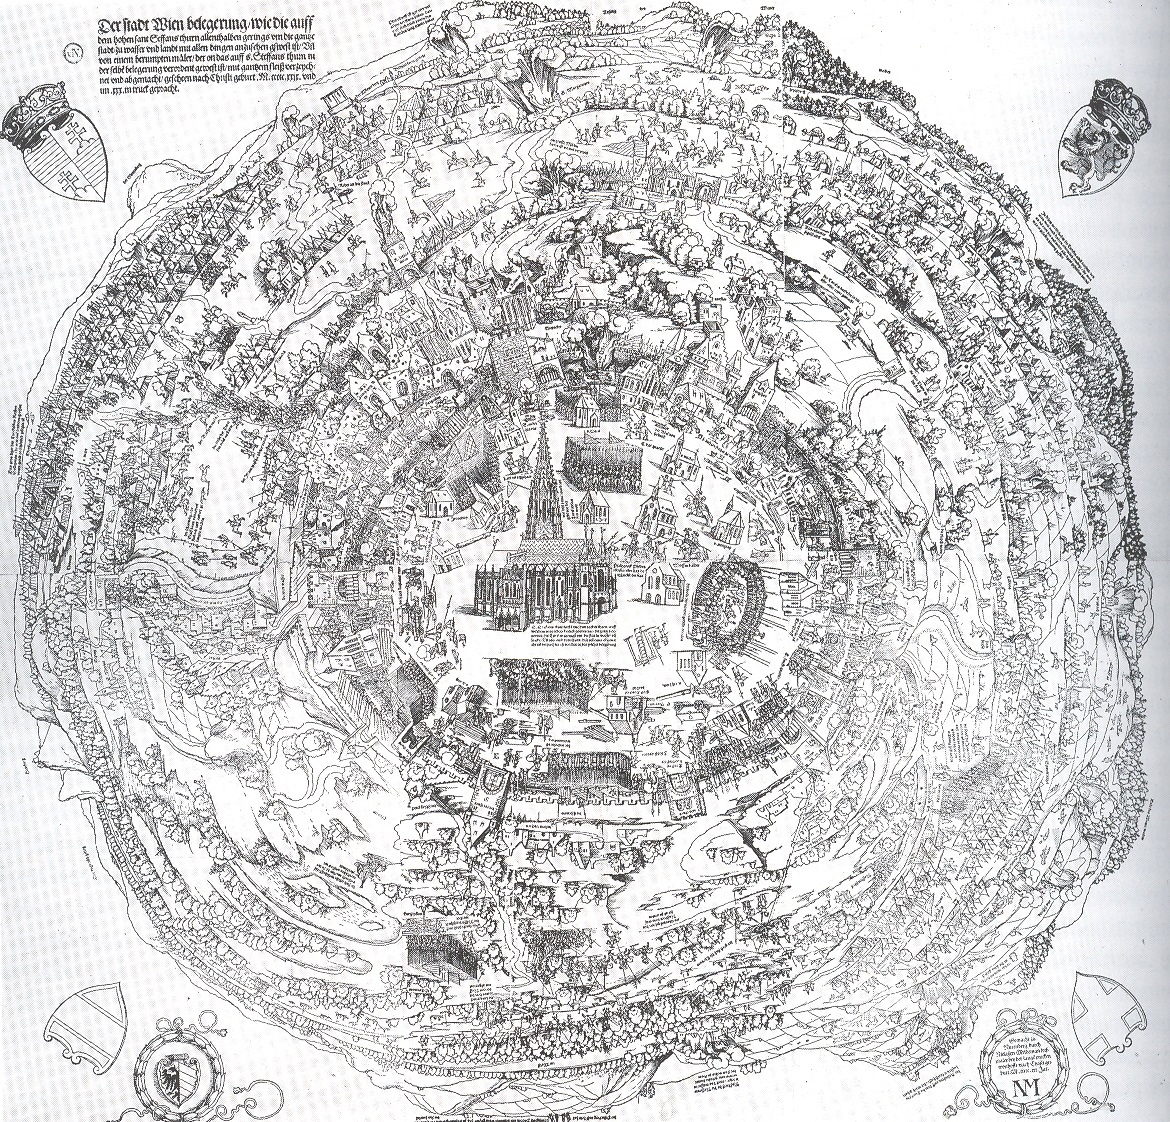 |
| Hans Sebald Beham - Siege of Vienna 1529, a panoramic contemporary woodcut showing the whole city encircled. |
The largest of these sorties was launched by the garrison on 6 October and 8,000 men sallied out to disrupt the Ottoman mines. This attack was initially successful but around 500 of the Habsburg troops were lost when they were unable to retreat back into the city in time. The 9th October saw a determined assault by the Janissaries on two breaches to the west of the Kärtner Gate when mines were blown beneath the walls. Salm was injured in the thigh during this assault and would die of his wound the following spring. The 11th saw a further Ottoman assault to the east of the Kärtner Gate but the Ottoman mines did not detonate properly thanks to the countermining of Tyrolean miners, with another attack failing the day after. The defenders gun positions around the gate had been destroyed by the Ottoman gun batteries and miners which meant a dusk assault was launched on the walls again. With weather conditions only worsening the Ottoman morale began to fall. A last major assault was made against the city walls on 14 October but the defenders arquebusiers and the landsknecht pike ensured that the Ottoman assault troops could not break into Vienna.
With the failure of the assault on the 14 October the Sultan ordered his army to break camp and begin the long journey home. The awful weather made the retreat difficult and the Habsburg light horse pursued the Ottomans, freeing Austrian captives and picking off stragglers from Suleiman's army. Suleiman would attempt a return to the walls of Vienna in 1532 only to be stalled at Güns for nearly the whole of August, during which time Charles V assembled a large army to counter the Ottoman advance. Suleiman thought better of continuing the campaign and turned back.
 |
| An Ottoman gun battery firing upon the beleaguered city walls. |
The Garrison's Sally
Our first game represented one of the sorties that was launched by the garrison after the arrival of the Ottomans up until 6 October. The table was set up to represent the walls of Vienna on one side with the Ottoman siege works along the other (see the photo below). The Habsburg player had to lead a sally from the city to destroy three objectives, these being two Ottoman gun batteries and one mine entrance. As always we used our modified version of Lion Rampant, Renaissance Rampant, with some additional rules.
Deployment
At the start of the game the Ottoman player could deploy two units of Janissaries on the table as guard units. Otherwise no units started on the table.
The Habsburg defenders could enter using move activations from either the main gate or from either end of the table edge by the walls. This represented troops leaving the walls at other points and travelling around them to arrive for the sortie. The Ottomans could deploy from along their table edge using move activations.
The Habsburgs would take the first turn.
Activation Fails
As we each had large retinues in this game, each turn each player would take 5 cards from a deck. Any King, Queen or Jack cards from the 5 they took could be used to get a reroll on an activation fail for that turn for their retinue. At the end of the turn all unused cards were put in a discard pile. Once the deck ran out a fresh deck was used for the reroll cards. The leader of each army also had the Lion Rampant "Command" ability which could allow for a reroll within 12" of the leader.
Destroying the objectives
Only infantry units could destroy the Habsburg's objectives. To destroy one of the three target objectives the Habsburgs had to have at least one base from an infantry unit in contact with it at the start of their activation phase. As an ordered activation, they could use that unit to try to destroy the objective (instead of Moving, Attacking, or Shooting). If there were 7 or more models in the unit the objective was destroyed on a roll of 8+ on 2D6; if there were 6 or fewer models in the unit the objective was destroyed on a roll of 9+ on 2D6.
Hook Guns
Stuart and I are currently trying to work out a way to use these in our Renaissance Rampant games. We tested some rules for three of them in this game. They could accompany landsknecht pike blocks and would move with the unit. If the unit was attacked, made an attack or was battered the Hook Gun was removed. The pike block could go into close order and retain the Hook Gun. The Hook Gun could fire once per game and was then removed from play.
They had range of 24", rolling 4 dice which hit on 5+. There was always a -1 Armour modifier regardless of range. If the pike unit was charged the Hook Gun could fire in defence on a successful activation of 7+.
They cost 1 point each.
Victory Points
Victory in the game was based on victory points which were awarded as follows:
The Habsburg Garrison
5 points if the mine was destroyed.
3 points for each gun battery that was destroyed.
5 points if Ibrahim Pasha was killed or routed.
The Ottoman Besiegers
5 points if Nicholas, Count of Salm was killed or routed.
2 points if Wilhelm von Roggendorf was killed or routed.
1 point for each Habsburg unit that was killed or routed.
 |
| A view of the tabletop from above. The defenders of the city had to destroy the three targets in the top of the photo, from left to right - a gun battery, the mine entrance and another gun battery. The Ottomans entered the table from the top of the image whilst the Habsburg defenders of Vienna could enter the table via the gates, bottom centre of the photo and from the bottom left, by a Viennese gun battery or from the bottom right, along the city walls. |
 |
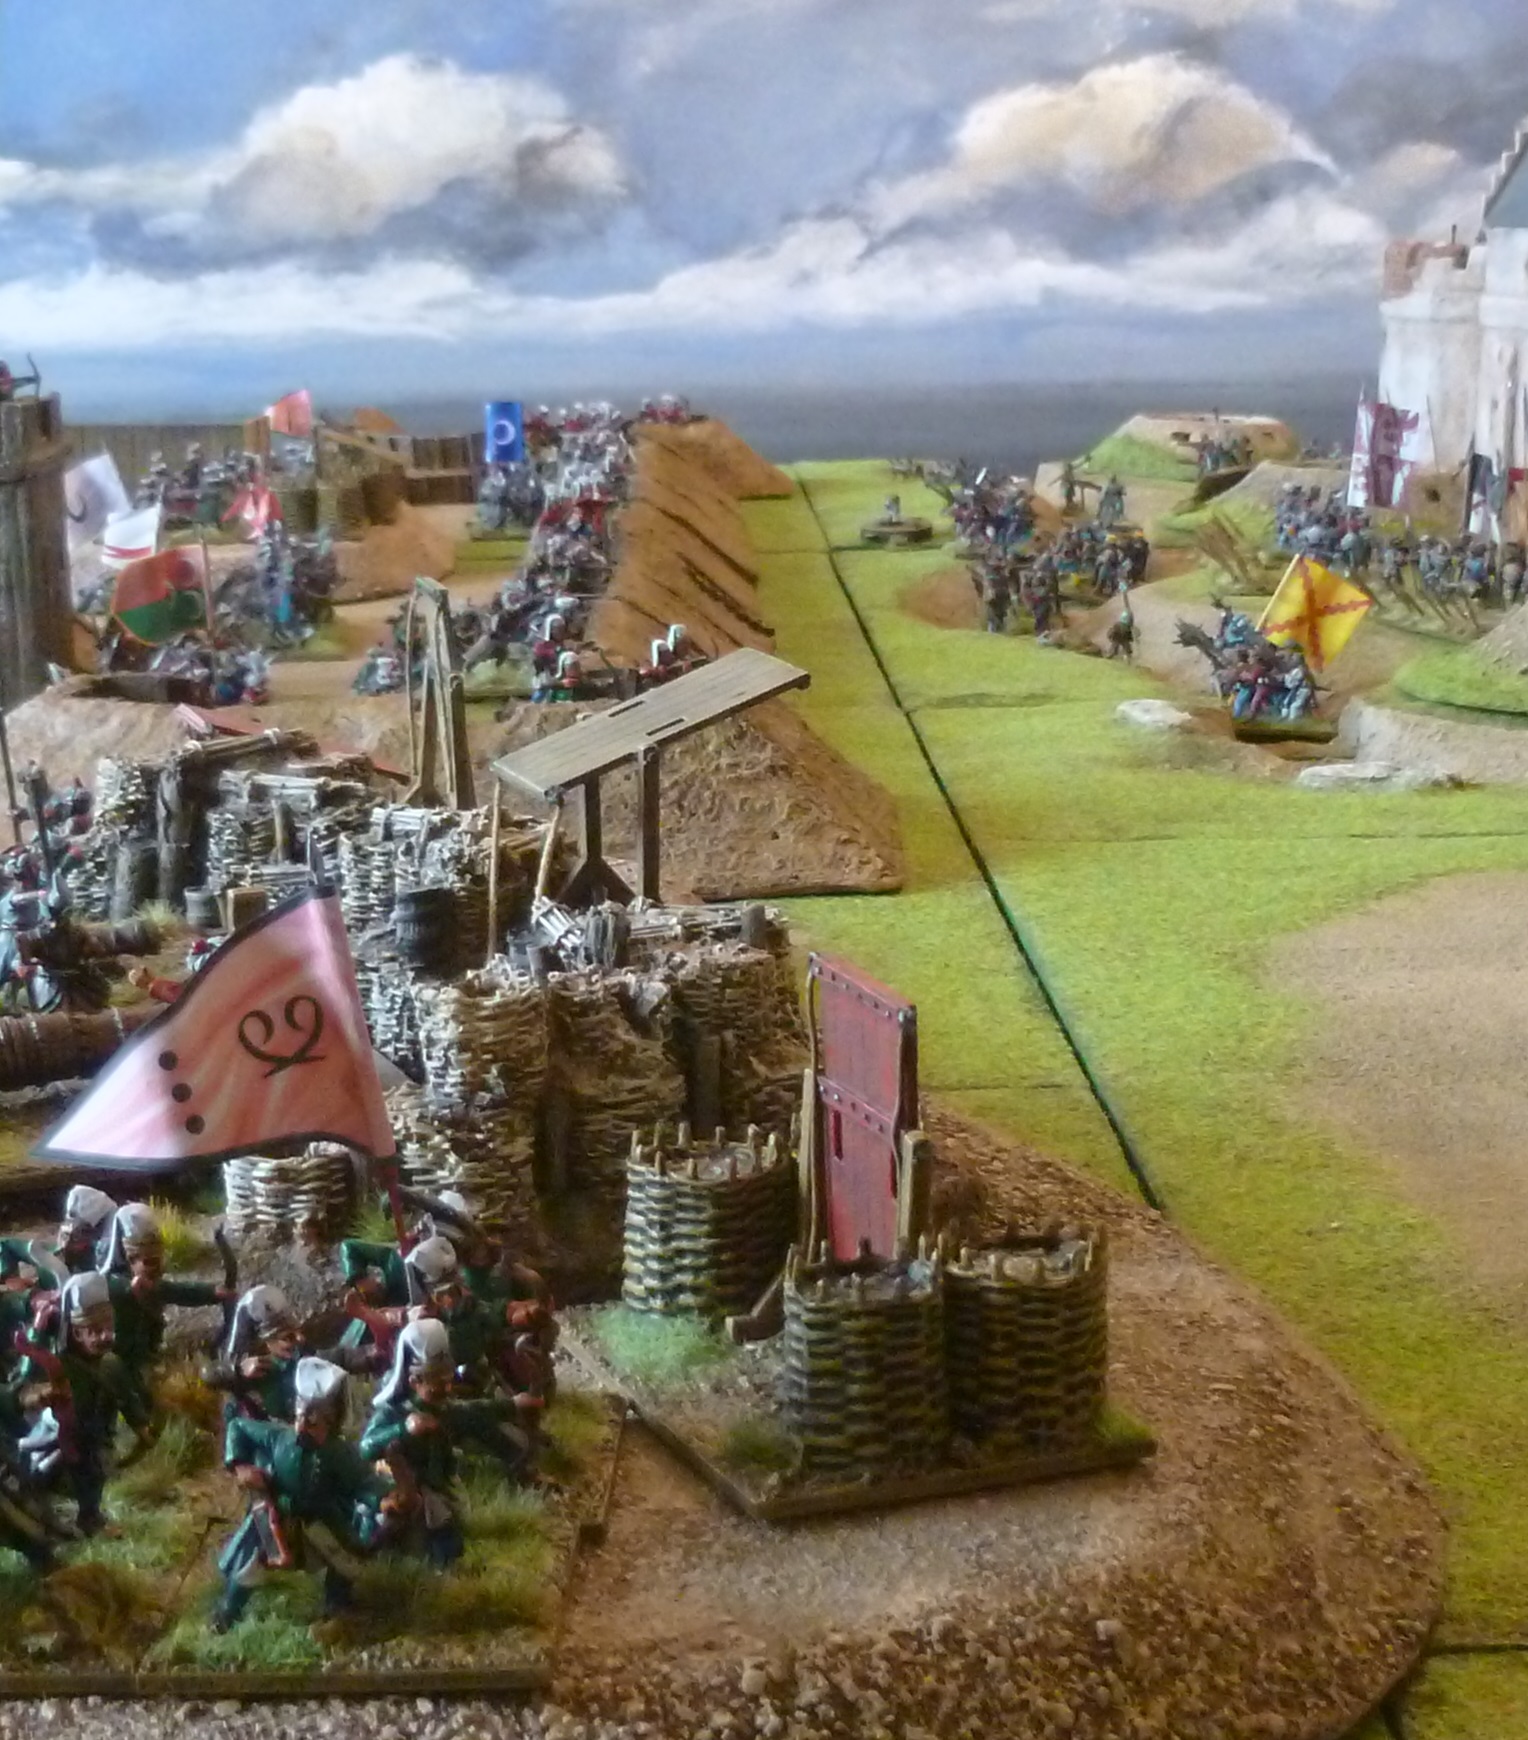
| The tabletop. The sally by the defenders would target the two Ottoman gun batteries on the right of the photo and the head of the mine in the centre right (with a wooden lookout tower built next to it by the Ottoman besiegers). |
The armies
The Vienna Garrison
1 Unit of Foot Knights (Nicholas, Count of Salm, retinue leader)
3 Units of Landsknecht Pike (All of which have Hook Guns attached, see above)
1 Unit of Landsknecht Arquebusiers
2 Units of Landsknecht Halberdiers
3 Units of Spanish Arquebusiers
1 Unit of Habsburg Gendarmes (Wilhelm von Roggendorf)
1 Unit of Habsburg Men at Arms
2 Units of Hussars
The Ottoman besiegers
2 Units of Sipahi ( one is Grand Vizier Ibrahim Pasha, the retinue leader)
3 Units of Janissary Archers
1 Unit of Janissary Arquebusiers
2 Units of Janissary Infantry
2 Units of Zirhli Nefer
1 Janissary Agha
1 Unit of Azab Arquebusiers
3 Units of Azab Infantry
3 Units of Azab Archers
For this game Stuart took command of Nicholas, Count of Salm's defenders whilst I commanded the Ottomans under Ibrahim Pasha. A brief write up follows but the photos also give a good idea of the action.
 |
| A view from above the walls, as the defenders begin to sally out the Ottoman besiegers have already been alerted and move forward to defend their earthworks. |
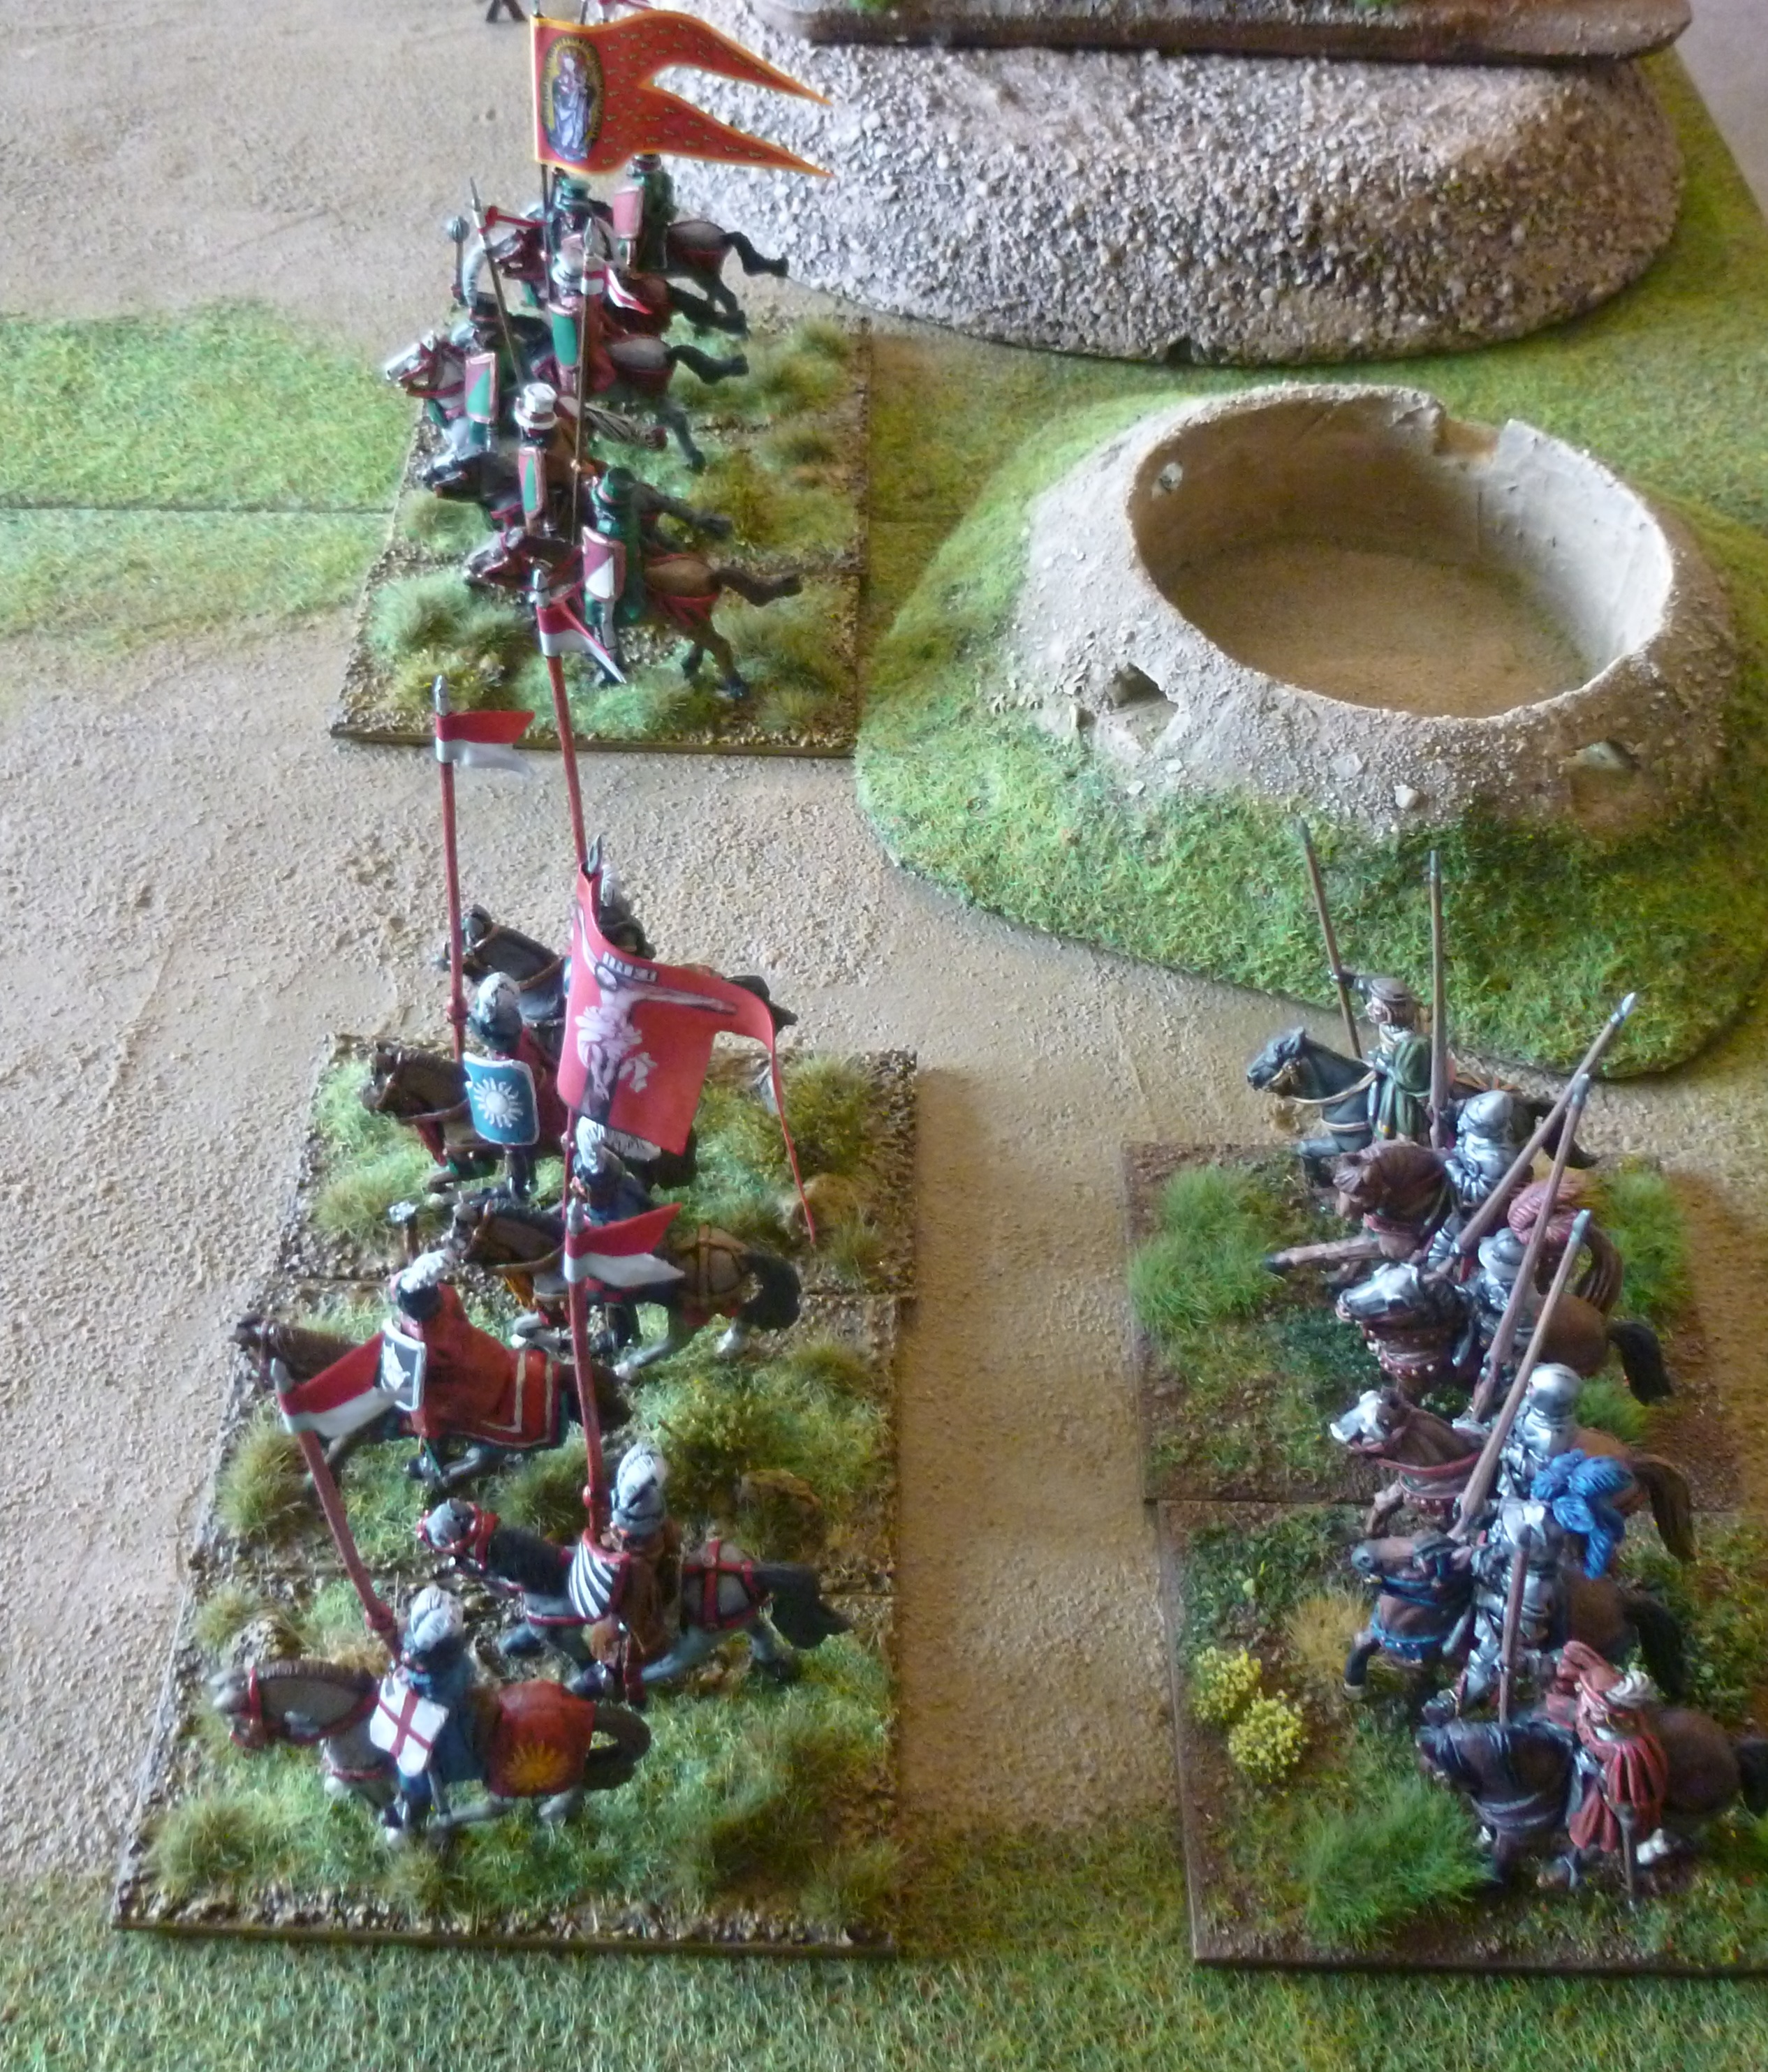 |
| From the defending garrison hussars and men at arms ride out ready to attempt to disrupt the enemy siege works. |
 |
| Grand Vizier, Ibrahim Pasha organises his troops as Vienna's defenders launch the attack. |
 |
| Landsknecht defenders emerge from the city gates. |
 |
| An Austrian men at arms has dismounted and sallied out on foot to encourage the landsknecht infantry in the garrison. |
 |
| Landsknecht armed with halberds and two handed swords emerge from the gates supported by Spanish arquebusiers. |
 |
| A view from along the battered city walls. |
 |
| Hussars from the garrison clash with sipahi as an Ottoman gun battery is threatened. |
 |
| A view showing the sally from the garrison. A group of landsknecht have reached the Ottoman earthworks, only to be forced back by janissaries defending the earthworks with arquebuses. |
 |
| A view of the Spanish arquebusiers as they sally forth and cross the ditch, Nicholas, Count of Salm, can be seen on the left under his heraldic arms. |
 |
| More defenders have sortied out of the gates with landsknecht pike and arquebusiers joining the attack on the siege works. |
 |
| Nicholas, Count of Salm, leads the sally from the gate. Janissaries with arquebuses can be seen in the foreground defending the Ottoman siege lines. |
 |
| A view of the fighting in the siege works. The Ottoman mine entrance, with a look out tower built alongside, is well defended. |
 |
| Landsknecht pike join the raid on the Ottoman camp. |
 |
| A view from the city gate, an Ottoman gun battery and defending Janissaries can be seen in the distance. |
 |
| The attack by the garrison is being slowed at the Ottoman earthworks. |
 |
| Janissary archers defend one of the gun batteries. |
 |
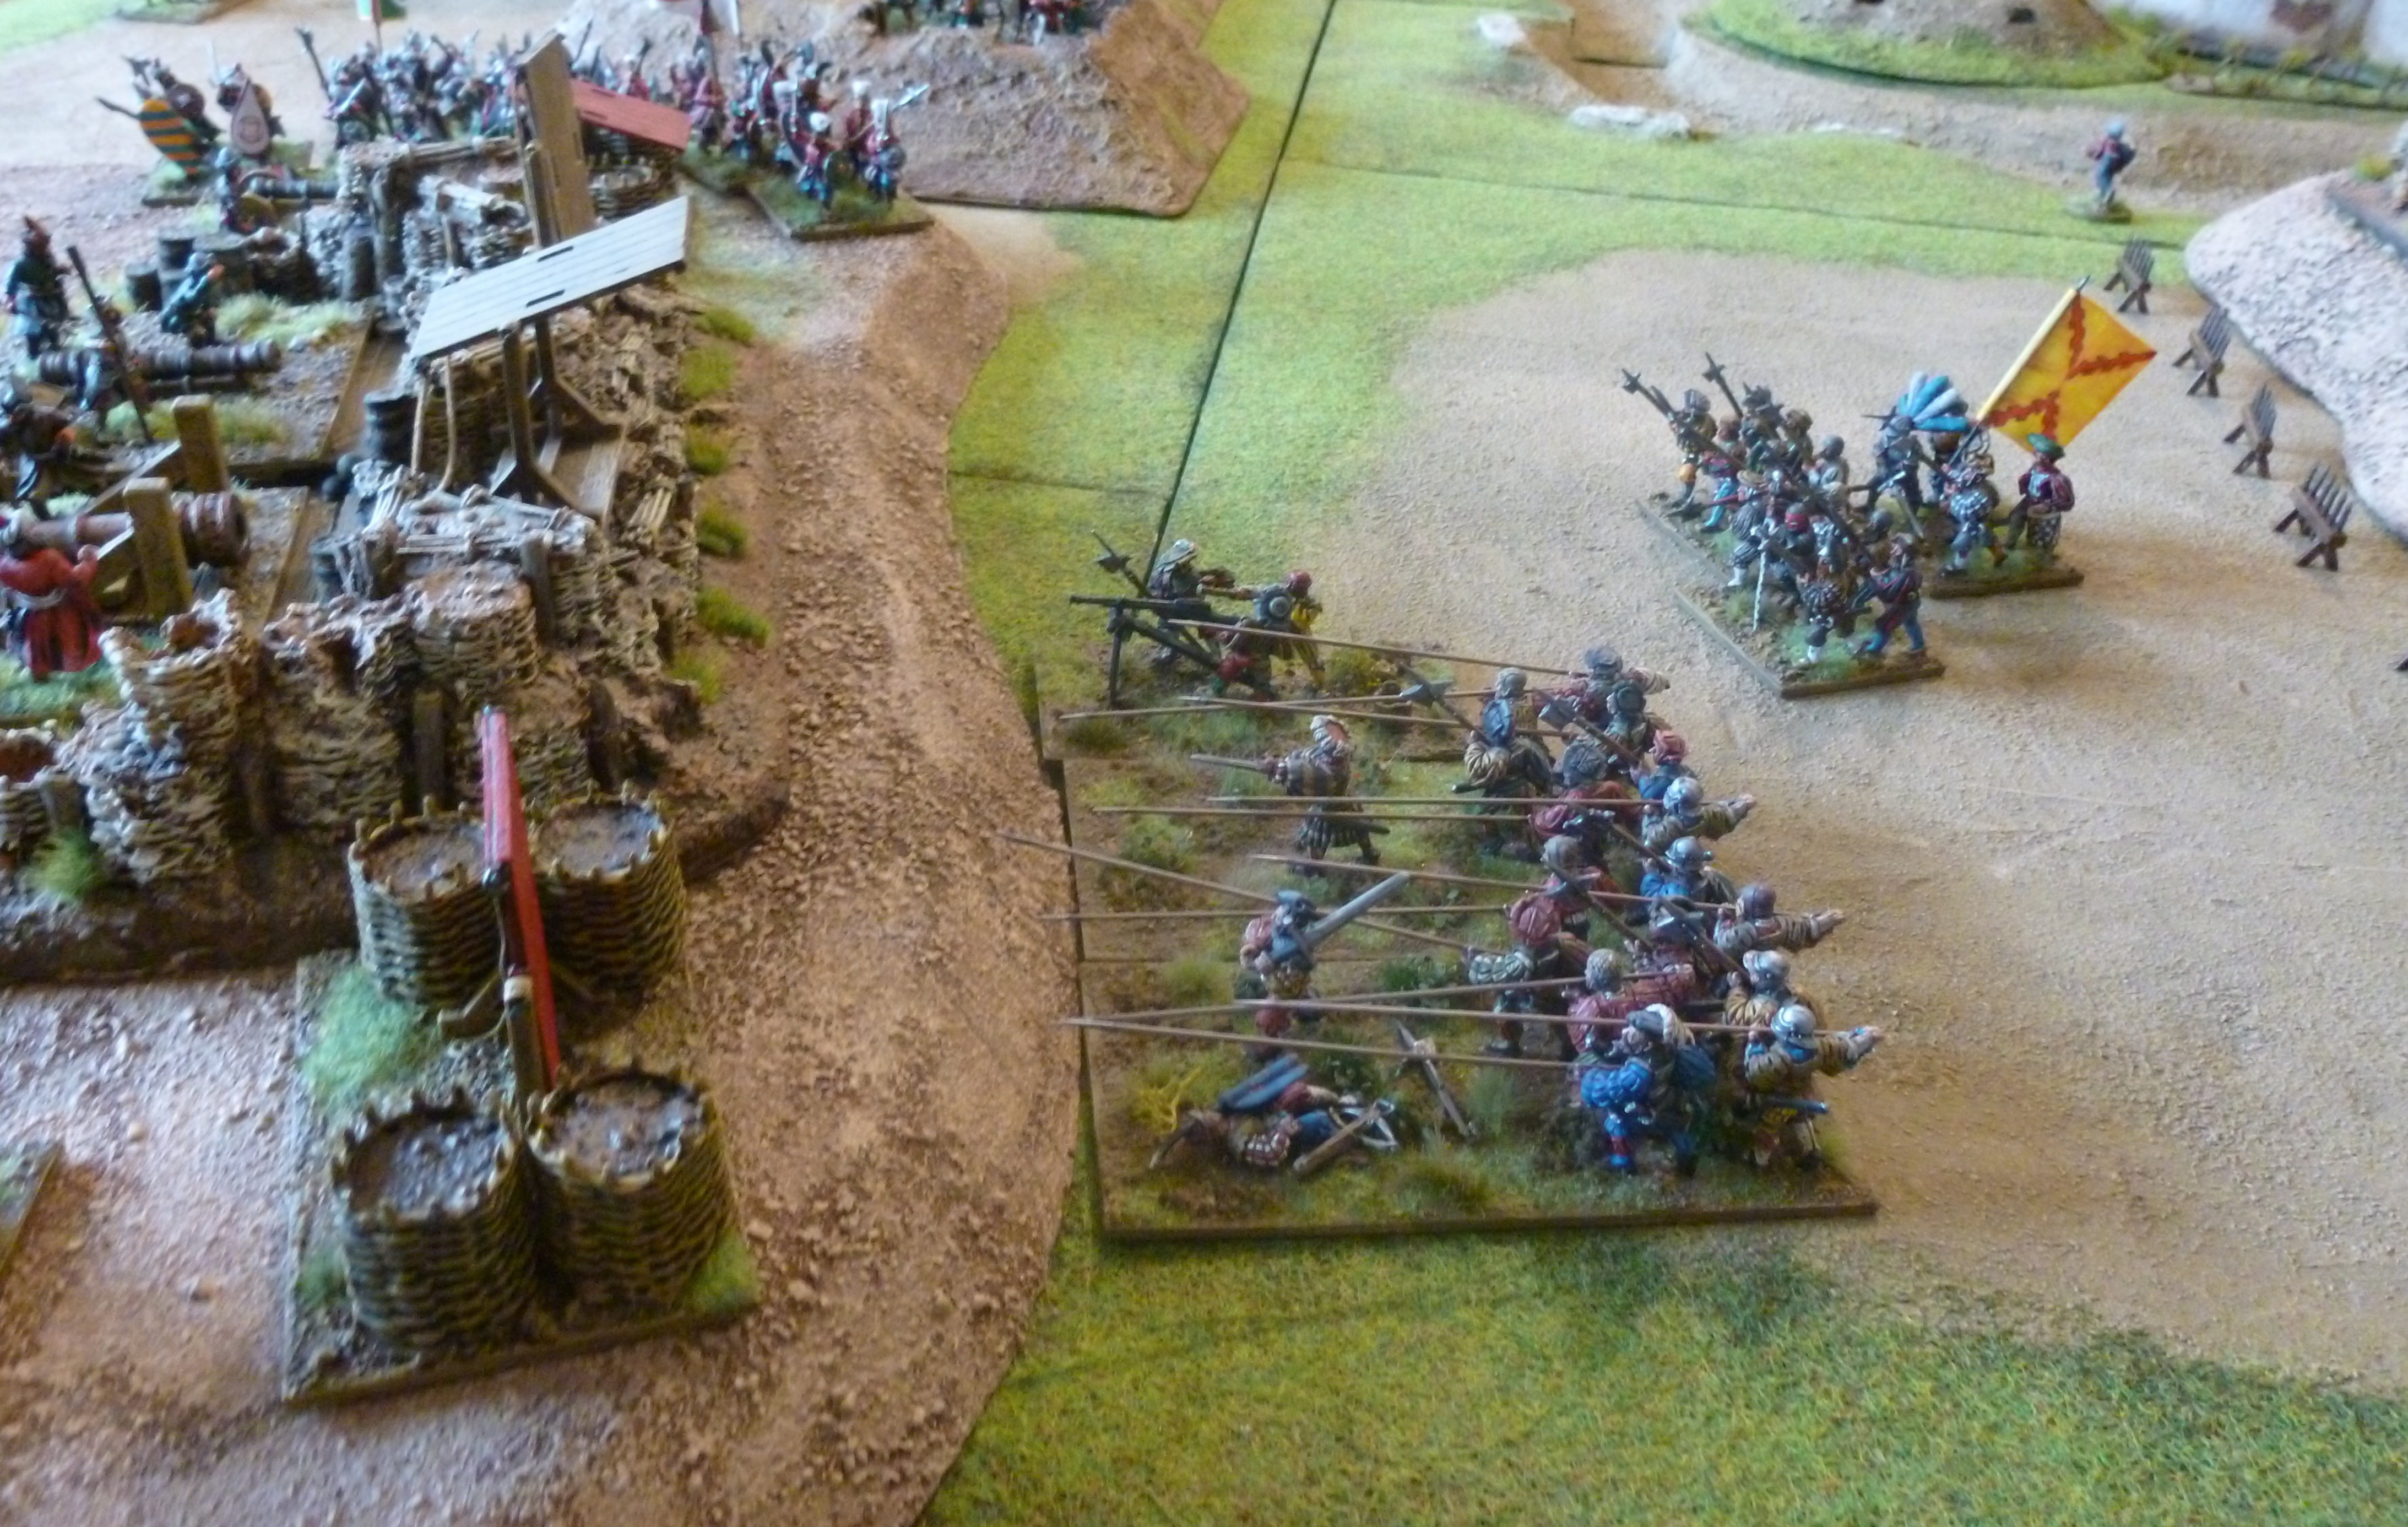
| A view of the fighting along the earthworks. The Landsknecht and Spanish troops from Vienna's garrison are firing on the janissaries and azab infantry who are defending the Ottoman siege lines. |
 |
| A view from above the walls showing the garrison attempting to break into the Ottoman siege lines. |
The action started badly for the troops sallying out from Vienna's walls. The Ottoman besiegers were alerted of the attack and had time to move forward into their advance positions to defend the gun batteries and the mine. A cavalry force from the garrison rode around from another gate and attacked the Ottomans, the first clash being between hussars and sipahi. The hussars drove the sipahi from the field and, supported by heavier cavalry from the garrison, pushed on into the Ottoman earthworks, driving back many of the janissaries defending them.
The Spanish and landsknecht infantry who sallied from the main gate became pinned in the city ditch, held back by arquebus shot and arrows from the Ottoman besiegers. One unit of landsknecht halberdiers did attempt to storm the Ottoman earthworks but they were driven back by a hail of shot fired by the janissaries manning the siege lines. Having held the main defences which protected the mine, Ibrahim Pasha sent reinforcements rushing to the other gun battery which looked in danger of being over run by the garrison's cavalry.
 |
| Hussars charge an Ottoman gun battery defended by janissaries. |
 |
| A cavalry force from the garrison crashes into the Ottoman besiegers and pushes them back. |
 |
| Reinforcements from the Ottoman camp rush to defend the gun battery that is under threat. |
 |
| The Spanish arquebusiers in the ditch have finally cleared the earthworks of defenders... |
 |
| ...Ibrahim Pasha calls for more troops to man the siege works. His bodyguard of cavalry may soon be needed. |
 |
| Wilhelm von Roggendorf and his heavily armoured cavalry clash with armoured janissaries in the siege lines. |
 |
| Some of the janissaries use the chaos caused by the fighting to push forward into the city ditch... |
 |
| ...they are quickly driven back when a force of landsknecht pike charges them and kills most in a savage melee. |
The Ottoman reinforcements to the threatened gun battery arrived too late allowing some of the garrison's landsknecht to destroy the position and wreck the guns. The objective having been destroyed the cavalry commander, Wilhelm von Roggendorf, attempted to retreat but was caught in the network of trenches and ditches and defeated by the advancing Ottoman reinforcements. These azab and janissary infantry were in turn defeated by the landsknecht who had attacked this weak point in the siege lines.
At the same time the fighting around the gate swung back and forth. A force of janissaries pushed forward into the city ditch in an attempt to disrupt the attack only to be charged by a detachment of landsknecht pike who quickly drove them back in a vicious melee where no quarter was given. The constant hail of shot from Spanish and landsknecht arquebusiers had driven most of the Ottoman infantry away from their earthworks and the Habsburg defenders were finally able to storm the Turkish siege lines. It looked as if the other gun battery and the mine were going to be destroyed as well. Once into the Ottoman trenches the city garrison hadn't counted on a force of armoured janissaries, specialists in siege warfare, who counter attacked them and drove them back. It had been a close run thing, Salm's troops had inflicted heavy casualties on Suleiman's besieging army but the sortie had ended with only one of the objectives destroyed and many of Vienna's defenders slain.
 |
| The Ottoman troops defending one of the gun batteries have been swept away by the garrison's cavalry allowing the landsknecht to push forward... |
 |
| ...the battery is destroyed by the defenders. One of the targets of the sortie has been achieved. |
 |
| Some of the Spanish arquebusiers attempt to destroy the other Ottoman gun battery but are beaten back in a bloody hand to hand fight with armoured janissaries, the Zirhli Nefer. |
 |
| Following his success in sweeping away the defenders Wilhelm von Roggendorf is brought down as he is unable to get back to the safety of the city walls. |
 |
| Landsknecht pike attempt to reach the surviving Ottoman gun battery and destroy it but are stopped by the armoured janissaries. The garrison's assault runs out of steam and has been defeated. |

The Retreat from Vienna
Our second game represented an attack on a column of bedraggled Ottoman troops as they slowly attempted to return east after the failed siege. The Ottoman army was deployed along the centre of the board, as in the pictures below, with camel baggage bases as static objects at four points along the column. The Ottoman objective was to defend these camel baggage counters whilst the Habsburg objective was to destroy them. The camel counters could not move during the game.
The Habsburgs could attempt to destroy these counters if a Habsburg unit was in base to base contact with one of them at the start of their turn. As an activation the Habsburg unit would successfully destroy the counter on roll of 4+ on a D6. The Habsburg players aim was to destroy as many of the camel counters as possible whilst the Ottoman player had to try and defend them.
The Habsburgs could attack from either side of the column but the Habsburg player had to write down which units would deploy from which side of the table at the start of the game and could not change this during the game.
The Habsburg player took the first turn with units being able to enter via a move activation from their respective table edges.
 |
| A view of the table from above showing the Ottoman column winding its way back eastward. The Habsburg pursuing cavalry can strike from either side of the column. |
 |
| A view of the column from the front, the baggage camels are flanked by the retreating troops. |
 |
| The commander of the retreating column. |
.jpg) |
| The sipahi keep an eye out for any pursuing forces... |
 |
| ...after a disastrous siege and with the weather deteriorating every day they are keen to return to their timars. |
The armies
The Retreating Ottoman Column
2 Units if Delis (one is the retinue leader)
3 Units of Sipahi
3 Units of Azabs
1 Unit of Azab Arquebusiers
3 Units of Azab Archers
The Habsburg Pursuing Force
2 Units of Men At Arms (one is Johann Katzianer, retinue leader)
2 Units of Hussars
4 Units of Light Lancers
2 Units of Hungarian Horse Archers
We stuck to the same sides for this game with Stuart controlling the ambushing Habsburg forces whilst I took command or the retreating Ottomans.
 |
| Hussars emerge from the woodland and charge the column only to be brought down by Ottoman arquebusiers. |
 |
| The heavier armed men at arms have more success and sweep away a unit of Delis. |
 |
| Horse archers in Habsburg service harass the retreating sipahi. |
 |
| Johann Katzianer leads the ambush as it hits the Ottoman column... |
 |
| ...but the ambush has been badly timed and the Habsburg units hit the column piecemeal allowing the Ottomans to organise their defence. |
The Habsburg forces were met with even more bad luck in this game! The timing of the ambush was miscalculated so that whilst some of the hussars and heavy cavalry charged out of the surrounding woods to attack the column of Ottomans the supporting lancers were slow to follow. A force of hussars was the first to close on the shocked Ottoman forces but they were decimated by a hail of shot from the azab arquebusiers. The heavier armed men at arms behind the hussars were more successful and crashed into the Turkish column throwing back both cavalry and infantry units. At the same time the Hungarian horse archers skirmished with the Ottomans and inflicted further casualties.
After the success of their initial charges the Habsburg men at arms lost momentum and Johann Katzianer, their captain, was unhorsed by the Ottoman commander in single combat. This had a terrible effect on the morale of the ambushing force. Whilst a unit of hussars bravely charged in and attempted to slay the Ottoman commander he was well protected by his bodyguard of wild Delis horsemen. The hussars were sent back and the Habsburg ambush was over before some the force had even emerged from the woods.
 |
| The Ottomans may be weary as they return from the siege but they do not loose their cohesion as the pursuing cavalry attack them. |
 |
| Johann Katzianer leads his men at arms into the heart of the column scattering the Ottoman infantry... |
 |
| ...only to be unhorsed when the Ottoman commander of this bedraggled force counterattacks. |
 |
| With their leader defeated the Habsburg pursuers loose heart. Some of the hussars try one final attack but are defeated by the Deli bodyguards of the Ottoman commander. The ambush has failed with some of the lancers in the ambushing force never even engaging. |
It was also fun to do something so different to our Tudor clashes. The Hook Gun rules definitely need refining, they didn't really achieve much in their first outing. The Ottoman lists also still need work, some units like the sipahi could work more like their historical counterparts on the tabletop. That being said these were the first games the Ottomans have been victorious in after four previous losses whenever they have been on the table. Now Stuart and I just need to decide what theatre of 16th century warfare we cover in our next games. We are keen to get another tabletop clash in before the end of the year.
As always with you two, a pair of stunningly attractive games...figures, terrain and scenery are all of the highest order! Ten out of ten, definitely!
ReplyDeleteCheers Ross, they were really fun games to set up and play through
DeleteFantastic display of warming and modelling at its finest, thanks for posting.
ReplyDeleteWillz.
Thank you Willz, it was great comibing our terrain and miniatures to create spectacle
DeleteLovely setup and extremally ambitious. The Turks make for a colourful array although Ive struggled to win many games with them. Still well done.
ReplyDeleteCheers Robbie, yes the Turks finally won some games - they really are a bright and colourful army with so many different troop options
DeleteWonderful looking games and figures. As you say different from the norm, but the ottomans bring much to the table.
ReplyDeleteThank you Stuart - this was an Ottoman siege I have been wanting to game for ages.
DeleteCan I use one of your pictures for my history chart?
ReplyDeleteYes Marie that is fine
Delete